Thursday, July 29, 2010

How to play Blu-ray movies on Wii?


It is well known that PS3 and Blu-ray Discs are both made by Sony, so PS3 offers native support for Blu-ray discs apparently, while the popular Nintendo Wii has no luck on this aspect, it can only play Wii and Gamecube games, no support for CDs, and DVDs, not to mention Blu-rays. It is said When Nintendo made the Wii, they were just focusing on fun and video games, not multimedia entertainment. But why couldn’t we use it as a part of our home theater system to watch movies? Factually, it is possible to play Blu-ray movies on Wii, just read the following guide to find out a solution.


What you will need:

Pavtube Blu-ray to Wii ripper

An internal or external Blu-ray drive


Step-by-step guide:

How to play Blu-ray movies on Wii?


Step 1: Free download Pavtube Blu-ray to Wii ripper, install and run it


Launch this program to rip Blu-ray to Wii. Once run it, click "BD/DVD ROM" or "BD/DVD Folder" to load your Blu-ray movie files.


Step 2: Select your needed subtitle and audio track

The Blu-ray to Wii ripper allows users to choose their desired subtitle and audio track to convert, so as to play Blu-ray movies on Wii in their wanted languages.


Click on the pull down menu of "Subtitle", then all the subtitles in the BD movie will be listed out, including language and subtitle ID, you can select one according to your own needs.


Click the drop-down list of "Audio", and then all the info about audio tracks will be shown clearly as below, including language, audio codec(turehd and dts master audio are both supported as well), stream ID, and audio channel, you can choose whatever you like when rip Blu-ray to Wii.


Step 3: Select output format for Wii

Click on the pull down menu of "Format", and then hit "Wii" preset, or if you have trouble while looking for the format, you can use searching function to find out the format profile. After that, all the formats (including video formats and audio formats) specialized for Wii will show up as below, and you can select anyone of them at will.


Step 4: Set advanced settings

Click "Settings" button, then you will be able to adjust audio and video parameters in the following interface, including codec, aspect ratio, bit rate, frame rate, sample rate, and audio channel. To play Blu-ray movies on Wii with excellent playback quality, you can optimize these settings in your own way.


Step 5: Rip Blu-ray to Wii

Click "Convert" button, then the Blu-ray to Wii ripper will rip Blu-ray to Wii compatible file format immediately. With multithreading technology and advanced audio and video in sync technology, the application will finish conversion task at super high speed without any audio and video out of sync issues. Once finished, you can click "Open" button to get the final generated files for your Wii with ease. Now you are ready to play Blu-ray movies on Wii. Just add the files to the SD card of your Wii for entertainment.

Convert Blu-ray movies Optoma PK201 mini projector


Optoma PK201 mini projector is considered as an ideal home cinema projector for its usage of watching movies and displaying photos using the internal media player. Optoma PK201 features a micro SD card slot that supports expanding capacity up to 16 GB in size, which gives Optoma PK201 the ability to directly project pictures and videos on the PK201 from a camera or other source devices like Motorola Droid by simply switching a memory card. In the purpose of helping Optoma PK201 mini projector owners experience their beloved Blu-ray movies on the gadget, this tutorial aims to show you how to rip Blu-ray movies to Optoma PK201 mini projector with Pavtube Blu-ray Ripper.


Step-by-step instruction:

How to rip Blu-ray movies to Optoma PK201 mini projector?


Step 1: Run Pavtube Blu-Ray Ripper, and load Blu-ray movie files to it

You can load BD files into the application through "BD/DVD ROM", or "BD/DVD Folder".


Step 2: Select output format for Optoma PK201 mini projector

To rip Blu-ray movies to Optoma PK201 mini projector, it is necessary to know the video formats supported by Optoma PK201, they are AVI, MOV, MP4 and 3GP. That means you need rip Blu-ray to a format among the four to satisfy Optoma PK201 mini. Take MP4 for example, follow "Common Video"> "MPEG-4 Movie (*.mp4)" would be all right.


Supposing you would like to use the Optoma PK201 as an iPod or iPhone display, you can then choose "iPod" or "iPhone" preset.


Step 3: Click "Settings" button to do advanced settings

Click "Settings" button, then you will be able to adjust audio and video parameters to have good control of the output file quality. The adjustable settings include codec, aspect ratio, bit rate, frame rate, sample rate, and audio channel. An 800x600 resolution is recommended when convert Blu-ray movies to Optoma PK201 for better projection.


Step 4: Rip Blu-ray movies to Optoma PK201 mini projector

Click "Convert" button to start converting Blu-ray movies to Optoma PK201 mini projector. Pavtube Blu-Ray Ripper adopts advanced audio and video in sync technology, so it is able to guarantee you a perfect audio and video in sync output file quality. When the ripping task is finished, you can get the final files for your PK201 via clicking "Open" button with ease. Just copy the files to your micro SD card, and now you are ready to experience your Blu-ray movies in 16:9 widescreen.

Friday, July 23, 2010

How to convert 1080p HD MKV to your iPhone 4 video ?

“I'd like to put a movie on iPhone 4, but to no avail. The movie is *.mkv file. What should I do with it? I heard that iPhone 4 plays HD video...” If you are facing the same problem, this article will definitely help. MKV (Matroska Video) is a container format including video,audio,image and subtitle tracks inside a single file, and it likes formats MOV and AVI to support video compression and codec. MKV video, especially MKV in HD, becomes more and more popular. And this guide is talking about converting 1080p HD MKV to iPhone 4 video so as to watch HD MKV videos on iPhone 4 more freely.Using Pavtube iPhone 4 Converter for Mac, you can easily convert 1080p MKV files to 720p iPhone 4 videos, and remain only the chapters you like. Pavtube iPhone 4 Converter is one of the top iPhone 4 tools for you to convert HD recordings, footages and movies at high quality. It allows you to adjust the advanced parameters, create new costumed formats, crop video, trim video, add watermark, replace audio with desired music, join videos together and split video at ease.


In the following guide I'd like to share with you converting 1080p MKV files to iPhone 4 supported formats with best video quality.


Guide of converting 1080p MKV files to iPhone 4 videos:


Step 1. Load 1080p MKV videos to the Mac iPhone 4 Converter.

Run the Mac MKV to iPhone 4 Converter Click the Add button to load the HD files that you'd like to convert, or simply drag and drop the 1080p source MKV files to the program. The Mac iPhone 4 HD Converter supports batch conversion, so multiple 1080p HD MKV files can be loaded at once.


When the 1080p MKV files are loaded to the program, you can view the videos from the Preview window. Simply select an item and click the “Play” button. When the video is playing, you may take snapshoot when it plays to your favorable frame by clicking the “Snapshoot” button.


Step 2. Select output format for iPhone 4


Click the pull down menu of "Format", and then tap "iPhone" preset. There are multiple formats specialized for iPhone 4 videos, you can select any one of them to meet your needs freely. According to Apple’s official site, the iPhone 4 supports “H.264 video up to 720p, 30 frames per second, Main Profile level 3.1 with AAC-LC audio up to 160 Kbps, 48kHz, stereo audio in .m4v, .mp4, and .mov file formats”. So if you’d like to maintain the best video quality for iPhone 4 playback, “iPhone H.264 720P” will be the right choice. And the 1080p MKV will be converted into iPhone 4 720p HD MP4 videos. In order to save storage, you may choose “iPhone 4 MPEG-4 640*480”.


Step 3. Click "Convert" button to start ripping 1080p HD to iPhone 4G videos

The popup ripping window of this Mac HD to iPhone 4 Converter will show you conversion progress, time elapse, left time, generated file size and estimated file size clearly, so that you can control your time and storage space of your iPhone 4G HD in a proper way. To join multiple 1080p HD video clips together, check the box of “Merge into one file” before conversion starts.


Once the ripping task is completed, you can click “Open” button at the bottom of the main interface to get the final output 720p HD MP4 files for iPhone 4 with ease. Sync the files to your iPhone 4G with iTunes for entertainment.


Optional facilities and tricks

Trick 1. Adjust audio and video quality and file size.

You are encouraged to use the default settings. However, when you feel like improving HD video quality, or cutting down file size, please click on “Settings” button to further customize output iPhone video. Generally, higher bit rate results in higher video quality and bigger file size. If you’d like to use the same settings for future conversion, simply click “Save As” and save your settings as a new profile. When the MKV to iPhone 4 Converter is lunched next time, you can click on the “Format” bar find the new profile under “Custom” tab.


Trick 2. Trim 1080p MKV videos to iPhone 4.

Click on “Edit” menu if you’d like to convert partial of the 1080p MKV files. To trim the movie, simply click on 'Trim' tab and type in desired time value in ‘Start’ and ‘End’ box and click ‘Set’ button. Or you may also click left square bracket and right square bracket to set start and end time when playing the 1080p MKV files.


Additional Tips:


Learn more tech specs of iPhone 4


See more useful info about iPhone, iPad and iPod

How to playback the ultimate portable device for presentation and media of Samsung SP-H03 Pico Projector?


Samsung SP-H03 Pico Projector,the first-ever micro projector product developed by Samsung, has brought beautiful breakthroughs on the performance of pico projectors in the market, not only for its low cost, but also for its larger internal memory and expandable storage capacity, and high level of brightness. More than that, the pico projector weights only six ounces, and measures merely 2.75" W x 1.5" H x 2.75" D inches, and is at a very affordable price of $299.99, so it’s really a good choice for those potential buyers who expect the best cost performance.


The pocket-worthy Samsung SP-H03 Pico Projector is known for its low price and high quality, which is one of the key features of Samsung products. For instance, AAXA P2 and AAXA L1, two of its competing products, retail at a price of $319.00 and $599.00 respectively, both are expensive than Samsung SP-H03. Samsung SP-H03 Pico Projector not only comes with cheaper price than AAXA P2 and AAXA L1, but also features bigger internal storage capacity and higher brightness levels. Samsung SP-H03 Pico Projector is selling with 1GB internal memory, which is expansion available via microSD card up to 16 GB, and it also supports inputting from a USB storage device, like iPhone 4 and some other smart phones. While the AAXA P2 has 1GB internal flash memory which is only expandable up to another 4GB via a microSD reader, and the AAXA L1 ships with 160MB internal memory which is expandable up to 2GB via a USB thumb drive.


With up to 30 ANSI lumens, Samsung SP-H03 projector delivers clear and crisp images up to 50-inch size using WVGA (854×480) resolution. Amazingly, it can also accommodate an 80 inches screen, and meanwhile produce an impressively sharp and bright picture. In addition, it even features an LED source with 30,000-hour lifetime for projection. Samsung SP-H03 liberates corporate staff members from heavy and large projectors, because it is able to export the same dynamic high quality images that are suitable and perfect for board room presentations.


Samsung SP-H03 is an on-the-go gadget that hosts a Computer-free Document Viewer to project various common document types in their native formats, such as Microsoft Office files (PowerPoint, Excel, and Word) or Adobe PDF documents. What’s amazing is that it offers native multimedia playback functionalities for users to watch movies, images, and enjoy music anytime, anywhere without connecting any other additional devices. It is compatible with a wide variety of media formats, including:

Movie: AVI, MP4, ASF, MPG, RM, FLV, WMV

Image: JPEG, PNG, BMP, GIF

Music: MP3, MP2, WAV, WMA, FLAC, APE, RA


That is to say, apart from being an ultimate portable presentation tool, Samsung SP-H03 Pico Projector is also an ideal tool to do personal entertainment when you travel or stay at home, especially for movie watching. If you have some video files which are already in formats of "AVI, MP4, ASF, MPG, RM, FLV, or WMV", you can directly add them to the microSD card of Samsung SP-H03 to do playback, or if your movie files are not in the above mentioned range, you only need a video converter to do format conversion before watching:


To transfer videos to Samsung SP-H03 Pico Projector on a PC, including ripping Blu-ray discs and DVD movies, you can try Pavtube Blu-Ray Video Converter Ultimate;


To convert videos to Samsung SP-H03 Pico Projector on a Mac computer, including copying Blu-ray movies and standard DVDs, you can use iMedia Converter for Mac.


In that way, you can use it as a Home Theater projector to experience your beloved movies on a larger screen in the cinema mode.


The only two shortages of Samsung SP-H03 I can see are listed as below:

1. The weak 1W speaker

But it can easily be remedied by plugging it into a speaker system.

2. 2 hours of battery life

The 30 lumens brightness rating will exhaust the battery power fast. It can only support continuous usage up to 2 hours. But a power socket is able to help you out from this problem, so it’s not a big thing at all.


Overall, the cheapest price, the biggest storage capacity, the excellent presentation quality, and the powerful media playback functionalities make Samsung SP-H03 Pico Projector the top choice for micro projectors.

Tuesday, July 20, 2010

[Best sharing]How to rip DVD to iTunes for playback on iPad, iPhone 4, iPod and Apple TV?


For copyright protection issues, you are not allowed importing commercial DVD movies to iTunes directly, although it seems not a big technology challenge for Apple at all. In case you wanna rip DVD to iTunes for playback on iPad, iPhone 4, iPod and Apple TV, this article will elaborate a solution on how to rip DVD to iTunes with Pavtube DVD to iTunes Converter.


Pavtube DVD to iTunes Converter provides you with an easiest way to rip DVD to iTunes compatible file formats, like H.264, MPEG-4, MP4, MOV, M4V, M4R, and MP3, in that way, you are able to add the result files for playback on each of your Apple products, including iPad, iPhone 4, iPhone, iPhone 3G, iPod and Apple TV. Well, go to find a detailed tutorial from the following contents.


HOW-TO:

How to rip DVD to iTunes for playback on iPad, iPhone 4, iPod and Apple TV?


Step 1: Free download DVD to iTunes Converter, install and run it

Once launch it, click "DVD ROM", "DVD Folder" or "IFO/ISO" to load your DVD movie files. All the contents in the DVD are checked by default when you load them. In general, the file with the longest duration time would be the main movie, if you just need rip main movie, you can right click on this file to "Uncheck All" firstly and then tick off the main movie to convert only.


Step 2: Select output format for iTunes

To rip DVD to iTunes, you’d better make sure the end use of the ripped DVD files, because this DVD to iTunes Converter provides you with format presets optimized for iPad, iPhone 4, iPod and Apple TV respectively. For example, if you wanna put the ripped DVD files onto iPad for playback, then "iPad" would be your better choice. On the basis of your own requirements, you can select "iPod", "iPhone" and "Apple TV" as well.


Step 3: Click "Settings" button to set advanced settings

This DVD to iTunes Converter allows users optimizing the output file quality by adjusting audio and video parameters like codec, aspect ratio, bit rate, frame rate, sample rate and audio channel. In fact, if you are not good at changing these settings, you can totally skip this step, because the default settings provided by this DVD to iTunes Converter are able to export you an acceptable file quality when play them back on your iPad, iPhone 4, iPod and Apple TV.


Step 4: Start converting/ripping DVD to iTunes

Click "Convert" button, then the DVD to iTunes Converter will start converting/ripping DVD to iTunes at speed. Due to the advanced audio and video in sync technology, this DVD to iTunes Converter is capable of converting/ripping DVD to iTunes without any audio and video out of sync issues. That is to say you needn’t worry about conversion speed issues and audio and video out of sync issues. Once the conversion is completed, you can click "Open" button to get the final ripped DVD files. Add them to iTunes to sync to iPad, iPhone 4, iPod or Apple TV for playback. Have fun.

Monday, July 12, 2010

How to convert DVD movie to iPhone 4 on mac

“This changes everything. Again.”As it advertised on Apple official site, unveiling of iPhone 4 brought with so many amazing facilities. The FaceTime video call, retina display, HD video recording and editing, all of these make our life easier and simpler with the new generation of iPhone 4. The iPhone 4 offers both 16GB and 32GB model, either of them can be used as a portable media library. So why not rip your DVD collections to iPhone 4 and enjoy the high quality videos on the 960*640 display? Now with DVD to iPhone Converter for Mac you can easily rip DVDs to iPhone 4 and travel with your DVD movie library. The powerful and user-friendly Mac DVD to iPhone 4 Converter produces videos up to 1280*720pixel, avoiding much quality loss during en-decoding process as many other converters bear when transcoding DVD to iPhone 4 formats.


You may DVD to iPhone 4 Converter for Mac and give it a shoot. There is not any time limitation, but please note that the trial converts video with a Pavtube logo watermark on the screen. Now please refer to the following guide how to convert DVD to iPhone 4 with Pavtube DVD to iPhone Converter on Mac (MacBook, iMac, etc).


Step 1. Load DVD for conversion.

Insert your DVD in Mac, run the DVD to iPhone Converter, click“DVD Folder”and browse to the DVD movie you’d like to convert,click“Choose”to confirm.


The DVD movie is displayed in a directory. Click the triangle arrow to expand the directory for checking movie chapters. Basically the main movie is included in the first Title, so you can right-click, select “Uncheck All” and then check the first title only. Now you got to select audio track and subtitle (if necessary). Click on the Audio box and select an audio track with desired language. Set subtitles in the same way. Always note that you got to check the chapter before setting audio and subtitle. By default there will be no subtitle at all.


When setting audio and sub, you can view the movie clips from the Preview window. Simply select an item and click the“Play”button. When the video is playing, you are allowed to take snapshoot. Just click the “Snapshoot” button when it plays to your favorable frame.


Step 2.Select iPhone 4 optimized format.

The Pavtube DVD to iPhone 4 Converter is capable of decrypting and converting protected (and unprotected) DVDs. It is capable of converting DVD to iPhone, iPhone 3G, iPhone 4 and some other video and audio formats like WMV, AVI, Divx, MKV etc. Since we are converting DVD to iPhone 4, you can click on the “Format” bar, find iPhone group and select desired output format from the profile list. There are H.264 and MPEG-4 encoded MP4 and MOV formats up to 720p for your choice. Customized video formats for iPhone 3G and iPhone first generation are available too.


You may customize video and audio parameters in Settings panel as well. Simply click “Settings” button to and set the bitrate, frame rate, channels, sampling rate as desired values.


Step 3.Set output location.

Click “Browse” button and specify an output folder to save converted files. Click “Choose” to confirm.


Step 4.Convert DVD to iPhone 4.

Click “Convert” to start converting DVD to iPhone 4 compatible format when everything’s done. The Mac DVD to iPhone 4 Converter supports auto shutdown so you may set auto shut down before conversion starts by entering “Option” window and check the box of “Shut down the computer after conversion”. When the conversion completes you may click “Open” button to find generated MP4/ MOV files and sync DVD movie to iPhone 4 with iTunes so as to enjoy the movies whenever and wherever you like.


Tip: The DVD to iPhone Converter features some editing functions for you to organize the videos. You may crop, trim, watermark selected movie clip at your disposal in Editor window. To enter the Editor interface, simply click the“Edit”menu.


How to convert down Panasonic AJ-HPX3700 HD MXF to MPEG files?

P2 camera-recorders like Panasonic AJ-HPX3700 record AV data as MXF (Material Exchanged File) files with metadata. It can record the metadata onto the clips scene by scene when it loaded from SD/ SDHC card containing the shooting information. This is very convenient for videographers and TV broadcasting makers to edit the MXF footage in professional editing software (e.g. Adobe Premiere CS5). The non-linear editing system supporting P2 can instantly start editing by mounting the P2 cards and can edit the clips in the P2 cards directly. However, the MXF files are not so well-suited when you feel like backing them up to PC or hard drive. As we all know, the P2 MXF format means high quality and huge file size. When recording in AVC-Intra 100 mode, a 64GB P2 card can be filled up in 64 minutes. It takes long time to copy the HD MXF files, and astonishing space to save them. This guide provides you solution for this issue: converting AJ-HPX3700 HD MXF to MPEG files and cut the file size down.


Software you'll need: Pavtube HD Video Converter trial (Please note that the trial version generates videos with a watermark in the middle of screen)


Step 1. Import P2 MXF to the powerful MXF Converter.?

Run the MXF Converter, click “Add” button and browse to the MXF files you’d like to convert. When the MXF footages are loaded to the program, you can view the videos from the Preview window. Simply select an item and click the “Play” button. When the video is playing, you may take snapshot when it plays to your favorable frame. Simply click the “Snapshoot” button.


convert AJ-HPX3700 HD MXF to MPEG


Step 2. Select output format- MPEG-2 *.mpg, *.ts, MPEG-4 *.mp4 etc.

The MXF Converter is capable of converting MXF files to various HD and SD video formats. For converting MXF video to MPEG, you just need to click on the “Format” bar and select desired MPEG format from the profile list. In the tab of “Common Video”, MPEG-1 and MPEG-2 encoded SD formats are available. If you’d like to remain HD video quality, please find MPEG-2 and MPEG-4 encoded HD MPG, TS and MP4 format in “HD Video”.


convert AJ-HPX3700 HD MXF to MPEG


Do not forget to specify a folder to save the converted MPEG files. Simply click the small folder icon next to “Output” field and specify an output folder to save converted files. And make sure there is enough space for saving the output files.


convert AJ-HPX3700 HD MXF to MPEG


Step 3. Further customize the output format.

Simply click “Settings” button to and set the bit rate, frame rate, channels, sampling rate to desired values. It seems to be complicated, but it is not. What you are doing is down-scaling the MXF files, and the trick lies in video and audio bit rate. The video bit rate of P2 MXF can be up to 100mbps! That’s extremely high! Video bit rate of a commercial blu-ray movie clip is around 30mbps. And standard DVD? 5-10mbps. The first image of this guide reveals basic infomation of the MXF I use for conversion. The MXF clip is 148M, 21’ in length, and its video bit rate is 5, 760kbps. When I convert it to MPEG-2 HD Video (*.mpg), and set “high quality”(18,000kbps) as video bit rate, the file size is down to 47M. The video quality I get will be better than a commercial DVD but not good engouth for burning blu-ray disc. In one word, the lower bit rate you set the smaller file size you get.


convert AJ-HPX3700 HD MXF to MPEG


Step 4. Start converting down MXF to MPEG.

Click “Convert” to start converting MXF to MPEG formats (*.mpg, *.mp4, *.ts etc) when everything’s ready. The HD Video Converter supports batch conversion so you may load multiple MXF files and convert MXF files to MPEG at one time. You may also merge them to one file by checking the box “Merge into one file” before conversion starts. After conversion you may click “Open” button to find generated MPEG files and use them freely.

Thursday, July 8, 2010

How to transfer/rip/convert DVD to iPad 720p HD video on Mac


Pavtube DVD to iPad Converter for Mac is specially developed for iPad users to transfer their beloved DVDs to iPad supported file formats, like H.264 (.mp4), MPEG-4 (.mp4), 640X480 video, 720p video and more. This Mac DVD to iPad Converter supports copying home-made DVDs and copy-protected DVDs, as well as DVD ISO/IFO image files, so now you are free to watch your DVD collection on your iPad with HD 720p quality. The following guide shows the detailed steps of how to transfer/rip/convert DVD to iPad 720p video on Mac with this Mac DVD to iPad software. Please feel free to skim over it.


How To:


Free download Mac DVD to iPad Converter and install it on your computer


Step 1: Launch DVD to iPad Converter for Mac, and add your DVD movie files to it

You can click "DVD Folder" or "IFO File" to load DVD files. All the titles are checked by default when loading, but in general, the one with the longest duration time would be the main movie, so you can right click on the file to uncheck all to simplify the process. Or if you’d like to convert extras, you can tick off them to transfer according to your own needs. To combine multiple files into a single file, you can tick off "Merge into one file".


Step 2: Choose output format for iPad

Click on the pull down menu at the end of "Format", and then choose "iPad" profile. After that, three iPad presets will pop up immediately, and you can select anyone of them to meet your requirements. Here I select "iPad HD Video (*.mp4)" for instance.


Step 3: Set advanced settings

Click "Settings" button, then the following window will show up, on which you are allowed to adjust video and audio parameters to your desired ones, including codec name, bit rate, frame rate, aspect ratio, sample rate and audio channel. To produce 720p video for iPad, you can directly select "iPad HD Video (*.mp4)" preset, because the default size of it is 1280x720, you needn’t change it anymore. Actually, all the default settings of this Mac DVD to iPad software will guarantee you an excellent playback quality on your iPad, so if you don’t wanna bring yourselves troubles, you’d better use the default settings, otherwise the incorrect adjustment may cause the final files unplayable on your iPad.


Step 4: Start transferring DVDs to iPad on Mac

Click "Convert" button, then the application will start converting DVD to iPad at a super high speed without any audio and video out of sync issues. Once the conversion task is completed, you can click "Open" button to get the final 720p video for your iPad. What you should do next is just syncing the videos to your iPad for watching with iTunes.


See Watch Blu-ray movies on iPad (for Mac users)

Pavtube TiVo to iPad Converter - Convert FIFA World Cup 2010 TiVo files to iPad


Luckily we have TiVo and other DVR, which help to record all the matches so that we could make them up later on TV, without missing any of the matches. However, fanatic football fans may complain, “Why can’t I bring the World Cup matches with me and watch the football game on the way to my work?” Well, of course you can. As far as I know, TiVo Desktop, free supplementary software by TiVo, can help TiVo users to transfer their recordings to computer or laptop.


In order to enjoy TiVo recordings on iPad, you get to transfer TiVo to your PC and then convert TiVo files to iPad compatible formats.


1. Transfer TiVo recordings to PC (or laptop)


Transferring TiVo recordings to PC is easy and straight-forward. All you need is a freeware by TiVo--- the TiVo Desktop (download the latest version v2.8). Connect the TiVo box with your home network, and run TiVo Desktop. Click on "Pick Recordings to Transfer". Check the box next to the title of the show (or shows) you want to transfer and click on "Start Transfer". Transfer times vary, but may be as long as the show's duration to complete the transfer.


2. Convert TiVo recordings to to iPad compatible formats.


There are too many converting tools on market, yet few do convert TiVo files. A recommended one is Pavtube TiVo to iPad Converter, which converts TiVo files as well as HD footages, Flash videos, Matroska container format, tec.


Best Way to Convert TiVo to iPad - Pavtube Video Converter


With the Best TiVo to iPad Converter, Follow the optimal settings to get excellent playback quality.


No.1


iPad HD Video(*.mp4)

Video Codec: H.264

Size: 1280*720 or 768*576

BitRate: 4000kbps

FrameRate: 30.00fps

Audio:

Codec: AAC

SamplerRate: 48000hz

BitRate: 128000bps

Channel: 2


I hope it will be of great help for you


Download:

For Mac user: TiVo to iPad Converter for Mac

For Windows user: TiVo to iPad Converter


-----------------------------------------------------------------------------

Pavtube iMedia Converter for Mac || Blu-ray Ripper Review || Mac Blu-ray Ripper || MTS Converter || DVD to iPhone 4

Macnn.com News: DVD and Blu-ray conversion software - Pavtube iMedia Converter for Mac

Tuesday, July 6, 2010

How to copy or compress Blu-ray movies to the hard drive of your PC


Ripping Blu-rays to the hard drive of your PC bridges the gap between your Blu-ray collection and portable devices. For instance, to copy Blu-ray to the currently hot Apple iPad tablet, you need firstly rip and compress BD movies to the hard drive of your computer, and then sync the ripped files to your iPad for watching with iTunes. Have not figured out a solution to access your Blu-ray discs? No worry, this article goes over how to copy or compress Blu-ray movies to the hard drive of your PC in detailed steps. Just check it to see if it is what your are looking for.


The application we are going to use is Pavtube Blu-Ray Ripper. There are two reasons why we choose this Blu-ray ripping software to back up blu-ray movie/disc to hard drive. Firstly, with full Blu-ray support, it is capable of removing the most popular copy protections applied in commercial BDs, including AACS, and the new BD+ technology (Blu-ray Avatar is a typical sample of it) and MKB V17. Secondly, audio and video in sync quality. This guarantees users a smoothly and excellent playback quality, so people will never encounter the annoying audio and video out of sync issues.


Step by step guide: How to copy or compress Blu-ray movies to the hard drive of your PC?


Step 1: Download, install and run this blu-ray to hard drive ripper

Once run it, click "BD/DVD ROM", "BD/DVD Folder" or "IFO/ISO" to load BD m2ts streams.


Step 2: Select an output format for ripping Blu-rays to the hard drive

Click on the dropdown list of "Format", and then select a format from the following popup window. This blu-ray to hard drive ripper offers a wide variety of output formats specialized for portable devices, video editing software and so on, which one to choose is depending on your end use of the output files. For example, supposing you want to rip and compress BD movies to the hard drive, so as to add the final files to your iPad for playback, then you can tap on "iPad" preset firstly, and then choose an output format for it from the three format profiles optimized for iPad.


Step 3: Set advanced settings

Click "Setting" button, then you are allowed to adjust audio and video parameters in the following interface, including codec name, aspect ratio, bit rate, frame rate, sample rate and audio channels.


Tip: The default settings of iPad presets will guarantee you a great playback quality on your tablet. So there is no need to change anything. Just skip this step to copy or compress Blu-ray movies to the hard drive of your PC to prepare the files for your iPad.


Step 4: Click "Convert" button to start backing up blu-ray movie/disc to hard drive

Once the conversion is finished, you can get the ripped Blu-ray movie files on your hard drive via clicking on "Open" button with ease. Now you are able to add these BD files to your portable devices for playback, or you can import them to your home theater system for entertainment. If you are using a Mac, you can use this Mac Blu-ray Ripper to copy or compress Blu-ray movies to the hard drive of your computer.

How to convert XviD/DivX AVI to iPhone 4


Are you one of the thousands of customers lined up at Apple Stores on June 24 to nap the new iPhone 4? Unfortunately, iPhone 4 is unable to play back a regular XviD, DivX or anything else in AVI containers. Is there any third party software to realize the goal of watching AVI videos on the cool iPhone 4? Yes, there is. With Pavtube Video Converter, you can freely convert XviD AVI, DivX AVI, or any other codecs encoded AVI files to iPhone 4 playable MP4 format. Go to find a step-by-step instruction from the contents below.


Step 1: Free download AVI to iPhone 4 Converter, install and launch it

Once you launch it, click "Add" button to load XviD/DivX AVI files. This program supports batch conversion, so you are allowed to add multiple files to it at a time. Supposing you would like to combine several files into a single file, you can tick off the checkbox "Merge into one file" to achieve it.


Step 2: Select output format for iPhone 4

Click on the drop down list at the end of "Format", and then hit "iPhone" preset. After that you will see there are two profiles specially optimized for iPhone 4, they are "iPhone 4 MPEG-4 640*480 (*.mp4)" and "iPhone 4 H.264 720P (*.mp4)". which one to choose is depending on your own requirements.


By the way, this AVI to iPhone 4 Converter also supports output files for playback on iPad and iPod, so if you are an Apple fan, it is really a good choice for you. You can not only use it as an AVI to iPhone Converter, but also an AVI to iPod and iPad converter.


Step 3: Adjust video and audio settings

Click "Settings" button, you will enter the following window, on which you are allowed to adjust audio and video parameters to optimize the output file quality, these parameters include codec name, aspect ratio, bit rate, frame rate, sample rate and audio channel.


The following info may be of some help for you while adjusting audio and video parameters.

iPhone 4 supported video formats:

H.264 video up to 720p, 30 frames per second, Main Profile level 3.1 with AAC-LC audio up to 160 Kbps, 48kHz, stereo audio in .m4v, .mp4, and .mov file formats;

MPEG-4 video, up to 2.5 Mbps, 640 by 480 pixels, 30 frames per second, Simple Profile with AAC-LC audio up to 160 Kbps per channel, 48kHz, stereo audio in .m4v, .mp4, and .mov file formats.

Step 4: Start converting XviD/DivX AVI to iPhone 4


Click "Convert" button, then the application will start converting AVI to iPhone 4 at a super high speed without any audio and video out of sync issues. Once the conversion task is completed, you can click "Open" button to get the final files for your iPhone 4. If you are not quite familiar with the process of adding videos to iPhone 4, you can see How to Sync iPhone and iTunes.

Thursday, July 1, 2010

Share the top 4 DVD to iPhone Converters to you

In the purpose of getting a reliable package to copy my collection of DVD movies to play on my iPhone, I searched the internet for a whole weekend. After going through over 10 different products, I selected one of them called Pavtube iPhone Converter Ultimate for the sake of audio-video in sync quality and Blu-ray compatibility. Besides this application, there are also another 3 utilities having good performances, I guess you guys might look for such a kind of solution right now, so I commented the 4 programs in my post in detail, hope you can find your right one among them.


No 1. Pavtube iPhone Converter Ultimate


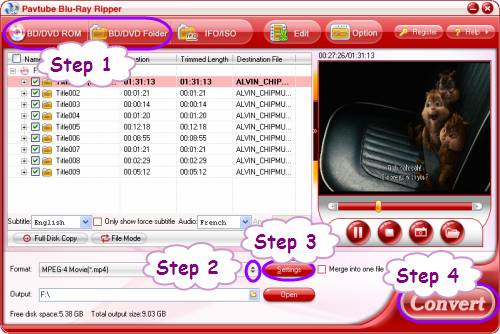
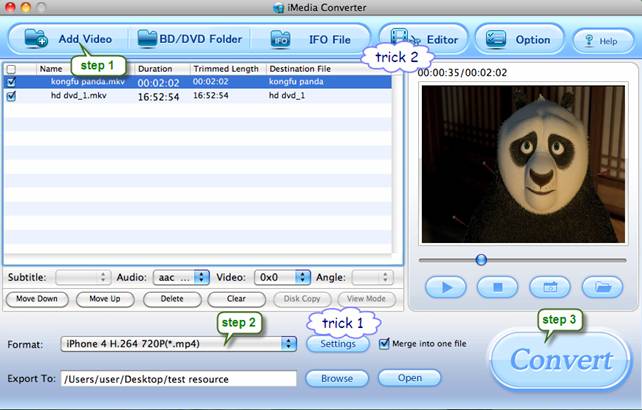
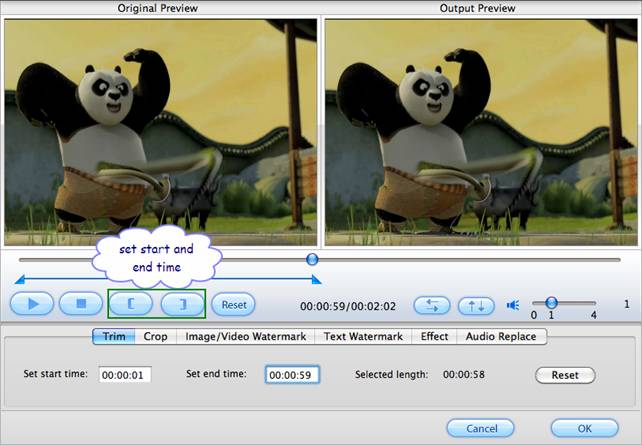
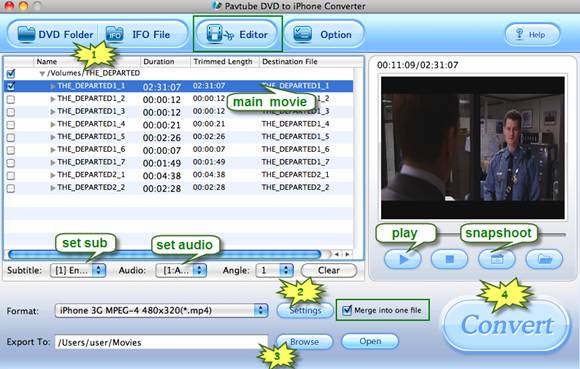
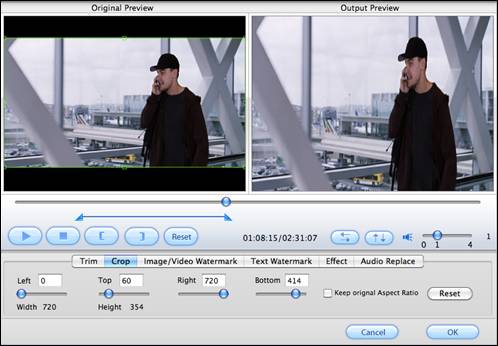
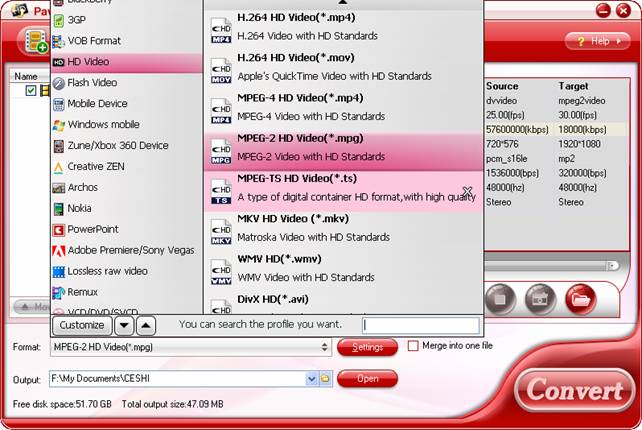
To be honest, I did not find any software better than this one. It is capable of processing not only standard DVD movies, but also Blu-ray movies. With powerful decryption ability, it is able to remove different copy protections of commercial DVDs and BD discs, including CSS, AACS, BD+ and the new released MKB V17. I have used it a lot to rip my Blu-ray and DVD collection for playback on my iPhone, including the new BD Avatar! Exciting thing!


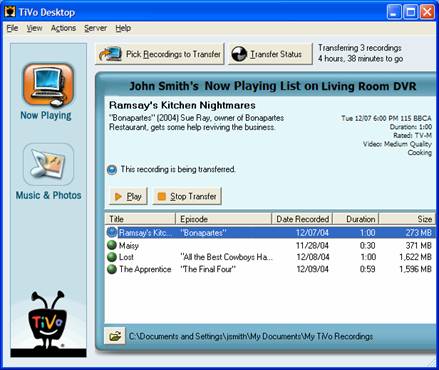
Additionally, it can be used as a video to iPhone converter as well. I mean that you can convert nearly all video files to your iPhone via it, including camera MTS/M2TS files, WMV/FLV/AVI/MKV files, and more. One of the most wonderful things is that it successfully converted my encrypted files recorded by my TiVo DVR to smoothly play on my iPhone, so it’s really amazing.


As I mentioned at the beginning, another reason I chose Pavtube iPhone Converter Ultimate is that it can guarantee an excellent output quality for my iPhone without any video and audio out of sync issues. Frankly speaking, lots of DVD to iPhone Converters are lack of this feature. Pavtube has it, so it won.


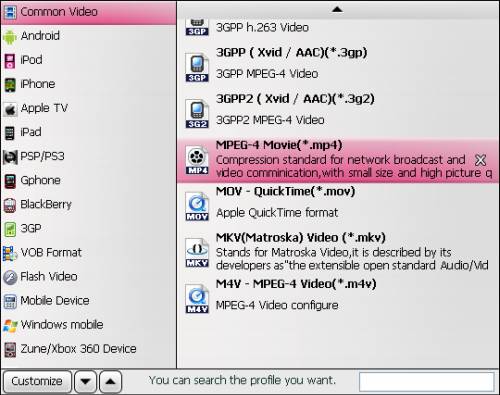
Besides output files specialized for iPhone, Pavtube iPhone Converter Ultimate also supports output other common videos, like AVI, WMV, M4V, 3GP, MKV, ASF, MOV, etc, so it can be considered as a versatile Blu-ray ripper + DVD ripper + video converter.


In my opinion, the only shortage of Pavtube is that it costs much more than the other 3 converters-$59 USD, but for its full functionalities, I think it is well worth paying.


No 2. Avex DVD to iPhone Video Suite


Avex DVD to iPhone suite is able to convert commercial DVD and common videos like FLV, AVI, MOD, M2TS and more to iPhone MP4 video, but with the exception of TiVo files. (Its official site says it supports TiVo files, but in my test, it failed.)


Compare with Pavtube iPhone Converter Ultimate, Avex DVD to iPhone suite is not very user-friendly, at least for me, some conversion options are difficult to find out, for example, I have not got the way to select subtitles and audio tracks until read its manual. Besides that, users need select different conversion modes to rip DVD or convert video files. It seems a little troublesome, but not a big problem.


Another two reasons why I didn’t choose Avex are that it is without Blu-ray support, and one can only convert 5 minutes to see the conversion quality by using the trail version. In my case, the output quality in the 5 minutes conversion is good, but I could not check if it would keep the good quality when it went to the end of the movie. From this point, Pavtube is much better, because it allows users to convert the whole movie without time restrictions, and only with a tiny "PAVTUBE" watermark standing in the center of the screen. In that way, users are free to see the final quality of it.


Due to its less functionality, Avex DVD to iPhone suite is a little cheaper than Pavtube. It costs $45 USD. If you need rip additional BD movies and TiVo recordings, Pavtube is the proper choice, but if you just need convert standard DVDs and common videos, then Avex DVD to iPhone suite is your choice.


No 3. WinX DVD to iPhone Ripper


WinX DVD to iPhone Ripper is only focusing on ripping DVDs, including normal DVDs, CSS protected DVDs, Sony ArccOS DVDs and region 1-6 DVDs. More than converting DVDs to iPhone, it also supports exporting files optimized for iPad, iPod, and Apple TV.


The same as Avex DVD to iPhone Video Suite, WinX DVD to iPhone Ripper also has time restriction while using the trial version-less than 5 minutes. In my test, its output files are in an acceptable quality while playback, but it is a pity I could only see the file produced within 5 minutes to check the video and audio quality. From this point, Pavtube is more reasonable than WinX DVD to iPhone Ripper and Avex DVD to iPhone Video Suite.


But in regard to the price, WinX DVD to iPhone Ripper is much more affordable, only $29.95 USD. Supposing you just need ripping DVDs to play on iPhone, iPad, iPod, or Apple TV, then WinX DVD to iPhone Ripper is the best choice.


No 4. TOP DVD to iPhone Converter


TOP DVD to iPhone Converter is a pure DVD to iPhone Converter, and unlike the former three programs, it only supports ripping standard DVD files to iPhone playable mp4 video and mp3 audio, without any supports for Blu-rays, common videos or other portable devices.


Compare with the above mentioned three applications, the conversion speed of TOP DVD to iPhone Converter is a little slower, but it’s not a serious thing, because the final quality is OK. The same as Pavtube iPhone Converter Ultimate, TOP DVD to iPhone Converter allows users trying the software without time limitation, only with three lines of text watermarks standing in the center of the image, which is a little bigger than that of Pavtube.


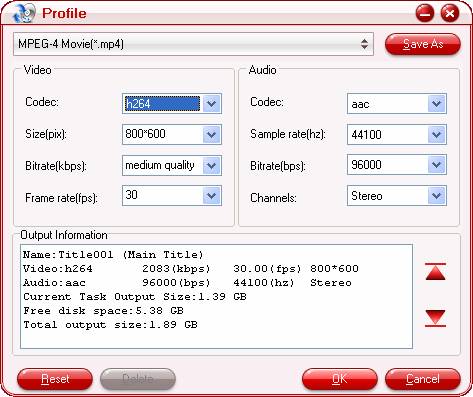
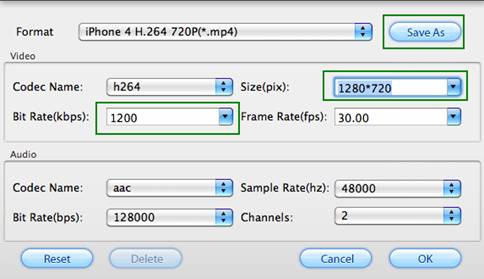
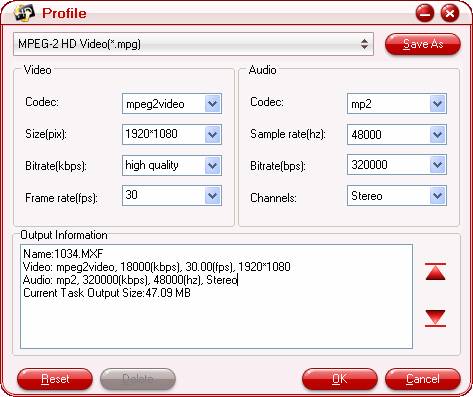
Another thing I need to mention is that video and audio settings like bit rate, frame rate, sample rate are unavailable to adjust in TOP software. Unlike the former mentioned 3 utilities, TOP DVD to iPhone Converter only provides users with "Video Size", "Video Quality", "Channel", and "Audio Quality" options to change. But if you are ready to use default settings, this would not be a problem.


What’s more, TOP software seems not as stable as another 3 programs, one crash problem has happened during my course of conversion test. But considering its much lower price, $19.99 USD, the cheapest one among all, maybe we should not have much higher expectations on it. To put it bluntly, the final quality produced by this software is good, so if you are considering much more about money cost, you can choose TOP software to rip commercial DVDs for playback on your iPhone.


Well, hope the above reviews will be of some help for you guys. Good luck.