Monday, June 28, 2010

How to rip standard DVD movies to iPhone 4 on Mac OS?


"Thanks to the Retina display, everything you see and do on iPhone 4 looks amazing. Text in books, web pages, and email is crisp at any size.Images in movies and photos are stunning at almost any angle.That’s because the Retina display’s pixel density is so high, your eye is unable to distinguish individual pixels." As it stated, the remarkable 960x640 resolution screen of iPhone 4 will make your movie watching experience unbelievably sharp and crisp, so it’s wise to rip and convert your purchased DVD movies or home made DVDs to your new iPhone 4 for entertainment. To help Mac users watching DVD movies on iPhone 4G, this article will focus on this point to show you a solution on how to rip, convert standard DVD movies to iPhone 4 on Mac OS. Just go to find a step-by-step tutorial from the following contents.


What you will need:

Pavtube DVD to iPhone Converter for Mac


Step-by-step guide: how to rip, convert standard DVD movies to iPhone 4 on Mac OS


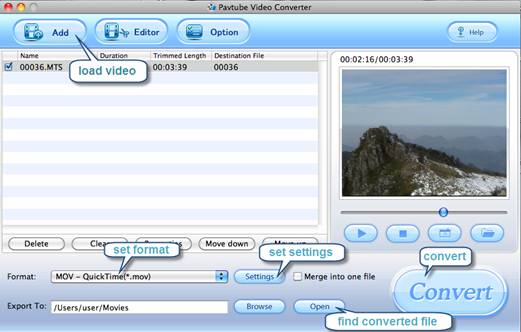
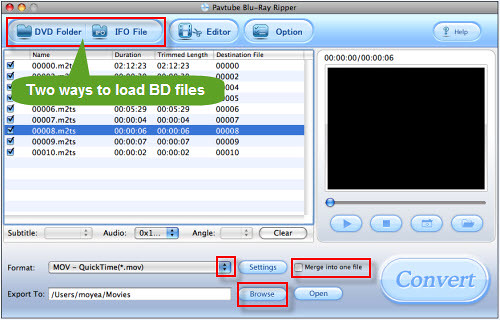
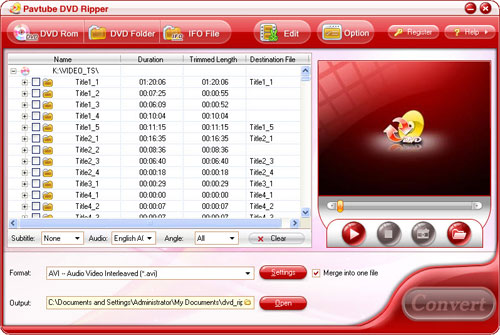
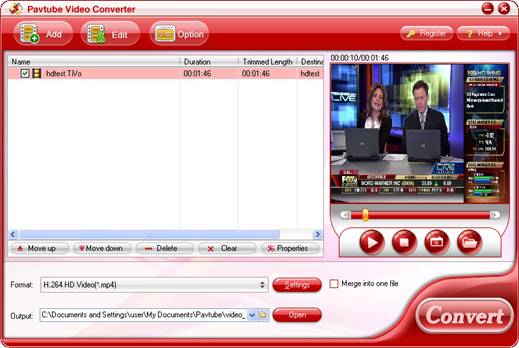
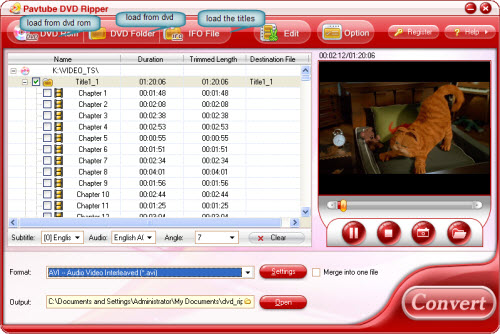
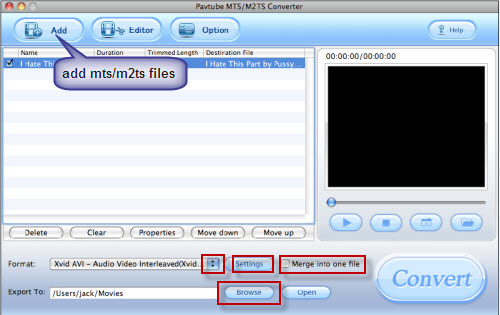
Step 1: Click "DVD Folder" or "IFO File" to load your DVD movie files

The entire movie files are checked after loaded, in general, the one with the longest duration time would be the main movie, so you can right click on the file name, and then "uncheck all" to only tick off the main movie to convert.


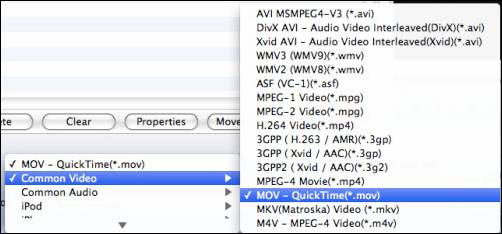
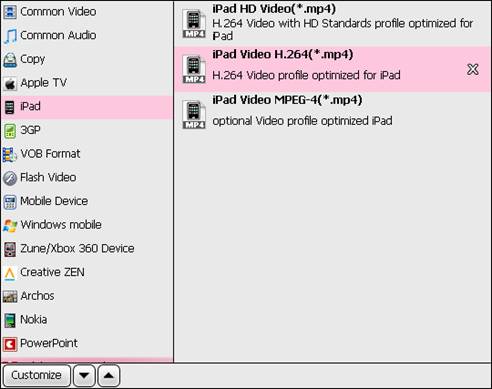
Step 2: Select an output format for iPhone 4G

Click on the pull down menu at the end of "Format", and then tap on "iPhone Video", afterwards, you will see there are multiple iPhone formats available for you to select from, which one to choose is depending on your own requirements.


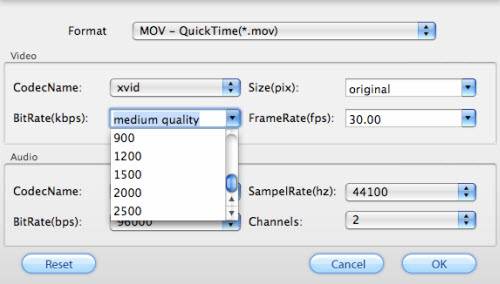
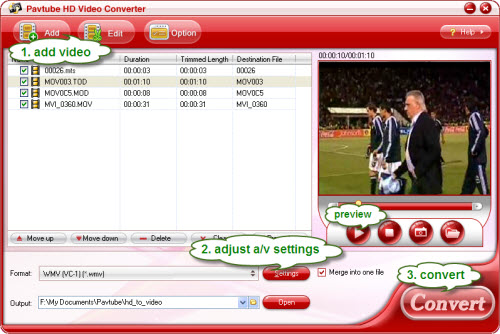
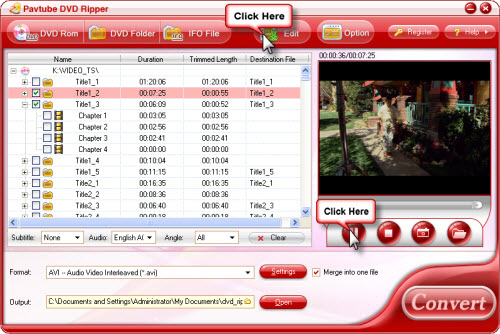
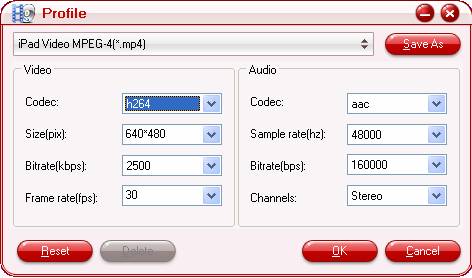
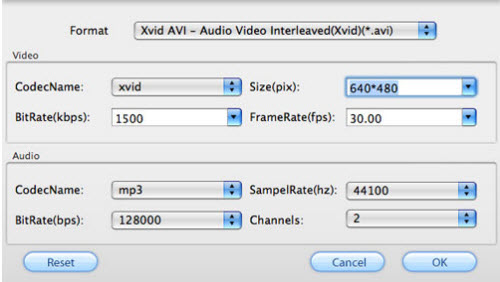
Step 3: Adjust audio and video parameters

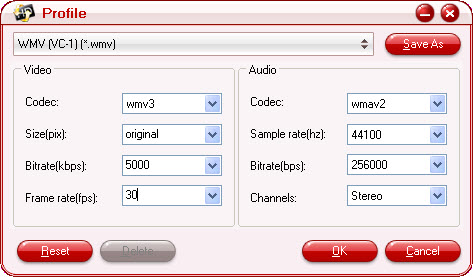
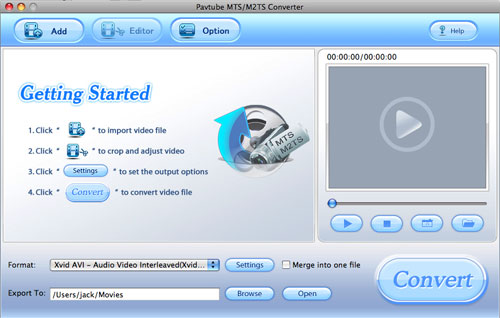
Click "Settings" button, then the following window will pop up. This Mac DVD to iPhone 4 ripper allows users adjusting video and audio parameters like codec name, aspect ratio, bit rate, frame rate, sample rate and audio channels to optimize the playback quality on iPhone 4G.


Please notice that the parameters you changed should not be out of the format restrictions of iPhone 4, otherwise, the output files may not playable on your iPhone 4G. Following are the video formats supported by iPhone 4, hope they are useful while adjusting A/V settings.


H.264 video up to 720p, 30 frames per second, Main Profile level 3.1 with AAC-LC audio up to 160 Kbps, 48kHz, stereo audio in .m4v, .mp4, and .mov file formats;


MPEG-4 video, up to 2.5 Mbps, 640 by 480 pixels, 30 frames per second, Simple Profile with AAC-LC audio up to 160 Kbps per channel, 48kHz, stereo audio in .m4v, .mp4, and .mov file formats;


Motion JPEG (M-JPEG) up to 35 Mbps, 1280 by 720 pixels, 30 frames per second, audio in ulaw, PCM stereo audio in .avi file format.


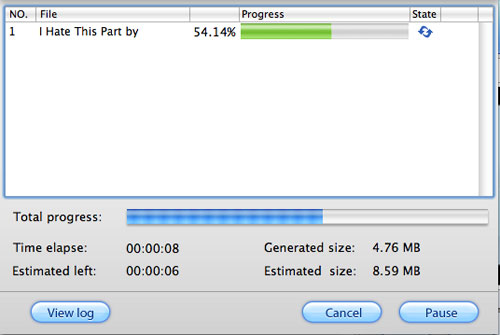
Step 4: Start ripping/converting DVD movies to iPhone 4

When the above mentioned steps are finished, you can click "Convert" button of this Mac DVD to iPhone 4 Converter to start ripping DVD to iPhone 4G. Once DVD ripping task is completed, you can click "Open" button to get the final files for your iPhone 4G. Sync these files to your iPhone 4 with iTunes, and have fun.


Additional tips:


1. The ripping speed of this DVD to iPhone Converter for Mac software is 1-2 times faster than the similar converters. Merge multiple files into one file is also available.


2. Never let users encounter audio and video out of sync issues.


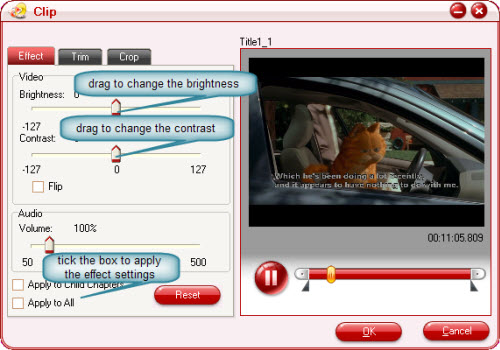
3. Other than adding text as watermark, images,GIF animations, and videos can also be added as watermarks to realize the picture-in-picture effect.


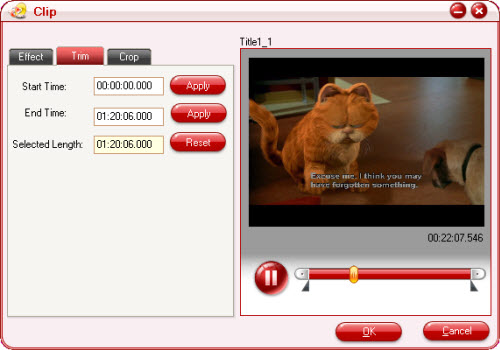
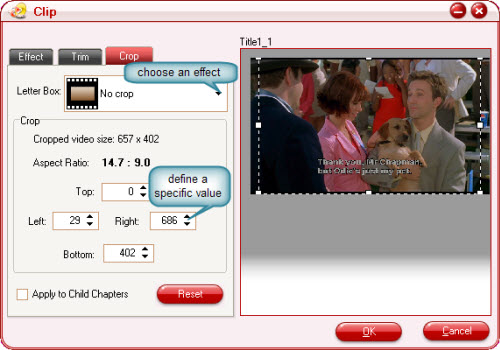
4. You can use the "Trim" function to select certain video clips to rip or convert. You can also take advantage of the "Crop" function to remove black edges in the source DVD files.


5. Special effects are provided, such as "Simple gauss blur", "Simple laplacian sharpen", "Aged film", "Flip color", and "Invert", so you are free to make your own videos.

Teach you to convert AVCHD Lite videos to be compatible with QuickTime Player on Mac


Part 1.What is AVCHD Lite? How to play AVCHD Lite video on Mac?

For the users of Panasonic Lumix line digital cameras like DMC-FT1, DMC-FZ35 and DMC-FZ38, AVCHD Lite should be a familiar phrase.The name was used first in marketing literature for the Panasonic DMC-ZS3 digital cameras, announced in January 2009. AVCHD Lite is a subset of AVCHD format, which identifies devices that are capable of 720p/30fps recording only. Comparing with Full HD, the 720p/30fps video is recorded in the normal AVCHD 720p/60 format, but every other frame is duplicated, resulting in thirty actual frames per second. A good news for Mac guys is that Apple has made it clear that iMovie 09’ is able to edit the AVCHD Lite video. Yet the AVCHD Lite video turns out to be incompatible with QuickTime Player. Surely you may play it with Mplayer or VLC player, but guys like me would rather use QuickTime Player watching everything. In order to play the AVCHD Lite video files generated by the Panasonic Lumix DMC-FT1 smoothly on Mac, the AVCHD Lite must be converted to QuickTime compatible format, like MOV, MP4,etc.


Part 2. How do I convert the AVCHD Lite for playing with QuickTime Player on Mac?

If you want to convert the AVCHD Lite to QuickTime for playing, then Pavtube Video Converter for Mac is an option for you. You can convert from AVCHD to any Quicktime format using this powerful video conversion tool.A Video Converter free trial version is available, only watermark of Pavtub logo will appear on the screen of converted videos.


You may refer to below guide how to convert the AVCHD Lite to QuickTime with Pavtube Video Converter for Mac.


Step One. Free download, install and launch the Mac Video Converter.

Once you run it, click “Add” to load the source AVCHD Lite MTS files.


Step Two.Select QuickTime (*.mov ) or H.264 Video (*.mp4) as output format for QuickTime

Click on the drop-down list of “Format”,and follow “Common Video”> “MOV-QuickTime (*.mov)” or "Common?Video" > "H.264 Video (*.mp4)". To retain the HD video quality,you can select “HD Video”> "H.264 HD Video (*.mp4)".


Step Three.Click "Settings" button to adjust video and audio parameters

Notice that which parameter to select has close relationship with the hardware configurations of your computer, so before your adjustment, read the following info attentively.


To play HD video on Mac, a large amount of data must be processed by your computer. A powerful system will deliver the best playback quality. Recommended hardware configurations for H.264 HD playback on Macintosh:

For 1280x720 (720p) video at 24-30 frames per second:


* 1.8 GHz PowerMac G5 or 1.83 GHz Intel Core Duo or faster Macintosh computer

* At least 256MB of RAM

* 64 MB or greater video card


Step 4: Click "Convert" button to start converting AVCHD Lite to QuickTime format.

After the above steps are done,you can click “Convert” button to start conversion. And you can click “Open” button to get the generated QuickTime MOV/ MP4 files effortlessly.Now you have converted AVCHD Lite video to QuickTime player compatible format successfully with this powerful AVCHD Lite converter. Afterwards,just import the output files to QuickTime Player effortlessly. Have fun.

Wednesday, June 23, 2010

How to convert Blu-ray, DVD and different video files to iPhone 4


Wanna rip your Blu-ray / standard DVD movies, and convert different?video files to your new iPhone 4 for entertainment?Generally speaking, to rip Blu-ray discs, you need a Blu-ray ripper; to rip DVD collection,you need a DVD ripper; to convert video files in different formats, you need a video?converter.That is to say you need at least three programs to deal with all of?your on hand movies and video files.But have you ever considered if there is a?three-in-one application to achieve all the conversion totally? Suppose you are looking for such an application,then Pavtube iPhone Converter Ultimate is a proper choice for you. Go to find a detailed guide from the following paragraphs.


Before we start, some information about iPhone 4 supported?video formats you may need to know:


Video formats supported:

H.264 video up to 720p, 30 frames per second, Main Profile level 3.1 with AAC-LC audio up to 160 Kbps, 48kHz, stereo audio in .m4v, .mp4, and .mov file formats;


MPEG-4 video, up to 2.5 Mbps, 640 by 480 pixels, 30 frames per second, Simple Profile with AAC-LC audio up to 160 Kbps per channel, 48kHz, stereo audio in .m4v, .mp4, and .mov file formats;


Motion JPEG (M-JPEG) up to 35 Mbps, 1280 by 720 pixels, 30 frames per second, audio in ulaw, PCM stereo audio in .avi file format.


HOW-TO:

Step 1: Free download iPhone 4 Converter, install and run it

Once you run this program, click "Add Video" to load?common video files like AVI, MKV, FLV, WMV, MTS/M2TS, TiVo, etc. to convert, and?click "Load DVD" to import Blu-ray or DVD movie files to rip.


Step?2: Select an output format for iPhone 4

Click on the drop down list of "Format", and then tap on "iPhone Video", after that all the specialized iPhone formats will pop up, including MPEG-4 480X320,H.264 480x320, MPEG-4 640x480, H.264 640x480, etc. You are free to choose anyone of them for your iPhone 4G.


Step 3: Set optimal?settings

Click "Settings" button, then the following window will?show up,and all the parameters on it are changeable,like codec name, aspect?ratio,bit rate, frame rate,sample rate, and audio channels.If you are not?satisfied with the default settings, you can adjust them according to your own?requirements.For instance,if you don’t want to use 480x320, then you can choose other size,if the optional options are out of your needs (for example?720p),you can select "custom" to type in your needed one to the textbox of "Size (pix)".


Or if you are not professional in optimizing audio and?video parameters,you can totally skip this step,because the default settings?will give you an acceptable playback quality for your iPhone 4.


Step 4: Start converting Blu-rays, DVDs, videos to iPhone 4 supported file format

As soon as the above mentioned steps are completed,you?can click the big button "Convert" to start ripping Blu-rays, DVDs,and videos?to iPhone 4G supported file format.This iPhone 4G?Converter will guarantee you a video and audio in sync file quality,so you?never need worry about this issue. Once finished,click "Open" button to get?the output final MP4 files for your iPhone 4G.What you should do next is just syncing videos?to your iPhone with iTunes for entertainment.Hope this helps.


Get FREE iPhone 4?Ringtone Maker.

How to convert Blu-ray Avatar to QuickTime Player compatible format on Mac

Visit Apple’s QuickTime official site, you will find that all the file formats supported by QuickTime (the free version) are stated clearly as below:


Audio formats:

iTunes Audio (.m4a, .m4b, .m4p), MP3, Core Audio (.caf), AIFF, AU, SD2, WAV, SND, AMR

Video formats:

QuickTime Movie (.mov), MPEG-4 (.mp4, .m4v), MPEG-1, 3GPP, 3GPP2, AVI, DV

Also, QuickTime can play movies using the following codecs:

Audio Codecs:

AAC (MPEG-4 Audio), HE-AAC, Apple Lossless, MP3, AMR Narrowband, MS ADPCM, QDesign Music 2, Qualcomm PureVoice (QCELP), IMA 4:1, MACE 3:1, MACE 6:1, ALaw 2:1, ULaw 2:1, 24-Bit Integer, 32-Bit Integer, 32-Bit Floating Point, 64-Bit Floating Point

Video Codecs:

MPEG-4 (Part 2), H.264, H.263, H.261, Apple ProRes, Apple Pixlet, Animation, Cinepak, Component Video, DV, DVC Pro, Graphics, Motion JPEG, Photo JPEG,

Sorenson Video 2, Sorenson Video 3


It is obviously that the Blu-ray .m2ts streams are not included. Even though you purchase QuickTime MPEG-2 Playback Component from online Apple Store to install it on your Mac, it is still unable to play commercial DVDs, not to mention the much more strictly protected Blu-ray Avatar, which adopts the new BD+ encryption. Then you may ask “Is there any solution to playback BD Avatar in QuickTime?” Yes, there is. Pavtube Blu-Ray Ripper for Mac is such a tool. With full Blu-ray disc support, it is able to remove copyright protections of your BD disc, no matter BD+, or AACS, even the latest MKB V17 is supported as well. Now it is even capable of successfully decrypting Avatar Blu-ray movies released in North America. Please feel free to read on this step-by-step tutorial to get what you are looking for.


Step 1: Free download, install and launch this Mac blue ray ripper.

Once you run it, click “BD/DVD Folder” or “IFO File” to load your Blu-ray Avatar files.


Step 2: Select H.264 Video (*.mp4) as output format for QuickTime

Follow "Common Video" > "H.264 Video (*.mp4)"


Step 3: Click "Settings" button to adjust video and audio parameters

Notice that which parameter to select has close relationship with the hardware configurations of your computer, so before your adjustment, read the following info attentively.

To play HD video, a large amount of data must be processed by your computer. A powerful system will deliver the best playback quality.


Recommended hardware configurations for H.264 HD playback on Macintosh:


For 1280x720 (720p) video at 24-30 frames per second:

1. 1.8 GHz PowerMac G5 or 1.83 GHz Intel Core Duo or faster Macintosh computer

2. At least 256MB of RAM

3. 64 MB or greater video card


For 1920x1080 (1080p) video at 24 frames per second:

1. Dual 2.0 GHz PowerMac G5 or 2.0 GHz Intel Core Duo or faster Macintosh computer

2. At least 512MB of RAM

3. 128MB or greater video card


Now you are ready to set advanced settings according to the hardware configurations of your computer. Our computer satisfies the above mentioned "1280x720 (720p) video at 24-30 frames per second",so we changed the settings as below:


Step 4: Click "Convert" button to start ripping Blu-ray Avatar on Mac.

Once the ripping task is finished, you can click “Open” button to get the output H.264 .mp4 Avatar videos for your QuickTime Player effortlessly. Have fun.


Ultimate version: Pavtube iMedia Converter for Mac - all-in-one Video Converter/DVD Ripper/Blu-ray Ripper for Mac

Monday, June 21, 2010

Be there with 2010 FIFA World Cup – Convert the football clips for editing


"I can’t believe I’m one of the guys who will watch the final and the opening game. I’m so happy now it’s not really possible to explain in words," said by a South African fan. Indeed, it would be more than great to experience this wonderful tournament in South Africa. Most football fans had spent hours, some overnight and had to endure the scorching morning conditions to queue for tickets. If you are lucky enough getting the chance to cheer for your favorite team at the scene, or being a witness of the final, you should not forget to bring the camera/ camcorder and record the most exciting match. And Pavtube HD Video Converter helps you to edit all the high quality footages and share your recordings easily, no matter they are shot in MTS, MOD, TOD or MOV format, HD or SD mode. In the following guide I would like to share with you the easy procedure of converting HD footages with Pavtube HD Video Converter.


Step One. Getting started

Transfer the footages you’d like to edit from camcorder or memory card to PC. Install and launch HD Video Converter, click "Add" to load the HD video clips, or directly drag and drop the files into file list. By default, the files are selected. You could view the files in preview window, simply highlight the file and click play button.


Step Two. Adjusting audio and video settings

Click "Settings" and customize advanced audio and video parameters. Now that we are converting the football recordings (MTS, MOV, TOD) for edit, you may select a compatible video format with your editing software. Take Adobe Premiere as example, editable formats are WMV, MPG and MOV, so you can click on the format bar and find the row of Adobe Premiere/ Sony Vegas, then elect a desired formats. Here I select WMV (VC-1) as output format (see as below shows). The footage was recorded in Full HD 1920*1080 size, so I select ‘original’ to keep the 1920*1080 resolution, and set Bitrate to 5000kbps, Frame rate to 30fps to maintain best video quality.


There are also various other video and audio formats for different editing software such as Sony Vegas, Avid, Magix Movie Edit Pro, Pinnacle Studio, etc. Just make sure the format you select is compatible with the editing software you use.


Step Three. Converting HD footages to editable formats


Finally, click on "Convert" button to start converting HD footages to editable files for Adobe Premiere. You could set auto shutdown in progress window or leave it there and come back later.


After conversion the videos can be easily loaded to Adobe Premiere for editing. To locate the converted files, click the "Open" button next to output path. The converter also allows you to convert the footages to flash videos (*.flv, *.f4v, *.swf) so that you can share the videos with more football fans on Youtbe and other video sharing sites.


Learn more: http://www.pavtube.com/2010-world-cup/

How to convert Blu-ray Avatar to Motorola Droid with optimal settings on Mac

The 3.7-inch, 854x480 screen makes Motorola Droid perfect for watching HD movies, camera footage, TV shows, music videos, and more. Want to make full use of your Droid to watch the hot Blu-ray movie Avatar? Although the BD Avatar has adopted the new BD+ copy protection, with Pavtube Blu-Ray Ripper for Mac, cracking the code is not an unreachable thing any more. Well, the following paragraphs will elaborate the steps of how to use this Mac Bluray ripper to convert BD Avatar for your Motorola Droid.


Step 1: Download, install and launch Pavtube Mac Bluray ripper

Once launched it, you can click “BD/DVD Folder” or “IFO File” to load Blu-ray/DVD files.


Step 2: Select subtitle and audio track

Click drop down list of "Subtitle" and "Audio" to select your needed subtitle and audio track in your BD Avatar respectively. The pull down menu will show you all the info clearly, including language and stream ID of subtitle, language, audio codec, audio ID, and channel of audio. You can choose one according to your own requirement, and the preview window will show you the changes in real time.

Step 3: Select output format for Motorola Droid

Click the drop-down menu of "Format", and then follow "Common Video"> "H.264 Video (*.mp4)”.


Step 4: Set optimal settings for perfect playback quality on your Droid

Click "Settings" button to optimize video and audio parameters, the optimal settings of Pavtube blue ray ripper mac for Droid are recommended as below:

The best Video and audio settings:

Video codec: H.264 MP4

Size (resolution): 848*480pix

Bit rate: 2500kbps

Frame rate: 24fps

Audio codec: AAC

Sample rate: 48khz

Bit rate: 64kbps/ 96kbps/ 128kbps

Channels: Stereo


The above mentioned settings will guarantee you an excellent playback quality at full screen without frame skipping and any video/audio out of sync issues. If you prefer a smaller file size, just adjust the video bit rate down to 1,500kbps and it will still look fine while watching on your Motorola Droid.


Step 5: Start ripping Blu-ray Avatar for watching on Driod

Once all the above mentioned steps are finished, you can click "Convert" button to start ripping BD Avatar. The final output MP4 files can be found out via clicking "Open" button effortlessly, what you should do next is adding the MP4 files to the SD card and enjoy them freely on Motorola Droid.


Thursday, June 17, 2010

[Experience]How to convert standard DVD to PSP on Mac OS?


Pavtube DVD Ripper for Mac is a professional application designed for Mac users to decrypt/rip/convert/compress their standard DVD movies, no matter the home made ones or the commercial ones. In that way, users can easily watch their beloved movies on their portable devices like PSP, iPad, iPod, BlackBerry, etc. This tutorial takes PSP for instance, and explains how to rip general DVD movies to PSP on Mac OS in detail. If it is what you are searching for, please feel free to read on the following contents.


Step-by-step Guide: How to convert standard DVD to PSP on Mac OS?


1. Free download this Mac DVD to PSP Converter, install and run it

Once you run it, click "DVD Folder" to load your DVD movie from the DVD-Rom, or click "IFO File" to load your DVD files from an IFO image file.


In general, the biggest file would be the main movie, if you don’t want to convert extra parts of the movie, tick off this one would be OK. To make your selection conveniently, you can right click on a movie title to "Check all" or "Uncheck all".


2. Select an output format for PSP

Click on the pull down menu of "Format", and then tap on "PSP/PS3" preset, afterwards, you will see multiple PSP profiles showing up. Which format to choose is depending on your own requirements. Here I select "PSP – PSP MPEG-4 Video Excellent Quality (*.mp4)" as an example.


3. Set advanced settings

Click "Settings" button, then you will enter the following interface, on which you are allowed to adjust video and audio parameters including codec, aspect ratio, bit rate, frame rate, sample rate, and audio channels. Actually, the default settings of "PSP – PSP MPEG-4 Video Excellent Quality (*.mp4)" will output acceptable full screen files for your PSP, so if you are not good at changing audio and video parameters, you’d better use the default settings. An inappropriate adjustment may cause the final files unplayable on your PSP.


4. Start ripping DVD to PSP

Click "Settings" button to start converting DVDs to PSP video. This Mac DVD to PSP Converter will finish the ripping task at super high speed without any audio and video out of sync issues. After finished, you can hit "Open" button to get the output DVD files for your PSP effortlessly. Add the files to your PSP, and now you are free to watch your DVDs on PSP whenever and wherever. Hope this helps.


See more info about Windows DVD to PSP Converter.


[Essence]How to edit, crop, copy, convert and combine DVD movies?

You may have the need to do some editing on your DVD movie and convert them with the customized editing to AVI, MPEG, WMV and 3GP video. This will be very interesting, since you are creating kind of new movie all by yourself.


To edit the DVD video, you need to find a DVD decrypting application, or DVD ripping software which provides editing options as much as possible. I am using Pavtube DVD Ripper, so, today, I just take this popular DVD Ripper for example.


First, you need to import the DVD movies to the DVD ripping software.


Second, select the titles you would like to do editing and if you don’t know much about the movie you import, click the preview button to make sure that you are editing the right titles or chapters. And the hit the button of "Edit" to adjust the effect, trim or crop the videos.


Third, now let’s start the editing. Pavtube DVD Ripper offers three main editing sections, effect setting, trimming and cropping.

Effect Setting: Options are contrast, brightness for video and volume for audio.


Drag the slider bar for Brightness, Contrast, and Volume to preview the effect on the right column.

If the DVD image does not display correctly, you can tick the checkbox for "Flip" to fix it.

Remember to hit "Apply". Hit "Apply to Child Chapters" if the file you select is a title, or "Apply to All" if the file you select is a chapter. Otherwise, you may click the "Reset" button to gain the default settings.

Trim: This is intended for users to define the beginning time as well as ending time. You can trim the section you want through either defining a specific time or an ending time or drag the side bars at the two ends to clip the movie section. The later is much more convenient. Keep in mind that you must hit the button of "Apply" and "OK" or you have spend all the time in vain.


Crop: This is intended for users to crop the image.

Select an option under the drop down list of the "Letter Box", drag the dashed frame on the preview pane, or enter value on the boxes for the four positions to set the pixels you want to cut off. If the file you select to customize is a title, you can tick the checkbox for "Apply to Child Chapters" to get other files with the same settings under the "Crop" tab.


As this guide shows, you can tick several items on the major interface and apply the settings one by one, and in this way, you keep different settings for different titles or chapters, for example, you may have trim first 3 minutes of the Title1_2, the last 30 seconds of the Title1-3 etc.


To combine the sections you have selected and edited, all you need to do is to tick the checkbox of "Merge into one file" next to the format selecting box.


And finally, you will get the videos consisting of your favorite parts and with your preferred settings. Hope you could enjoy the popular DVD Ripper program! Oh,yeah!

Sunday, June 13, 2010

Rip ypur Blu-ray movies to PSP playable format on Mac?


It's a good choice to watch your favorite Blu-ray movies on portable PSP while traveling on public vehicle.In order to make BD movies playable on PSP, one thing is inevitable,that is using a practical Blu-ray Ripper to remove BD copy protections and convert the movie to PSP supported file format.In purpose of solving this problem, this guide will provide Blu-ray movie and PSP lovers with a solution on how to rip Blu-ray movies to PSP playable format in detail with Pavtube Blu-Ray Ripper for Mac.If you are looking for such a solution right now,just read on the following contents to see whether it is helpful or not.


Here we go.


Guide: how to rip Blu-ray movies to PSP playable format on Mac?


Step 1: Run Mac Blu-ray to PSP Converter and add BD files to it

Once you launch this program, click "BD/DVD Folder" to load your Blu-ray movie files.


Step 2: Select an output format for PSP

Click the drop down list of "Format", and then hit "PSP" preset, after that, you will see there are dozens of formats optimized for PSP, just select one to satisfy your requirements at will. To keep a higher quality, you can choose "PSP – PSP MPEG-4 Video Excellent Quality (*.mp4)", to minimize the final file size, you can select "PSP – PSP MPEG-4 Video minimal Size (*.mp4)". Here I chose "PSP – PSP MPEG-4 Video Excellent Quality (*.mp4)" for instance:


Step 3:Adjust audio and video settings

Click "Settings" button, then you will see a popup window as below. All the A/V parameters shown on it is changeable, including codec name, bit rate, frame rate, size, sample rate and audio channels. The default settings of "PSP – PSP MPEG-4 Video Excellent Quality (*.mp4)" will guarantee output an acceptable full screen playback quality on your PSP, so if you are not professional in adjusting A/V settings, you’d better not to change the default settings, otherwise you may get a final file that is unplayable on your PSP.


Step 4: Start ripping Blu-ray movies to PSP supported format

Once the above mentioned steps are done, you can click the big button "Convert" to start converting BD movies to PSP workable file format. This Mac Blu-ray to PSP Converter will ensure you an audio and video in sync file quality for your PSP. Once finished, you can get the result Blu-ray movie files for your PSP by clicking on "Open" button with ease.


Note:

If you don't want to wait around for the whole ripping process, then before clicking "Convert",you can click "Option" button at the top right of the main interface to tick off "Shut down the computer after conversion". In that case, you can go out for a walk or have a cup of tea, or do something else as you like while the ripping task is running.


More features of this Mac blu-ray ripper

1.Capable of removing different copy protections of commercial DVDs and BD discs, including CSS, AACS,BD+ and the new released MKB V17.


2. Capability of recognizing almost all subtitles and audio tracks,including Dolby TureHD Audio and DTS-HD Master Audio.


3. Support "Full Disk Copy" to remain the original Blu-ray and DVD file structure.


4. Support 5.1 surround sound output.


5. Support output multiple file formats to satisfy your different end uses.


6. Cut black bars and specify certain scenes to convert.


To see more detailed user guide of Blu-ray to PSP Converter for Mac.

[News]Way to convert TiVo files on iPad and iPad Wi-Fi +3G?

Ever since the release of iPad, the new ‘big guy’ has been the hottest product. Screen of iPad is so good, multi-touch is amazing and colors are so vibrant that working on boring tasks also becomes enjoyable. According to Apple, iPad gives up to 10 hours of surfing the web on Wi-Fi, watching video, or listening to music. By any means, it is a great portable video player. So why not transfer you TiVo recordings to iPad? No matter where you are, whenever it is, just take out the iPad from your handbag and enjoy your favorite TV programs or football matches freely! Nice idea, isn’t it? In the following guide I would like to share with you how to get your TiVo recordings ready for iPad (iPad Wi-Fi +3G).


In order to enjoy TiVo recordings on iPad, you get to transfer TiVo to your PC and then convert the TiVo files to iPad compatible formats.


1. Transfer TiVo recordings to PC (or laptop)


Transferring TiVo recordings to PC is easy and straight-forward. All you need is a freeware by TiVo--- the TiVo Desktop (download the latest version v2.8). Connect the TiVo box with your home network, and run TiVo Desktop. Click on "Pick Recordings to Transfer". Check the box next to the title of the show (or shows) you want to transfer and click on "Start Transfer". Transfer times vary, but may be as long as the show's duration to complete the transfer.


2. Convert TiVo recordings to to iPad compatible formats.


There are too many converting tools on market, yet few do convert TiVo files. A recommended one is Pavtube Video Converter, which converts TiVo files as well as HD footages, Flash videos, Matroska container format, tec.


Before converting TiVo files, let’s take a look at the iPad-supported video formats:


H.264 video up to 720p, 30 frames per second, Main Profile level 3.1 with AAC-LC audio up to 160 Kbps, 48kHz, stereo audio in .m4v, .mp4, and .mov file formats;


MPEG-4 video, up to 2.5 Mbps, 640 by 480 pixels, 30 frames per second, Simple Profile with AAC-LC audio up to 160 Kbps, 48kHz, stereo audio in .m4v, .mp4, and .mov file formats;


Motion JPEG (M-JPEG) up to 35 Mbps, 1280 by 720 pixels, 30 frames per second, audio in ulaw, PCM stereo audio in .avi file format


Now please refer to the converting procedures below:


Step 1. Input Media Access Key.


Launch Pavtube Video Converter, Click on the "Option" button, switch to TiVo tab, and enter your Media Access Key. Click "OK" to confirm.


Step 2: Import TiVo files.


Now click "Add" to import all .tivo files, or you may drag and drop the *.tivo files to the window of Pavtube Video Converter.


Step 2: Select an output format for iPad, iPad 3G, or iPad Wi-Fi+3G


Click on the pull down menu of "Format" and then tap "iPad", after that, you will see three options optimized for iPad showing as below, including "iPad HD Video (*.mp4)", "iPad Video H.264 (*.MP4)", "iPad Video MPEG-4 (*.mp4)". You can select any one of them according to your own needs.


Step 3: Click "Settings" button to adjust audio and video parameters


You are allowed to adjust codec, aspect ratio, bit rate, frame rate, sample rate and audio channel in the popup window to optimize the output file quality. Following are the recommended settings to get best playback quality.


Step 4: Click "Convert" button to start conversion.


Once finished, you can get the output files for your iPad via clicking on "Open" button effortlessly. Afterwards, connect your iPad to your PC, and then sync the videos to iPad via iTunes.


If you are using Mac, please refer to Converting TiVo to iPad on Mac.

Wednesday, June 2, 2010

How to convert DVD to AVI for further editing with Windows Movie Maker?

DVD movie still plays essential role in our audio/video daily life in spite of prosperity of online video and handheld devices. The problem is that DVD movie is not editable and you can only watch the movie the way it is presented on the disk. This is a time of individual customization and showing your own style, why not tries to edit a movie and watch it whatever way you like. To edit the DVD movie, you need to convert DVD to AVI firstly and then import the exported AVI videos to Adobe Premiere, Windows Movie Maker, and Sony Vegas etc.??First let us start from what is AVI.


About AVI

AVI stands for Audio Video Interleave Which is defined by Microsoft, it can work as a container to be embedded with different codec, such as DivX, XviD, etc. The AVI video generally brings high quality, but occupies larger disk space. It is suitable for further video editing.


To edit DVD with Windows movie maker, you need a DVD Ripper to convert DVD to AVI. This popular software offers AVI formats with various codec, which will certainly meet your needs to play, and edit video etc.


1. Run Pavtube DVD Ripper

If you have not installed it yet, please download the free trial version of Pavtube DVD Ripper.


2. Add DVD video by clicking "DVD ROM “or "DVD Folder or IFO File ".


3. Choose the AVI format on the "Format" drop down box.

There are 6 profiles with AVI as output format.Pavtube DVD Ripper offer several options for AVI with uncompressed codec and less compressed codec. The uncompressed codec is available for the profile "Losseless uncompressed avi".The profile is set with recommended settings, and you can also change the output format by clicking the "Settings" button.There are six video codec for uncompressed AVI: BGR24, RGB555, YUY2, UYVY, and RGBA32.Channel with the video,as the effect is the same as that with RGBA32.Choose RGBA32 if there is alpha channel.


Also it offer 5 profiles for AVI with less compressed codec,AVI – Audio Video Interleaved,XVID Video,DIVX Video,AVI with DV Codec,Creative Zen Player Video.The profile for Creative Zen Player Video is particular for Creative Zen with preset image dimension and video bit rate.You can choose the codec from DivX and XviD.DV AVI can be transferred to digital camcorder.


4.Check the box to start Converting

After conversion,just click the "Open" button, and you will find the output AVI files.


Now you have got the output AVI videos, and the rest of the work goes to video editing software.Let’s take Windows movie maker for example.

Step1: Import your video. Get your video onto your computer any way you need too.Open Windows Movie Maker.


Step2: Edit your AVI video. Open your storyboard by clicking "View storyboard." Your storyboard will be your timeline and where you will do most of your editing. For you movie folks we can call it your "cutting room floor." To put your video in the storyboard, drag it from your library to the storyboard. Click the plus sign on your timeline so you can see video and audio lines. If you want to add extra audio to your piece, import it the same way you did your video.


Step3: Play your AVI video and watch for where you want to cut and delete the extraneous video. Place your timeline cursor (the blue line that crosses perpendicular to the timeline) where you want to cut your video and split it by choosing "Edit split." Split your original video as many times as you want. Once you split the video you see the rest of the original video in your library. Delete the video you don't want by pressing "Delete" on your keyboard.


Step4: Add video by dragging it to the storyboard. Make sure your cursor is where you want it on the timeline because the program will automatically place your audio track where your cursor is. You will notice your audio track goes into the audio space on your timeline. To edit audio follow the same steps as the video.

How to convert MTS or M2TS to iPod, iPhone, etc. compatible formats on Mac?

I have often seen people asking questions like I have a Sony HDR-SR5, or some other AVCHD camcorders such as Canon HF11, JVC GZ-HD10, Panasonic HDC-SD5, etc, but I failed to import the video files copied from my camcorder in the format of .mts or .m2ts for playback on my iPod, iPhone, or some other common used mobile players, is there anyone can give me some suggestions? Question like this seems endless, for there are always people keeping asking these similar questions without an end. This time when I read this question, I couldn’t stop myself giving you people a solution.

Firstly I should tell you that most portable devices can not read .mts or .m2ts files directly, if you want to play them on your mobile devices like iPod, iPhone, etc. without trouble, you have to convert them into their acceptable format like MP4 previously.


This article aims to tell you how to convert MTS or M2TS to iPod, iPhone, etc. compatible formats with Pavtube MTS/M2TS Converter for Mac. If you are an above question asker, please read on the following step-by-step guide at will.

1. Install and run Pavtube MTS/M2TS Converter for Mac

Once you’ve run it, a sky-blue interface will appear as follow:


2. Import MTS or M2TS files to it, as well as set output format and destination folder

Click “Add” to import MTS or M2TS files, and at the same time, you can click the drop-down list of “Format” to select whatever format you need, like MP4 for iPod, iPhone, WMV for Zune player, or some other formats, what you should choose is depending on which format your portable device is supporting. Also, you can click “Browse” to decide where to load the output files. Moreover, if you want to integrate several files to be one single file, you can check “Merge into one file”.


3. Set advanced settings

If you have higher expectations about the resulted file, you can click “Settings” to adjust the parameters of video or audio on the below window. For example, you can set the screen size of the output videos, or change bit rate to adjust the quality or size of the output files.


4. Convert

Click button “Convert”, you will see the following window. It shows you the converting process as well as generated size and estimated size of the converting file, so that you can make sure if there ere enough space on your Mac to save the output files.


Additional tips:

What is MTS/M2TS?


Before talk about MTS/M2TS, AVCHD have to be mentioned at first. AVCHD is a tapeless HD format developed by Sony and Panasonic in May, 2006. AVCHD video is compressed in MPEG-4 AVC/H.264 format, and it supports 720p, 1080i, 1080p, etc. At the same time, AVCHD audio is stored in compressed form Dolby AC-3. Well, what is the relationship between AVCHD and MTS/M2TS? If you are attentive enough, you will find AVCHD is with file extension .mts on camcorder and with .m2ts after import to computer.