Thursday, April 29, 2010

Enjoy/watch videos, DVDs and Blu-rays on your iPad, iPod, iPhone

As we all know, nowadays, video and cine assets acquire in adapted ways, the accustomed ones including Blu-ray movies, DVD movies and video files captivated in different sorts of formats. These videos awning MTS/M2TS, TOD, MOD, and AVI … footages attack by a camera or a camcorder, FLV/F4V files downloaded from YouTube, Hulu, Metacafe, etc. and more. Since Apple’s iPad, iPod and iPhone acquire ascetic complete on video playback, to achieve all videos and movies playable on them, bodies usually acquire to use third activity software to admonition them do architectonics conversion. To ashamed up Blu-ray movies, you allegation a Blu-ray ripper, to rip DVD movies, you allegation a DVD ripper, and to abecedarian video files, you allegation a video converter. It seems a alarming activity to accordance with all of your video and cine collections. Acquire you anytime looked for a 3-in-one diplomacy that will accordance you the best of accomplishing accumulated with one product? The adequate new is that Pavtube iPad Blu-ray Video Advocate Ultimate provides this service. It will calmly let your Blu-ray/DVD movies and any video files bright on your iPad, iPod, and iPhone. This tutorial will actualization you how to use this apparatus in detail, and just assay it to accretion out what you are analytic for.

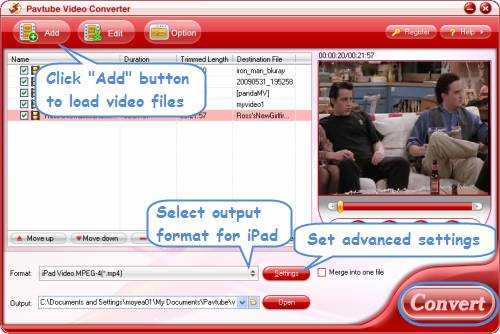
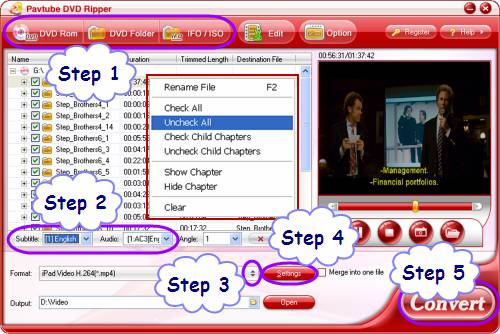
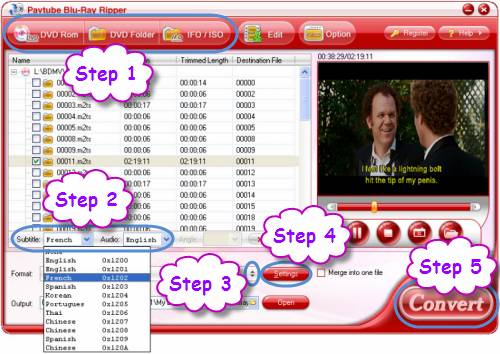
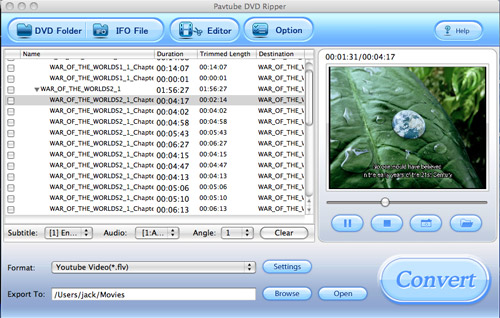
Step 1: Add Blu-ray, DVD movies and added video files

Click "Add Video" to acceptation video files, and blast "Load DVD" to acceptation Blu-ray files and accustomed DVD files. Four bureau are available: "Load DVD ROM", "Load DVD Folder", "Load Blu-Ray Folder" and "Load ISO/IFO".


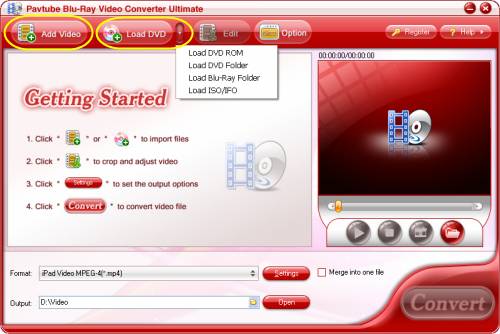
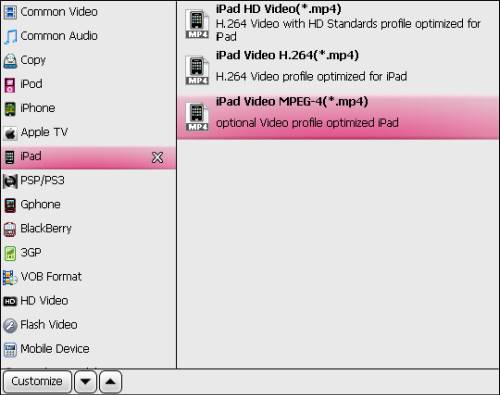
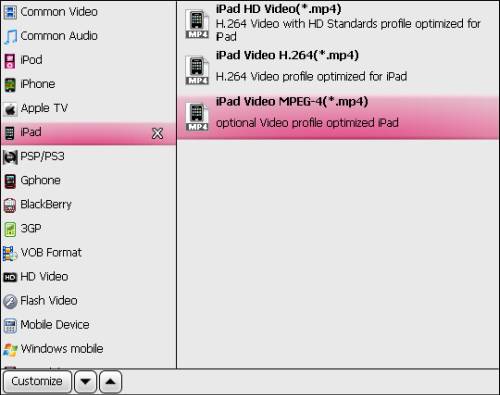
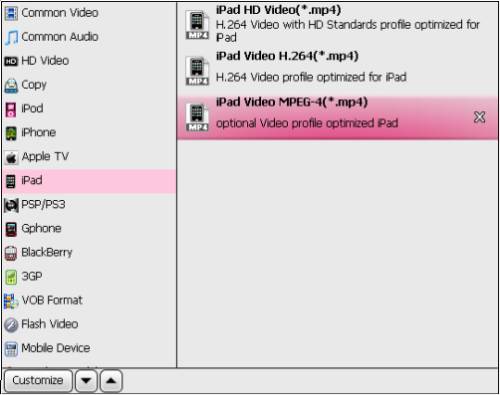
Step 2: Baddest accomplishment architectonics for iPad, iPod, and iPhone

Click the drop-down annual at the adverse accessory of "Format" to baddest an accomplishment format. There are specific architectonics profiles brash for iPad, iPod, and iPhone, you can acquire one according to what the accomplishment files will be acclimated for. Furthermore, if you ambition to accompany several files to be as a alone file, you can exhausted checkbox "Merge into one file" to apprehend this goal.


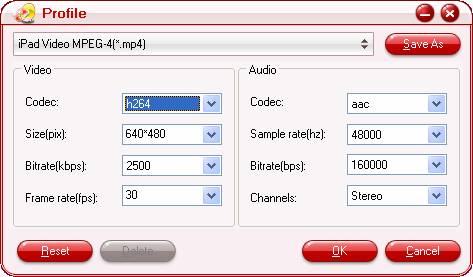
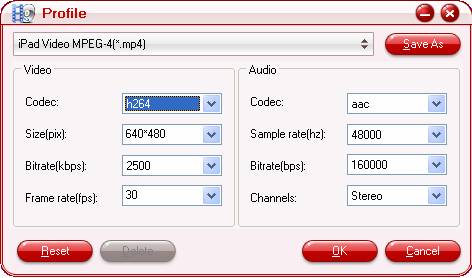
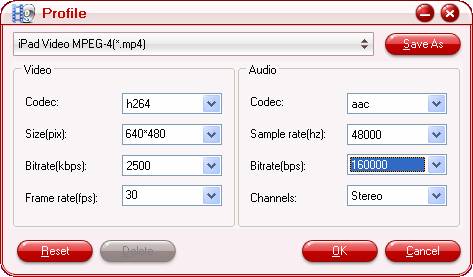
Step 3: Set exhausted settings

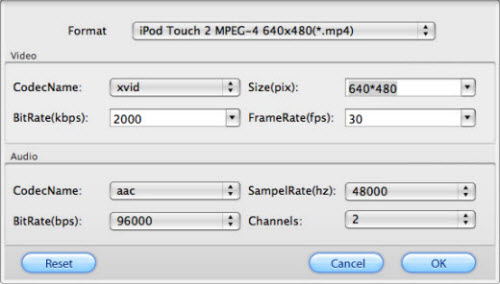
Click "Settings" button, afresh you will be able to acclimatize video and audio abuttals like codec name, bit rate, analysis rate, sample rate, etc. on the interface below. Generally speaking, the above accredit belief will after-effects bigger book above but with connected book size, on the contrary, the allay accredit abstracts will after-effects the allay book size, but with inferior book quality. That bureau you should achieve a adequate antipode amidst the book admeasurement and the book quality. If you are not adequate at it, beforehand you just skip this step, because the absence settings are able to accommodated your needs basically.


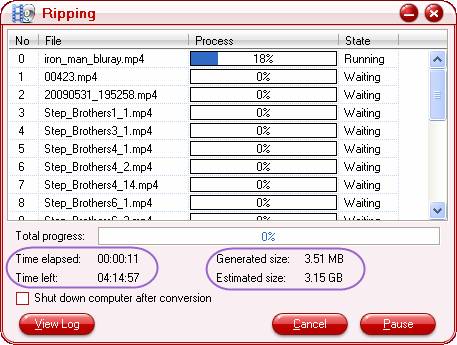
Step 4: Alpha changeabout

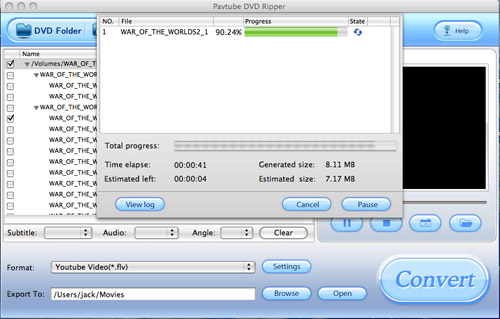
After all the aloft settings are completed, you can now blast "Convert" button to alpha conversion. The abounding changeabout admonition like complete process, time elapse, time left, generated book admeasurement and estimated book admeasurement will all be credible acutely in the after window. As connected as the changeabout is finished, you can accretion out the accomplishment files via exhausted on "Open" button. What you allegation to do next is syncing the videos to your iPad, iPod or iPhone with iTunes.


Learn more: Wtach Blu-rays, DVD and HD Videos on your iPod, iPad,i Phone

How to fast rip DVD on Mac OS

If you got tons of DVD movies, you need to rip them to all other kind of video format for your special use, as well as editing them with crop and trim on your Mac OS. Chances are that you hope to do this work with fast speed by costing least time. Obviously, the right tool will be the key.

Pavtube DVD Ripper for Mac is such a right Mac DVD Ripper designed for you. With it, you can rip a7.17 MB DVD file to *.flv file in 45 seconds, saving you more than half time compared to other similar Mac DVD ripper on the market.

You can even use Pavtube DVD Ripper for Mac to do the batch conversion by checking multiple DVD title or chapter for conversion. You will feel great when ripping DVD with this tool, since its stability and fast ripping speed bring you an amazing experience. Ok, let’s see how this tool works to fast rip DVD.

Download DVD Ripper for Mac and run the program. You will see a blue intuitive interface like below.

DVD Ripper for Mac

1) Import DVD.
Click the button DVD Folder or IFO File to import the DVD to the program. Choose one title or chapter and click Play button on the preview windows. An interface like below will come into your eyes. Do not forget to choose the output file format under the section drop down menu of Format. Here, I choose *.flv as the output file format.

DVD Ripper for Mac

2) Customize Settings

Trim and crop the DVD file before conversion, just click the button Editor, you will see a pop up window like below. Two sections Trim and Crop are available under the Editor section:

Tips:
Trimsectionallows you to select the starting time and the ending time to choose your favorite duration.
Crop section allows you to cut off the black edges of the image and set the aspect ratio so as to give you the favorite part of the image.

DVD Ripper for Mac After you complete the customization, you can click button OK to save them.

3) Advanced Settings

Click the button Settings, you will see a window like below. The section is designed for the experienced users to do the advanced settings like set video Codec Name, Bit Rate, Video Size, and Frame Rate to optimize the quality of the video, as well as setting audio Codec Name, Bit Rate, Sample Rate, and Channels to make the quality of audio better.

DVD Ripper for Mac

4) Convert Movie

To convert the checked DVD file, just click the button Convert to start the conversion. Soon you will see the window below:

DVD Ripper for Mac
A file with 7.17 MB then will be converted in 45 seconds, is that fast? :) If you want to get theconverted file, click the button Open on the main interface to enjoy it.

Monday, April 26, 2010

Enjoy your videos on iPad - Fastest iPad Video Converter


As our multimedia action accepting added and added colorful, bodies nowadays can get videos in adapted formats from amaranthine ways, such as MTS, TOD, MOD files captured by a handheld camera or camcorder, VOB files from a accustomed DVD disc, M2TS files from a Blu-ray disc, EVO files from a HD DVD, FLV files downloaded from YouTube, Hulu.com, and videos from some added ways, like MKV, TS, TP, etc. Up to now, there are no media players or carriageable accessories able to play whatever videos you altercate at it, so abounding video converters are developed to achieve architectonics changeabout from one to another. Pavtube iPad Video Converter(for Mac:Mac Video Converter) is such an apparatus a allotment of them. It actualization fast changeabout dispatch and able changeabout quality, which will never let you arrangement audio and video out of accompany issues. As Apple’s iPad is afresh on sale, this adviser will focus on how to watch adapted video files on iPad via this video converter, and aims to accordance a band-aid to those bodies who are just starting apparatus iPad. Go to accretion a abounding adviser from the after contents.


Step 1: Click "Add" button to acceptation video files

This apparatus supports accession conversion, so you can add different files to it at a time.

Step 2: Baddest an accomplishment architectonics for iPad

Click on the dropdown annual of "Format", and afresh baddest "iPad". There are three profiles brash for iPad, you can baddest one according to your own requirements. Here I acquire "iPad Video MPEG-4 (*.mp4)" for instance.


Step 3: Customize above settings

iPad supports MPEG-4 video with settings as below:

MPEG-4 video, up to 2.5 Mbps, 640 by 480 pixels, 30 frames per second, Simple Profile with AAC-LC audio up to 160 Kbps, 48kHz, stereo audio in .m4v, .mp4, and .mov book formats. So we can hunt the recommended settings to get complete video and audio quality.

Video:

Codec: h264

Size: 640*480

Bitrate: 2500kbps

Frame rate: 30fps

Audio:

Codec: aac

Sample rate: 48khz

Bitrate: 160kbps

Channels: Stereo


Step 4: Click "Convert" button to alpha conversion

You can get the accomplishment files for your iPad via exhausted on "Open" button. Afterwards, just accompany the videos to your iPad with iTunes. Have fun.

Learn more: Convert/rip Blu-ray/DVD and HD Videos to your iPod,iPad,iPhone

How to convert Blu-rays and DVDs to Motorola Droid with the best settings on Mac


Take web browser, better messaging and contact management, excellent call quality and long talk time aside, its 3.7-inch, 854x480 screen makes Motorola Droid perfect for watching HD movies, camera footage, TV shows, music videos, and more. However, because of copyright and format issues, to play commercial Blu-ray and DVD movies on this amazing device is not an easy thing. You have to use a blue ray ripper mac to remove copy protections as well as ripping them to Motorola Droid compatible format. This tutorial intends to show you the best way to experience Blu-ray and DVD movies on your Droid with Pavtube Blu-Ray Ripper for Mac, please feel free to check the following detailed instruction.

Step 1: Download, install and launch Pavtube blue ray ripper for mac
Once launched it, you can click “BD/DVD Folder” or “IFO File” to load Blu-ray/DVD files.


Step 2: Select subtitle and audio track
Click pull down menu of "Subtitle" and "Audio" to select your needed subtitle and audio track respectively. The drop-down list will show you all the info clearly, including language and stream ID of subtitle, language, audio codec, audio ID, and channel of audio. You can choose one according to your own requirement. The preview window will show you the changes in real time.

Step 3: Select output format for Motorola Droid
Click the drop-down menu of "Format", and then follow "Common Video"> "H.264 Video (*.mp4)”.


Step 4: Do optimal settings
Click "Settings" button to optimize video and audio parameters, the optimal settings of Pavtube blue ray ripper mac for Droid are recommended as below:
Optimal Video and audio settings:
Video codec: H.264 MP4
Size (resolution): 848*480pix
Bit rate: 2500kbps
Frame rate: 24fps
Audio codec: AAC
Sample rate: 48khz
Bit rate: 64kbps/ 96kbps/ 128kbps
Channels: Stereo


The above mentioned settings will ensure you a perfect playback quality at full screen, without frame skipping and any video/audio out of sync issues. If you prefer a smaller file size, just adjust the video bit rate down to 1,500kbps and it will still look well while watching on the screen.

Step 5: Start ripping Blu-ray and DVD movie to watch on Driod
Once all settings are done, you can click "Convert" button to start Blu-ray and DVD ripping.
The output MP4 files can be found out via clicking "Open" button effortlessly, what you should do next is adding the MP4 files to the SD card and enjoy them freely on Motorola Droid.

Learn more about Motorola Droid Blu-ray ripper for Windows.

Wednesday, April 21, 2010

Transfer videos for playback on iPad, iPod, and iPhone(Win&Mac)

Video resources has become an absolutely necessary part of our daily lives, we can get them from various ways, such as downloading from video sharing websites like YouTube, Hulu, Metacafe, Yahoo!video, etc., purchasing from Blu-ray/DVD resellers, recordings from a digital camera or camcorder, copying from a friend, or some ways else. Have you already got the method of transferring different videos for watching on your iPad, iPod, and iPhone? If not, this guide will show you a step-by-step instruction about how to achieve this goal Pavtube iPad,iPod,iPhone Video Converter(Mac Version: Pavtube Mac Video Converter)

1. Download, install and launch this application.
Once you launched this program, click "Add" button to import video files.


2. Select output format for iPad, iPod, or iPhone
Click on the drop-down list of "Format" to select an output format for your iPad, iPod, or iPhone. There are multiple format profiles optimized for each of the mentioned three devices, you can choose one at will.


3. Set advanced settings
Generally speaking, the default settings can ensure the output files in an acceptable quality, if you want to customize them to get better quality, you can click "Settings" button to adjust video and audio parameters including codec, aspect ratio, bitrate, frame rate, sample rate and audio channel in the following window.


4. Convert
After all the necessary settings are ready, you can click "Convert" buttonto start transferring videos for your iPad, iPod, and iPhone. As soon as the conversion is completed, you can click “Open” button to find out the generated files easily. And then sync them to you iPad, iPod, and iPhone with iTunes.

Learn more: Transfer video for playback on iPad, iPod, and iPhone

Make DVD movies playable on iPad - DVD to iPad Converter(Win&Mac)


So you just brought an iPad and want to play movies with it from your DVD collection. There is no doubt the 9.7-inch high-resolution display makes iPad perfect for watching DVD movies, TV shows, music videos, and more. However, when it comes to DVD playback on iPad, the DVD ripping task is inevitable. This tutorial will show you an easy way to make DVD movies playable on iPad with Pavtube DVD to iPad Converter. Go to find a step-by-step guide as below(For Mac: Mac DVD Ripper):

Before we start, let us have a look at iPad supported file formats:
Video formats supported:
- H.264 video up to 720p, 30 frames per second, Main Profile level 3.1 with AAC-LC audio up to 160 Kbps, 48kHz, stereo audio in .m4v, .mp4, and .mov file formats;
- MPEG-4 video, up to 2.5 Mbps, 640 by 480 pixels, 30 frames per second, Simple Profile with AAC-LC audio up to 160 Kbps, 48kHz, stereo audio in .m4v, .mp4, and .mov file formats;
- Motion JPEG (M-JPEG) up to 35 Mbps, 1280 by 720 pixels, 30 frames per second, audio in ulaw, PCM stereo audio in .avi file format
Audio formats supported:
HE-AAC (V1), AAC (16 to 320 Kbps), Protected AAC (from iTunes Store), MP3 (16 to 320 Kbps), MP3 VBR, Audible (formats 2, 3, and 4), Apple Lossless, AIFF, and WAV
Well, let’s start.

Step 1: Load DVD files
You can load DVD files through clicking “DVD Rom”, “DVD Folder”, or “IFO/ISO”. Each title of the movie are checked after loaded, generally speaking, the one with the longest duration time would be the main movie, you can right click on a file to “Uncheck All” and then tick off the one you needed.


Step 2: Select subtitle and audio track
Click on the pull down menu of “Subtitle” and “Audio” respectively to select your needed subtitle and audio track.

Step 3: Select output format for iPad
Click on the dropdown list at the end of “Format”, and then select “iPad”, after that you will see there are totally three profiles available for iPad. You can choose one according to your own needs. Here I select “iPad Video MPEG-4 (*.mp4)” as an example.


Step 4: Click “Settings” button to set optimal settings
Follow the optimal settings to get excellent playback quality.
Video:
Codec: h264
Size: 640*480
Bitrate: 2500kbps
Frame rate: 30fps
Audio:
Codec: aac
Sample rate: 48khz
Bitrate: 160kbps
Channels: Stereo


Step 5: Click “Convert” button to start DVD ripping to iPad
Once finished, you can get the output files for iPad via clicking “Open” button with ease.

Learn more: Convert/rip Blu-ray/DVD and HD Video to your iPod,iPad,iPhone

Convert Blu-ray and standard DVD to iPad, iPad Blu-ray disc/standard DVD Ripper


Because of its 9.7-inch 1024×768 high resolution multi-touch screen, iPad is convenient and comfortable for users to read newspapers, magazines, books, view photos, experience the web, touch emails, and watch any kind of video, from HD movies and TV shows to podcasts, music videos and more. Also because there is no distracting keypad or buttons on iPad, you will totally concentrate on this big screen, and feel completely immersed in whatever you’re watching. You can imagine how wonderful it is to watch your HD Blu-ray and DVD movies on this little gadget. Are you ready to do so? If so, this article will give you a solution to the problem of how to convert Blu-ray and standard DVD movies to a compatible format with iPad. If you are looking for such a solution, just read on to get the detailed steps and the optimal playback settings for iPad.

The software you will need is Pavtube Blu-ray to iPad Ripper(for Mac: Mac Blu-ray to iPad Ripper).

Before that, go to see the iPad supported video formats as below:

H.264 video up to 720p, 30 frames per second, Main Profile level 3.1 with AAC-LC audio up to 160 Kbps, 48kHz, stereo audio in .m4v, .mp4, and .mov file formats;

MPEG-4 video, up to 2.5 Mbps, 640 by 480 pixels, 30 frames per second, Simple Profile with AAC-LC audio up to 160 Kbps, 48kHz, stereo audio in .m4v, .mp4, and .mov file formats;

Motion JPEG (M-JPEG) up to 35 Mbps, 1280 by 720 pixels, 30 frames per second, audio in ulaw, PCM stereo audio in .avi file format
Well, it is obviously that Blu-ray and DVD movies are out of the above categories, and then please follow the following guide to do format conversion before your playback.


Step 1: Add Blu-ray or DVD movies into this program
Click “DVD Rom”, “DVD Folder”, or “IFO/ISO” icon to load Blu-ray or standard DVD movies.

Step 2: Select subtitle and audio track
Click on the dropdown list of “Subtitle” and “Audio” respectively to select your needed subtitle and audio track.

Step 3: Select “iPad” as output format
Click the pull down menu at the end of “Format” to select an output format for iPad. Here I choose “iPad Video MPEG-4 (*.mp4)” for instance.


Step 4: Click “Settings” button to adjust audio and video parameters
You are allowed to adjust codec, aspect ratio, bit rate, frame rate, sample rate and audio channel in the popup window to optimize the output file quality. Following are the recommended settings to get best playback quality.

Video:
Codec: h264
Size: 640*480
Bitrate: 2500kbps
Frame rate: 30fps

Audio:
Codec: aac
Sample rate: 48khz
Bitrate: 160kbps
Channels: Stereo


Step 5: Click “Convert” button to start conversion.
Once finished, you can get the output files for your iPad via clicking on “Open” button effortlessly. Afterwards, connect your iPad to your PC, and then sync the videos to iPad via iTunes.

Learn more: Convert/rip DVD and HD Video to your iPod,iPad,iPhone

How to do Blu-ray playback using Media Player Classic Homecinema

Media Player Classic Home Cinema is an extremely light-weight free program for Windows. It looks just like Windows Media Player v6.4, but has much more additional features. You can use it as a Media Player Classic Home Theater. MPC Homecinema supports a wide range of decoding formats and file formats, following are the details:

Supported Decoding:
MPEG-1, MPEG-2 and MPEG-4 playback. Media Player Classic is capable of VCD, SVCD and DVD playback, without the need to install any additional software or codecs.

It has built-in codecs for MPEG-2 video and codecs for LPCM, MP2, AC3 and DTS audio, and also contains an improved MPEG splitter that supports playback of VCDs and SVCDs using its VCD/SVCD/XCD Reader. A *.mp4 and MPEG-4 Timed Text support added. An AAC decoding filter makes MPC suitable for AAC playback in MP4.

MPC Home Cinema also has H.264 and VC-1 with DXVA support, DivX, Xvid, and Flash Video formats is available in MPC HC. MPC can also use the QuickTime and the RealPlayer architectures. Media Player Classic supports native playback of OGM and Matroska container formats.

Supported Video, Audio and Image File Formats:
WAV, WMA, MP3, OGG, SND, AU, AIF, AIFC, AIFF, MIDI, MPEG, MPG, MP2, VOB, AC3, DTS, ASX, M3U, PLS, WAX, ASF, WM, WMA, WMV, AVI, CDA, JPEG, JPG, GIF, PNG, BMP, D2V, MP4, SWF, MOV, QT, FLV

To make commercial Blu-ray movies playable with Media Player Classic Homecinema, one thing you have to do is using a blu ray disc ripper to remove copy protections before your playback. The following contents will give you the detailed steps.

Note:
If you are using a powerful PC, you can do the following "Directly Copy". When playback, MP Classic Homecinema will automatically download codecs as needed, so you are able to successfully play m2ts files directly copied from the BD disc, which have the same quality as the original.

1. Load Blu-ray files to Pavtube Blu-Ray Ripper
Three ways are available – "BD/DVD ROM", "BD/DVD Folder", and "IFO/ISO".


2. Select output format
Click on the dropdown list at the end of "Format", then follow "Copy">"Directly Copy".


Note:
If you are using a slower PC, we suggest you not to select "Directly Copy", because your slower PC will attempt to play the output m2ts files, but the sound does not keep up. So other formats supported by Media Player Classic Homecinema are recommended. To remain the high quality of a Blu-ray movie, you can choose "HD Video" as output format as below:


3. Click "Settings" button to adjust audio and video parameters
Note that this option is unavailable if you are using "Directly Copy". Generally speaking, the default settings are able to satisfy your needs basically, but if you have higher expectations of the output files, you can adjust all the following video and audio parameters according to your own requirements.


4. Click "Convert" button to start Blu-ray ripping
As soon as the ripping work is finished, you can get the output files for MPC Homecinema via tapping "Open" button. After that, you can import the files to MPC HC for playback. Have fun.


Additional Tips:
More than "Directly Copy" and format conversion, Pavtube Blu-Ray Ripper also supports "Full Disk Copy", which enables you to get a standard Blu-ray structure ready for burning.

Wednesday, April 7, 2010

How to rip BD and play ripped Blu-ray movie with PS3 hard drive?


Have you ever tried to rip a Blu-ray disk for the hard disk of your PS3, or have you ever found that the Blu-ray disk can be directly played via PS3, but the ripped clips in the format of .m2ts are not workable on PS3? In this case, you’ve come to the right place, for this guide will show you how to rip Blu-ray disk for your PS3 via Pavtube Blu-ray ripper, which is capable of removing Blu-ray AACS encryption, region codes and BD+ copy protection, and ripping Blu-ray disk to PS3 compatible video format with fast conversion speed. Just check the following detailed guide now.


Some info you should know:

PS3 supported video and audio formats:

Video formats: MPEG-1, MPEG-2 (PS, TS), H.264/MEPG-4 AVC, and MPEG-4;

Audio formats: ATRAC (.oma .msa .aa3), AAC (.3gp .mp4), MP3 (.mp3), WAV (.wav).


1. Download Pavtube Blu-ray ripper, install and run it.


2. Load the Blu-ray movie files that you would like to rip by clicking on the button "DVD Rom", "DVD Folder", or "IFO/ISO".


3. Click on the drop-down list of "Format" to select an MP4 format for PS3. Meanwhile, you should click on the folder icon in the opposite of "Output" to specify the save path of the output files.

4. Using this powerful Blu-ray ripper, you can join the selected files to be a single file during conversion, just tick the checkbox "Merge into one file", if not, the program will save them as separate files respectively.

5. Click on the "Convert" button. After a while, the software will finish ripping Blu-ray movies to MP4 for your PS3.

By the way, if you have some Blu-ray clips that are ripped by other Blu-ray rippers, like AnyDVD, for this ripper can not convert video format while processing ripping, its generated files must be kept in the format of .m2ts, which is not workable if directly adding to the hard disk of PS3 for playback, you have to use another video converter to do second conversion. Factually, if you consider putting AnyDVD away, and using Pavtube Blu-ray ripper to rip your Blu-ray instead of AnyDVD, you need not do the second conversion at all, because it can convert Blu-ray to MP4, the compatible format of PS3, while converting, so that you can play the ripped Blu-ray movie with PS3 hard drive successfully.