Sunday, February 21, 2010

How to rip Blu-ray files into HD video format on Mac?

Want to find an effective way to rip Blu-ray files into HD videos without many quality losses, but failed? If you are a Mac user, and involved in that case just right, this thread here may exactly do you a favor, since it is written in purpose of showing people how to do it via the help of third party software called Pavtube Blu-ray Ripper for Mac. Apart from ripping Blu-rays to standard media formats like AVI, ASF, MPEG, MP4, WMV, MKV, MOV, FLV, SWF, RM, 3GP, AAC, AC3, MP3, OGG, WAV, WMA, M4A, etc., Pavtube Blu-ray Ripper for Mac can also make use of HD codec like H.264, Xvid, MPEG-2, WMV, Divx, etc. to convert BD files into lots of HD video formats, such as H.264 HD Video (*.mp4), H.264 HD Video (*.mov), MPEG-4 HD Video (*.mp4), MPEG-2 HD Video (*.mpg), MKV HD Video (*.mkv), WMV HD (*wmv), Divx HD (*.avi), AVI HD Video (*.avi), etc. Now, let’s move on to see how to rip BD files into HD video formats on Mac step by step.

bd5total091224.jpg

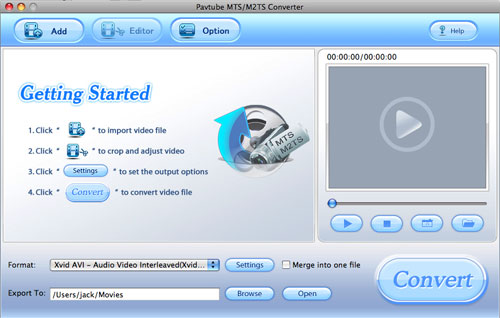
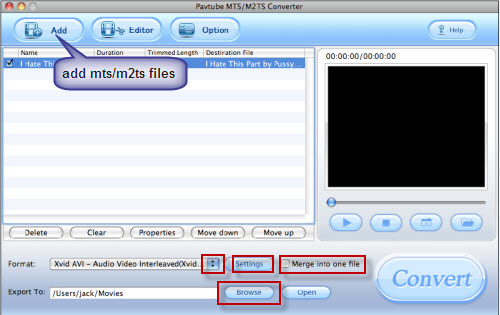
Step 1: Click "DVD Folder" or "IFO File" to import Blu-ray files.

Step 2: Click the drop-down list at the end of "Format" to select an HD format as output format. Here I choose H.264 HD Video (*.mp4)" for instance.

Step 3: Click "Browse" button to look for and set a save path to store the output HD videos.

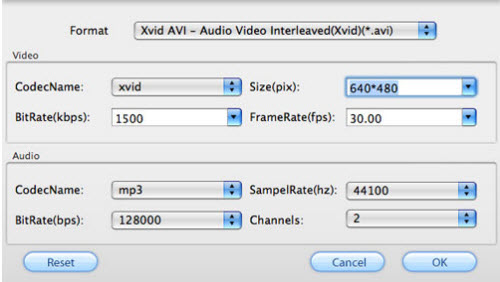
Step 4: Click "Settings" button to do advanced settings.

After clicking this button, you will enter the window shown below, on which you are allowed to adjust video and audio parameters like codec name, bit rate, image pixel, sample rate, etc., in that way you can take charge of the output file size as well as image quality on your hands freely.

bd5profile091224.jpg

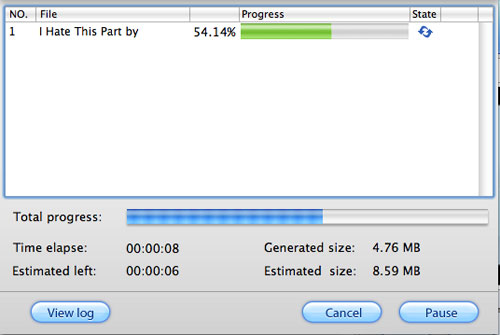
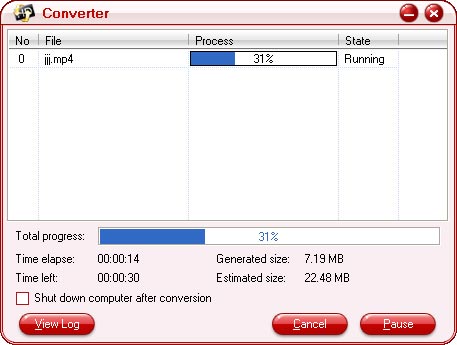
Step 5: Click "Convert" button to start Blu-ray ripping.

As long as the ripping work is finished, you can click "Open" button to find out the ripped HD files with ease.

BTW, if you want to combine all the BD files into one file, so that there are no intervals while playback, you can tick the checkbox "Merge into one file" to achieve it.

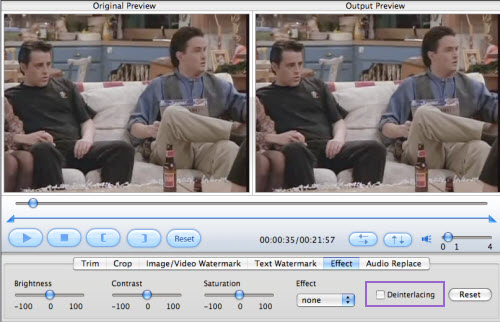
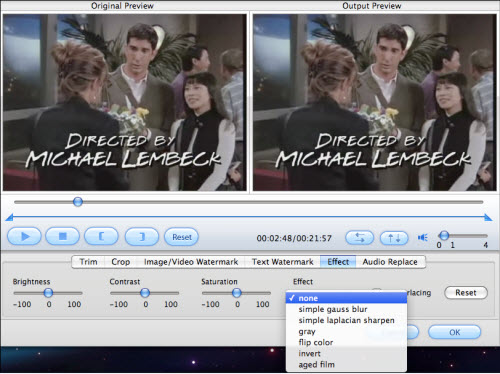
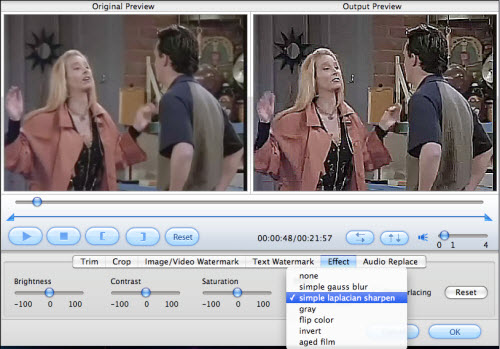
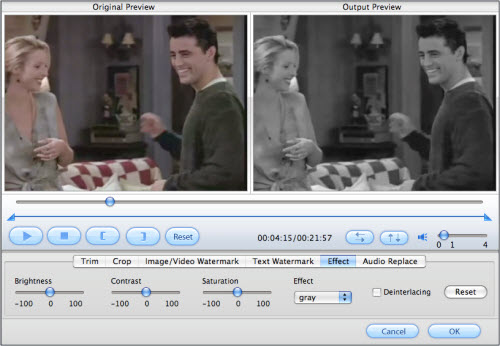
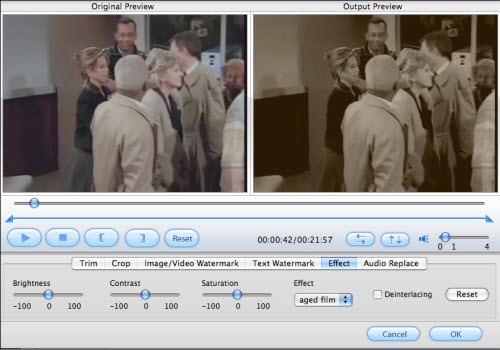
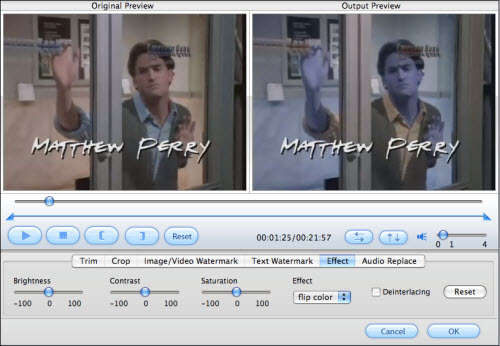
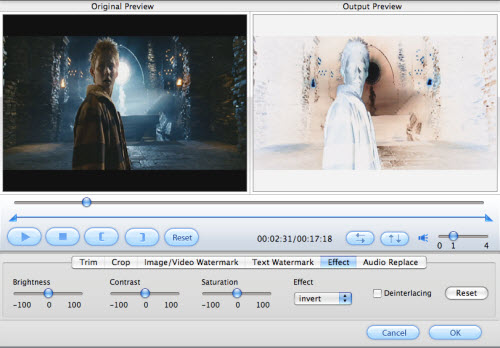
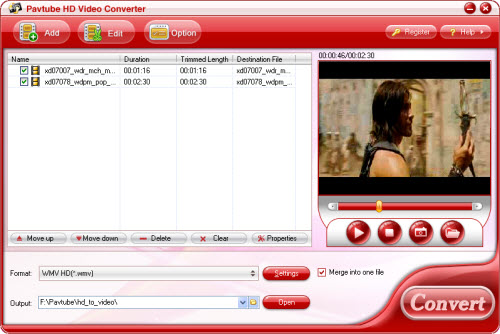
Also, if you want to do simple editing on the original BD files, you can click "Editor" button to do this. Briefly speaking, Pavtube Blu-ray Ripper for Mac provides users with functions like "Crop", "Trim", "Text Watermark", "Image/Video Watermark", "Effect" and "Audio Replace", via these functions you can remove unwanted areas of the original video, specify a certain video duration to rip, add your own preferred pictures, text, and videos to be as watermark in the output HD files, and adding special effects, as well as substitute the primary audio with your favorite ones.

All in all, Pavtube Blu-ray Ripper for Mac can basically meet all the needs you demand during the course of ripping Blu-ray files into HD video format. Well, it’s time to end up now, hope this helps. Good luck.

How to add special effects to your HD videos on Mac?

People’s demands for video quality continuously follow up with the development of multimedia technology. Hence, HD video is born. Nowadays, we can get HD videos from various ways, like downloading online, recording by HD camcorders, coming from HD or Blu-ray DVDs, etc. Additionally, more and more people are willing to make efforts to edit their on-hand HD videos, therefore, this guide, with the intention of offering help to these people ,will introduce you how to add special effects to your HD videos on Mac via Pavtube HD Video Converter for Mac step by step.

1. Download, install and run Pavtube HD Vidoe Converter for Mac.

2. Add your HD video files to this program, then click icon "Editor".

3. Press tag "Effect" to adjust common effect parameters as well as add special effects.

3.1 Adjust common effect parameters and Deinterlacing
As soon as you click the "Effect" button, the following interface will show up, you can adjust the common effect parameters like Brightness, Contrast, and Saturation by dragging the slider bars. If there are stripes on your original HD videos, you can hit the checkbox "Deinterlacing" to fix it.
how-to-add-special-effects-to-your-hd-videos-on- mac_clip_image001.jpg

Apart from changing the common parameters of effect, now I will show you how to add special effects to your files. Follow me, please. Just click the drop-down list of "Effect", which is between Saturation and Deinterlacing. Afterwards, you will see there are seven options as below interface showing:
how-to-add-special-effects-to-your-hd-videos-on- mac_clip_image002.jpg

Select whatever special effect you need, and if you want to change your former settings, just click "Reset". As long as you have chosen a satisfactory effect, click "OK", the settings will be saved, otherwise press "Cancel" to abandon it. Well, next, I will reveal you all the special effects one by one; meanwhile, you can consider which one is that you need right now.

3.2 Simple gauss blur
This function can remove the video noises, so that your video quality will be improved a lot. So long as you have this problem, you can use it. If not, you may just skip it.

how-to-add-special-effects-to-your-hd-videos-on- mac_clip_image003.jpg

3.3 Simple laplacian sharpen
This function enables the video files to have sharpened edges; in that case, the resulted videos will be much more different from the normal ones.

how-to-add-special-effects-to-your-hd-videos-on- mac_clip_image004.jpg

3.4 Gray
Look at the following picture, the difference between original previewand output preview has obviously presented the effect of "gray". From the literal meaning of it, we can also know that it shadows the bright color of the original files, and achieves a deep gray effect.

how-to-add-special-effects-to-your-hd-videos-on- mac_clip_image005.jpg

3.5 Aged film
I put this function here, because it is a little same with the above mentioned "gray", can’t you see it? The visual difference lies in that "aged film" is fulfilled with the color of old yellow, while the above one is filled with gray. You can use this effect to make your videos look like old films produced many years ago.
how-to-add-special-effects-to-your-hd-videos-on- mac_clip_image006.jpg

3.6 Flip color
Primary color red and blue are reversed by this function, and the generated video image seems much bluer than before.
how-to-add-special-effects-to-your-hd-videos-on- mac_clip_image007.jpg

3.7 Invert
Like "flip color", "invert" also realizes its special effect by reversing conflicting colors, such as black and white. This effect really brings us great visual impact. Don’t you think it looks like the scenes appeared in some horror movies? Ha-ha!

how-to-add-special-effects-to-your-hd-videos-on- mac_clip_image008.jpg

4. Convert
When you have finished adding special effects to your HD videos, you can click "Convert" to continue your conversion job. A video file with built-in special effects is really wonderful. Don’t you think so?

How to convert MKV files to other video formats like AVI, MOV, MP4, etc. on Mac? (Support Snow Leopard)

Feel headache to deal with tons of MKV files downloaded from the network on your Mac OS? Congratulations, you are lucky enough to be here, since this thread here will focus on this point and tell you how to convert MKV files to other video formats like AVI, MOV, MP4, etc. on Mac, even the newly released Snow Leopard is supported. I believe some of you are searching solutions to this problem, in that case, just feel free to get whatever you need from this post with ease. The program we will use is called Pavtube MKV Converter for Mac, and now let’s have a look at the step-by-step instruction of it together.

Step 1: Download, install and launch Pavtube MKV Converter for Mac.

See, the following window is its friendly main interface, you can click “Add” button to load MKV files which you want to convert into this program.

mkvmac2add091225.jpg

Step 2: Choose output format and set destination folder

As soon as MKV files are input, now click on the drop-down list of “Format” to select an output format according to your end use of the output files. For example, import to iPhone or iPod for playback, you can select MP4; add to BlackBerry for entertainment, you can choose WMV or AVI; upload to YouTube for sharing, you can select FLV; load to iMovie for further editing you can choose MOV, etc. What’s more, if you want to join multiple MKV files to be one file, you can check “Merge into one file” to realize it. Imagine you dislike using the path set by default to save the output files, you can specify one by yourself through hitting “Browse” button.

mkvmac2format091225.jpg

Step 3: Set configurable settings

Pavtube MKV Converter for Mac permits users adjusting video and audio parameters like codec, aspect ratio, bit rate, frame rate, etc., in that case, you can decide the output file size and the video quality. In principle, the larger input values will generate better quality, but accompanying with larger file size; on the contrary, the smaller input values will produce smaller file size, but in accordance with more inferior file quality. Due to this, you’d better make a balance between the output file size and the output file quality. If you are not good at configuration, you can totally skip this step.

mkvmac2profile091225.jpg

Step 4: Convert

As long as the above mentioned steps are all finished, what you should do next is just pressing “Convert” button to begin conversion. After done, click on the “Open” button, and then you will find out the output files easily.

How to Convert Canon Camcorders JVC Everio MOD files to MP4, 3GP, AVI, FLV, MOV, etc. on Mac?

With the development of video recording technologies, more and more people are willing to record their daily lives with camcorders to keep memories, such as wedding parties, birthday parties, babies’ growth, or whatever else they thought deserved recording. Sometimes recording is simple, while handling the generated videos is complicated. Because the video files produced by camcorders usually can not be recognized by most playing or editing software on Mac directly, MOD is one of the formats among them. If you have a JVC, Canon, or Panasonic camcorder, you have probably seen this format before. Next I am going to share some of my knowledge about MOD format and how to convert MOD to other video and audio formats for further enjoyment.

Part 1: About MOD
MOD is the informal name of tapeless video format used by JVC, Panasonic, and Canon in some models of camcorders, such as JVC GZ-MG130, GZ-MS100U, GZ-MG255, Panasonic SDR-SW20, SDR-SW21, SDR-S26, Canon FS100, FS200, FS21 and so on. It is used exclusively for standard definition video files, and has never been given to a meaning explanation or official name by JVC or Panasonic, the pioneers of it.

Part 2: How to convert MOD generated by JVC Cannon Camcorder to MP4, 3GP, AVI, FLV, MOV, etc.?
When you meet the MOD video files, what will you do firstly? I think to find out a useful MOD converter for Mac at first is really essential. You should convert them to some common video formats previously, and after that, video playing or editing can only be done without troubles. Pavtube MOD Converter for Mac is such a kind of converter. Now, let’s go through the step-by-step instruction of it together.

Step 1: Download, install and run this program

Step 2: Add video files, select formats, and set destination folder
Press “Add” button to input your MOD files to this program, and then click “Format” button to select your resulted video formats, like MP4, 3GP, AVI, FLV, MOV, etc. You can also use the default exported folder or set it by yourself through clicking “Browse”. Meanwhile, you are also allowed to set output settings by click “Settings”.
how-to-converter-mod-on-mac_clip_image001.jpg

Step 3: Start converting
Click“Convert” button at the right bottom of the main interface to start converting.
Once you have finished these editing and converting jobs, you can deal with the resulted videos with ease: Export MP4 or MOV files to iMovie to do further editing, or export 3GP files to your cell phone for playback, or export AVI or MPEG files to PPT to vivify your presentation, or export MP4 files to play on your iPod or iPhone, or export FLV files to upload to video websites to share with others, all in all, you can do whatever you like with them.

Tips:
Factually, I’m using this product now and like it very much. Because its after-sales service is really perfect. As soon as I’ve purchased it, their customer service staff Vivian sent me a greeting email kindly, and asked me if I have some problems while using it. She has definitely done me some favors in the use of their product. This makes me feel that I am important, and they are prepared to help me anytime and anywhere. Yes, that’s how it goes.

What’s more, this product has several outstanding functions as below, which can absolutely bring you joyful experiences.

1. Pavtube MOD Converter for Mac does not have the audio-video out of sync problem.

2. It has pretty fast converting speed; even batch conversion can be completed in a few minutes.

3. With exception of adding text as watermark, images, GIF animations, and videos can also be added as watermarks to realize the picture-in-picture effect.

4. You can use the “Trim” function to select certain video clips to convert. And you can also take advantage of the “Crop” function to remove black edges or change the screen size.

5. You can merge multiple video files into one file, as well as replace the original audio with your specified audio.

Hope you could enjoy it. ^_^

How to convert MTS or M2TS to iPod, iPhone, etc. compatible formats on Mac?

I have often seen people asking questions like I have a Sony HDR-SR5, or some other AVCHD camcorders such as Canon HF11, JVC GZ-HD10, Panasonic HDC-SD5, etc, but I failed to import the video files copied from my camcorder in the format of .mts or .m2ts for playback on my iPod, iPhone, or some other common used mobile players, is there anyone can give me some suggestions? Question like this seems endless, for there are always people keeping asking these similar questions without an end. This time when I read this question, I couldn’t stop myself giving you people a solution.
Firstly I should tell you that most portable devices can not read .mts or .m2ts files directly, if you want to play them on your mobile devices like iPod, iPhone, etc. without trouble, you have to convert them into their acceptable format like MP4 previously.

This article aims to tell you how to convert MTS or M2TS to iPod, iPhone, etc. compatible formats with Pavtube MTS/M2TS Converter for Mac. If you are an above question asker, please read on the following step-by-step guide at will.
1. Install and run Pavtube MTS/M2TS Converter for Mac
Once you’ve run it, a sky-blue interface will appear as follow:
interface.jpg

2. Import MTS or M2TS files to it, as well as set output format and destination folder
Click “Add” to import MTS or M2TS files, and at the same time, you can click the drop-down list of “Format” to select whatever format you need, like MP4 for iPod, iPhone, WMV for Zune player, or some other formats, what you should choose is depending on which format your portable device is supporting. Also, you can click “Browse” to decide where to load the output files. Moreover, if you want to integrate several files to be one single file, you can check “Merge into one file”.
how-to-convert-mts_clip_image001.jpg

3. Set advanced settings
If you have higher expectations about the resulted file, you can click “Settings” to adjust the parameters of video or audio on the below window. For example, you can set the screen size of the output videos, or change bit rate to adjust the quality or size of the output files.
how-to-convert-mts_clip_image002.jpg

4. Convert
Click button “Convert”, you will see the following window. It shows you the converting process as well as generated size and estimated size of the converting file, so that you can make sure if there ere enough space on your Mac to save the output files.
interface_settings.jpg

Additional tips:
What is MTS/M2TS?

Before talk about MTS/M2TS, AVCHD have to be mentioned at first. AVCHD is a tapeless HD format developed by Sony and Panasonic in May, 2006. AVCHD video is compressed in MPEG-4 AVC/H.264 format, and it supports 720p, 1080i, 1080p, etc. At the same time, AVCHD audio is stored in compressed form Dolby AC-3. Well, what is the relationship between AVCHD and MTS/M2TS? If you are attentive enough, you will find AVCHD is with file extension .mts on camcorder and with .m2ts after import to computer.

How to directly copy or burn Blu-ray and DVD movies

bluraycopytheme100104.jpg

To avoid the original Blu-ray and DVD discs being scratched by frequent use, it is a good idea to copy and save them as video folders, or burn them to another blank Blu-ray disc or DVD disc as backups. When it comes to this point, a practical program written for this utility is necessary. In my article here, I’d like to take Pavtube Blu-ray Copy for example to show you how to directly copy or burn Blu-ray and DVD movies via it in detail. If you are looking for such a solution right now, you can feel free to move on with the following paragraphs.

First of all, what can Pavtube Blu-ray Copy do for you?

1. Make perfect 1:1 copies of Blu-ray and DVD movies

2. Support disc to disc, disc to folder, and disc to ISO backup to meet your multiple needs

3. Copy Blu-ray and DVD movies with flawless quality

4. Free you from the annoying protections of Blu-ray and DVD movies

5. Directly burn Blu-ray and DVD movies without other burning software

Okay, now let’s have a look at its simple operating steps.

bluraycopymain100104.jpg

Step 1: Select Blu-ray or DVD source file

Click the drop-down list of "Source" to select Blu-ray or DVD source file. You can select from BD ROM, DVD ROM, Blu-Ray/DVD Folder, and Image File (*.ISO).

Step 2: Select Target

Click the drop-down list of "Target" to select destination folder, your target can be BD ROM, DVD ROM, Blu-Ray/DVD Folder, or Image File (*.ISO).

Step 3: Entitle Disc Label

If your target is a blank disc, then you can type your wanted disc label into the textbox after "Disc Label"

Step 4: Click "Start" button to begin copying and burning

Additional tips:

The "Options" window will pop up as soon as you press the red circle marked icon at the left. To burn a disc to a blank disc, the program will generate some temporary files previously, and then burn them to the blank disc. The temporary files will be saved in a default folder, if you want to save them in your specified folder, you can click the folder icon at the end of "Work Space" to change. Furthermore, you are allowed to tick "Delete temporary files" and "Shut down computer automatically", so as to save your storage space and manage your time in a proper way.

bluraycopyoptions100104.jpg

Recommend you an awesome 3-in-one program which integrates Blu-ray ripper, DVD ripper and video converter together

bdultimatetheme091222.jpg

Can’t wait sharing the good news to all of you here, an excellent program called Pavtube Blu-ray Video Converter Ultimate has made its debut recently with enhanced and multifunction performance.
Pavtube Blu-ray Video Converter Ultimate is more than just an application. It combines three programs in one: a powerful Blu-ray ripper, an amazing DVD ripper, and a versatile video converter. All that and more make it the best DVD and video dealing software I’ve ever seen. Best of all, it is absolutely cost-efficient; I only spend $65 USD for it, but have three programs together at a time.

In addition, it has an easy-to-handle interface, only several simple steps, you can finish ripping or converting your Blu-rays, DVDs or video files to many other media formats, including high definition videos and standard definition videos which are workable on almost all the pop portable devices, like iPod, iPhone, PSP, PS3, BlackBerry, Gphone, etc. or other media players or video editors. Now I’d like to give a brief introduction to the main operating procedures of Pavtube Blu-ray Video Converter Ultimate. First of all, you can import various sorts of video files into it through clicking "Add Video", and obviously, by clicking "Load DVD" you are able to load no matter Blu-ray disks or general DVDs into this program.

bdultimatetotal091222.jpg

After that you can click the drop-down list of "Format" to select your wanted output format. Moreover, the destination folder is optional as well, you can click the folder icon at the opposite side of "Output" to browse and specify a path to store the output files at will, if not, the program will export the output files to a destination folder set by default automatically. Also, if you want to combine all the files to be as a single file, you can achieve it through ticking the checkbox "Merge into one file", no matter what formats they are, even Blu-ray files and DVD files are all available.

Furthermore, if you are professional in adjusting video and audio parameters to make good control of the output files, you can click "Settings" button to do it. As long as all the above mentioned procedures are completed, then you just need press "Convert" button to start conversion, and all the output files can be find via clicking "Open" button.

See, done, isn’t it easy enough? Besides the simple usage, the other point I prefer most is that it does not have video and audio out of sync issues, which has surpassed many similar applications in the market. Well, it’s time to have an end now, hope my recommendation is informative. Have a nice day!

How to convert HD videos like MTS, M2TS, TS, TP, TOD, etc. to other formats?

Because of their perfect and outstanding video quality, HD videos always get great appreciation from virtually all the movie lovers. However, apart from this merit, these video files also cause troubles when people wanna move them to their mobile players or local PC for playback or editing. Have you ever met setbacks while converting your on-hand HD-DVDs, or Blu-ray DVDs to other formats like MP4 for playback on your iPod, iPhone? Or converting to WMV for playback on your Zune player? Or converting to 3GP for playback on your cell phones? If your answer is yea-saying, please go on with this guide, because it will share you how to convert HD videos like MTS, M2TS, TS, TP, TOD, etc. to other formats via Pavtube HD Video Converter in detail.

1.Download, install and then launch this program.
As soon as you have run this converter, the following interface will emerge.

main_interface.jpg

2.Input files, set format, destination folder and advanced settings
Click button "Add" to input HD video files, after that, you can select format according to your demands by clicking the drop-down list of "Format". For instance, to play on iPhone, you can select MP4; to edit with iMovie, you can select MP4 or MOV; to play on Zune, you can select WMV, etc. Moreover, if you want to join multiple files together to be a single one, you can check "Merge into one file". At the same time, you are allowed to specify where to load the output files by clicking output folder. Moreover, if you are professional enough, you can press "Settings" to adjust audio or video parameters, like bit rate, frame rate, codec and so on.

import.jpg

3.Convert HD Video
Once you have finished the above settings, you can start converting by pressing "Convert". This program can completely finish the converting process at speed with extremely good quality. The following interface will show you all the detailed conversion info, including the conversion progress, the elapsed time, the left time, the generated file size as well as the estimated file size.

convert.jpg

Additional Tips:
What are HD videos?
(From Wikipedia)High-definition video or HD video refers to any video system of higher resolution than standard-definition (SD) video, and most commonly involves display resolutions of 1280×720 pixels (720p) or 1920×1080 pixels (1080i/1080p). Usually these HD videos are recorded in the format of M2TS, TS, TP, etc.
Visit this link to learn more about HD videos:

http://en.wikipedia.org/wiki/High-definition_video

How to convert MKV to other video formats like MP4, FLV, AVI, WMV, 3GP, etc.?

About MKV files:

Wikipedia gives an explanation of it as: "The Matroska Multimedia Container is an open standard free container format, a file format that can hold an unlimited number of video, audio, picture or subtitle tracks inside a single file. It is intended to serve as a universal format for storing common multimedia content, like movies or TV shows. Matroska is similar in conception to other containers like AVI, MP4 or ASF, but is entirely open in specification, with implementations consisting mostly of open source software. Matroska file types are .MKV for video (with subtitles and audio), .MKA for audio-only files and .MKS for subtitles only. The most common use of .MKV files is to store HD video files."

Although MKV files have been one of the most popular video formats, most portable devices, video players, video editors, etc. do not give native supports to them. Therefore, it’s necessary for us to convert this format to many other media formats, so as to play or edit them without trouble.

How to convert MKV to other video formats like MP4, FLV, AVI, WMV, 3GP, etc.?

Software you need:

Pavtube MKV Converter

mkv2total091225.jpg

Step 1: Click "Add" button to load MKV files.

Step 2: Click the drop-down list of "Format" to select an output format, which format to select depending on your end use of the generated files. Meanwhile, click the folder icon at the end of "Output" to specify a destination folder.

Step 3: Click "Settings" button to adjust video and audio parameters like aspect ratio, bit rate, frame rate, sample rate, etc.

Step 4: Click "Convert" button to start conversion.

Tips:

1. If you want to combine multiple MKV files to be as one file, please tick the checkbox "Merge into one file".

2. Click the camera icon, and then you can take screenshot of the playing MKV file, after that, click the folder icon on the right side of this icon to get the screenshots.

3. Click "Edit" button, then you will be led to the editor interface as below:

mkv2edit091225.jpg

The "Crop" function allows you cutting off black edges and the unwanted areas of the original MKV files.

The "Trim" function enables you to set the exact duration of the video clip. You can set the "Start" time and "End" time, or you can directly drag the slide bar to the time points as you like.

Through using "Text Watermark" and "Image/Video Watermark" function, you are able to add your preferred texts, pictures, even GIF animations and videos to be as your watermark, in that way, the "Picture -in-picture" effect will be realized beautifully.

The "Effect" function permits you adjusting the effects of your MKV files, including "Brightness", "Contrast", "Saturation", and adding special effects like "simple gauss blur", "Simple laplasian sharpen", flip color", etc. to your videos.

"Audio Replace" function makes it possible for you to take place of the original audio with your specified audio source.

How to convert MOD files shot by JVC, Panasonic, and Canon camcorders

JVC, Panasonic, and Canon camcorders users are usually troubled by MOD and TOD files that generated by their JVC camcorders, because the two formats generally can not be directly accepted by most video players or editors. If you want to enjoy these video files on your computer or portable devices, or even do some further editing with video editing software, you have to convert them to some other common video formats previously. This article here will introduce you how to convert MOD files generated camcorders like JVC GZ-MG130, JVC GZ-MG630, Panasonic SDR-S7, Canon FS100, etc. If you are in need, please go ahead with it.

Required software:

Pavtube MOD Converter

Step 1: Download, install and run Pavtube MOD Converter

Step 2: Import video files, select output format and specify store path

Click "Add" button to load your recorded MOD files to this program, and select whatever formats you need from the drop-down list of "Format". If you want to play on your cell phone, you can select 3GP; to play on iPod or iPhone, you can select MP4; to share online, you can select FLV. Meanwhile, press output folder to specify where to locate the output files, or you can use the store path set by default. Further more, suppose you need to join several files to be as a single file, you can check "Merge into one file" to realize it.

modconverter-format091204.jpg

Step 3: Set advanced settings:

You are allowed to do some advanced settings according to your own requirements. In this section, you are able to set parameters for output video, the bigger value, the better quality, but the larger size.

modconverter-profile091204.jpg

Step 4: Convert

Pavtube MOD Converter provides you a friendly interface while converting, and all the conversion info can be found out in the following window, like total progress, spent time, the generated file size, as well as the possibly left time and the entire size probably produced during the conversion.

modconverter-conversion091204.jpg

Tips:

1. The converting speed of this software is 1-2 times faster than the similar converters. Batch conversion can be done in a few minutes.

2. It does not have audio and video out of sync issues.

3. With exception of adding text as watermark, images, GIF animations, and videos can also be added as watermarks to realize the picture-in-picture effect.

4. You can use the "Trim" function to select certain video clips to convert. And you can also take advantage of the "Crop" function to remove black edges or change the screen size.