Monday, December 28, 2009

Improve basketball performance with Video Hoops Lt

basketball-videohoops091221.jpg

In the purpose of helping players reach their full potential, the professional basketball coaches always take advantage of a program called Video Hoops Lt, which has been design and built specifically for basketball, to analyze the performance of each player, including analysis on both offensive and defensive possessions, all standard basketball statistical information, such as shots, rebounds, turnovers, etc., and search logged information to create game situation clips for viewing or creating a new video file. By this means, the coaches are able to rearrange playbook of the training and teach players how to improve their performance during a game.Youtube’s Video to H.264 File.

Since Video Hoops Lt is a great teaching tool to track team possessions, individual statistics and performance, it has become an absolutely necessary program for both basketball coaches and players. The training or game info recorded on a DVD based camcorder, or the important game about other teams from purchased DVDs usually need to be captured to Video Hoops Lt to do further analyzing for reference, the problem lies in that Video Hoops Lt is only able to support DV and MPEG1 file formats well, the DVD source is hard to be loaded directly. In that case, the users have to transcode the DVD to a DV or MPEG1 format in advance. At this point, one more thing should be noticed that a DV video file will provide a higher quality picture than the MPEG1 file, however the DV file will require more hard drive storage space. For a typical 1 hour and 30 minutes basketball video, the MPEG1 file will range in size from 1 to 3 gigabits and the DV file will range in size from 15 to 20 gigabits. Although the DV format requires much more storage space, to recall the game clips in a clear way, DV format is a recommended format.Choose “Save Target As” to download the Video Overview.

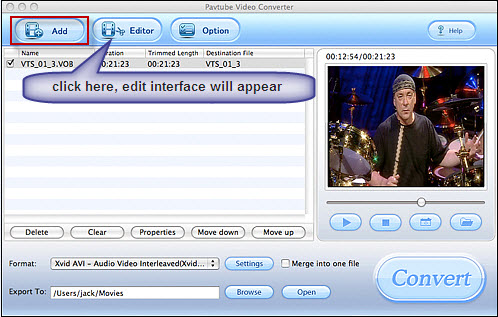
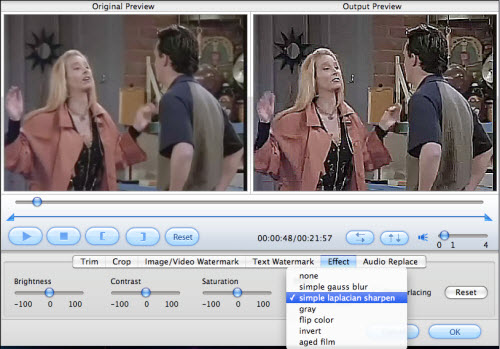
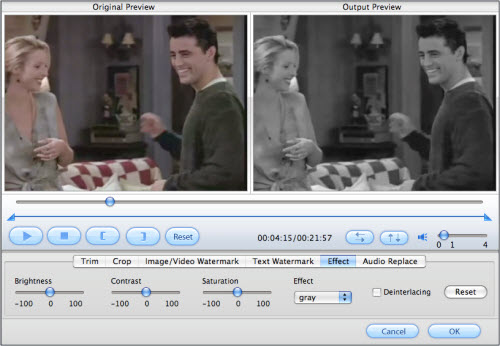
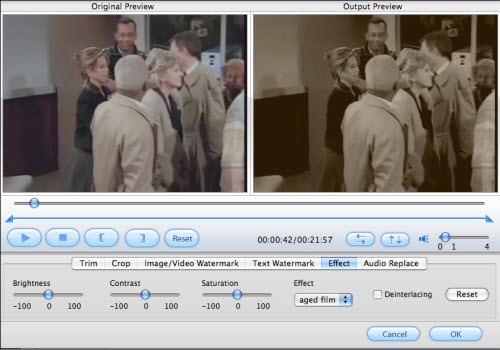
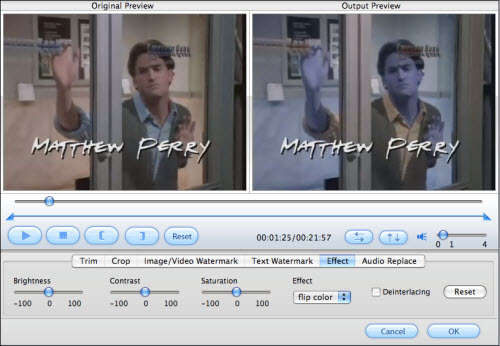
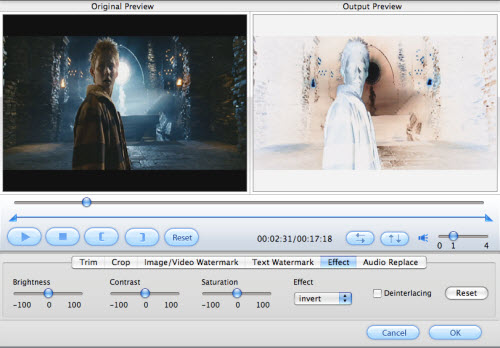
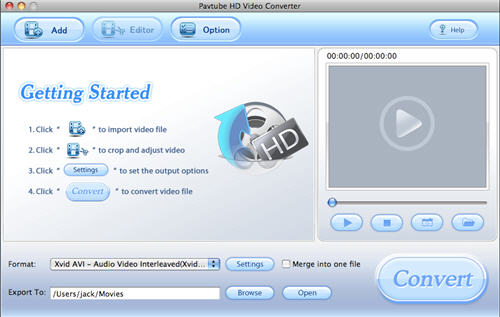
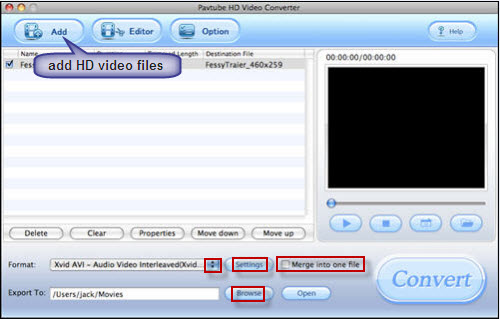
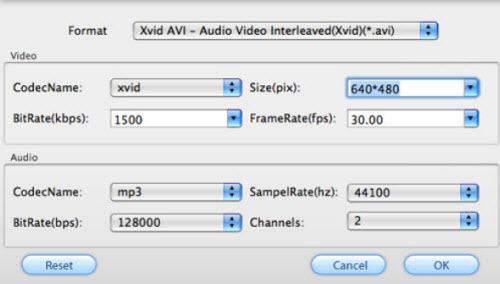
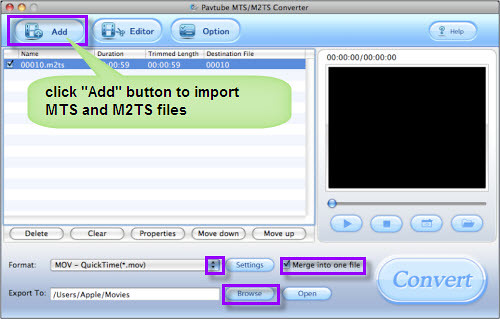
Come back to the point, to convert DVD to a DV format, the assistance from Pavtube DVD Ripper is essential, because this program has the format option for AVI with DV Codec (*.avi), and audio and video out of sync issues are ensured never to happen via using it.

dvdripper-dv091221.jpg

When choosing the DV AVI format, you must make sure which format is available in your area, NTSC or PAL. NTSC is a video format used in North America, Central America, Japan, and parts of South America; PAL is the video format used in Europe, Africa, the Middle East, most of Asia, and parts of South America. You should select a correct one according to your geographical region.Compare prices on best ipod video converter for deals on more Electronics products.

After the format conversion is done, the assistant or head basketball coaches are able to import the valuable video info pertaining to player time, team possessions, player statistical events, etc. to Video Hoops Lt for deep analysis and further editing without trouble.

How to convert Christmas holiday footage in the format of

christmasfather.jpg

The long-awaited Christmas and New Year holiday is approaching, what’s your plan about this? Have a great and lively party with your family and friends in your fresh decorated house, or go outside to have a vacation travel with them to enjoy the amazing snowy winter, or go aboard to lie in the sun and sunbathe on the beaches. Whatever you do, it’s a nice idea to record all these free and happy moments as beautiful memory. As far as I know, lots of families have JVC,Pavtube DVD Ripper for Mac can rip DVD to most popular video and audio formats with high image and sound quality. You can fast rip DVD to AVI, MPEG, WMV, MP4, DivX, H.264/AVC, MOV, 3GP, MP3, WAV, WMA, AC3, M4A, etc. Canon, Panasonic mod camcorders, which shot footage in the special .mod format. MOD is the informal name of tapeless video format used by JVC, Panasonic, and Canon in some models of camcorders, such as JVC GZ-MG130, GZ-MS100U, GZ-MG255, Panasonic SDR-SW20, SDR-SW21, SDR-S26, Canon FS100, FS200, FS21 and so on. It is used exclusively for standard definition video files, and has never been given to a meaning explanation or official name by JVC or Panasonic, the pioneers of it. Since .mod format is unable to be recognized by nearly all popular portable devices, like iPod, iPhone, PSP, etc. and video editing software, before you deal with these files, you definitely need a MOD converter to do pre-conversion work. As a Mac user, personally I use Pavtube MOD Converter for Mac to do this job; it works well for me all the time with fast conversion speed and no audio/video out of sync issues, so I share it here, hope it will be of some help for you who are having such needs.

Step 1: Download, install and run Pavtube MOD Converter for Mac

Step 2: Add .mod files, select output format, and set destination folder

Press “Add” button to input your MOD files to this program, and then click the drop-down list of “Format” to select the output video format, like MP4, 3GP, AVI, FLV, MOV, etc. You can also use the default exported folder or set it by yourself through clicking “Browse” button. Meanwhile, you are also allowed to adjust audio and video parameters like bit rate, frame rate, sample rate, etc. by clicking “Settings” button.Video Converter for Mac is a professional Mac Video Converter which can perfectly convert video on Macintosh.

modconvertermac091222.jpg

Step 3: Start converting

Click “Convert” button at the right bottom of the main interface to start converting.FLV converter for Mac is also a flash video editing tool.

Once you have finished the conversion job, you can deal with the resulted videos with ease: Export MP4 or MOV files to iMovie to do further editing, or export 3GP files to your cell phone for playback, or export MP4 files to play on your iPod or iPhone, or export FLV files to upload to video websites to share with others, all in all, you can do whatever you like with them.

How to copy Blu-ray movie on Mac

Up to now, Apple is not supporting Blu-ray drives in Mac computers yet; more and more Mac users have configured external Blu-ray drive to realize watching Blu-ray movies on Mac, meanwhile, some commercial tools are beginning to pop up like mushrooms in the purpose of helping Mac users make copies of Blu-ray movies. Doubtlessly, some of the tools have been possible to make copies, but the process has often been very time consuming and involved many manual operations, and more applications, even need the help from a Windows PC.Mac Mod Converter is the easiest to use mod video converter on Mac OS.

But why do you need copy your own Blu-ray movies in this way?

Purpose is of course that you do not have to deal with a disc every time you want to watch a movie. HD multimedia players such as Xbox 360, PS3, WD TV HD Media Player, Xtreamer, Tvix M-7000A and Popcorn Hour are becoming more popular, and play movies directly from the hard drives and memory devices are much more convenient.

Now you need only one to do decryption and conversion:

Pavtube Blu-Ray Ripper for Mac, the best program makes the coping job absolutely quickly, and the quality of the copy is also very good.

Many of the programs that let you rip or copy Blu-ray movies are pretty similar, and I suspect that some of them share the same program code, with only different user interfaces. This is so far the case what regular DVD-ripping programs concern. The output file quality is also variable.

After testing quite a lot of Blu-ray-ripping programs developed for Mac users, I have concluded that Pavtube Blu-Ray Ripper for Mac is one of the easiest and fastest applications for the purpose. This is also one of the few programs that have built-in decryption of both DVD and Blu-ray movies. You do not need another program to remove Blu-ray and DVD copyright protections during the ripping and copying process, what you need is only this one.Tod converter for mac to play on iPod, iPhone, QuickTime, iTunes, iMovie, iDVD, Apple TV, iMovie etc.

It allows you choosing from loads of different output formats, and customizing everything for portable devices and multimedia players, ranging from iPod, iPhone, PSP, BlackBerry to Xbox 360, PS3, Apple TV and other HD multimedia boxes for living room use. You can copy the movie without any quality loss keeping the original .m2ts format via selecting its “Copy” option, but in that way, it requires therefore much free hard disk space.

blurayrippermac-maininterface091224.jpg

The main interface of the program is easy and plain. You must first select the drive or folder that contains the Blu-ray movie, and for quite a while, a number of .m2ts video streams from the disc or folder will be listed out.

bluraymac-formathdmp4091222.jpg

Now you just tick off on what you want to copy. Normally select the .m2ts video stream with the longest playing time, because it is usually the main movie of the Blu-ray. If in doubt, you can preview the selected stream in the video pane to the right to check it. You can also tick several .m2ts files, if you want to copy the extras of the Blu-ray movie. Note that you can also combine everything into one file via ticking the checkbox “Merge into one file”.

Then choose what format you want to convert to in the drop-down list of “Format”:

bluraymac-formatselecthd091222.jpg

If you have one of the multimedia players that I mentioned initially, or want to make a copy of the HD resolution that is compatible with most computers (using QuickTime Player for example), game consoles and multimedia boxes, I recommend using the format “H.264 HD Video”. Basically, a 2-hour feature film occupies 5.6 GB of hard disk space with default settings (1080P, 1920 x 1080, medium quality) in the choice of this format.MTS Converter is especially designed for all High-Definition video lovers to convert MTS files to all kinds of video and audio files.

720P is a beautiful compromise

It may be wise to click on “Settings”to adjust some parametersbefore you start the copying:

bluraymac-settingbd091222.jpg

By lowering the resolution to 1280 x 720 (720P) and select “medium quality”, you will still get a copy that far exceeds normal DVD quality, the file size will be around 3.5 GB for a 2 hour feature film, and even some older Mac computers with moderate processor and graphics card will be able to play the movie without problems. Fra sofakroken er det slett ikke sikkert du vil merke særlig forskjell på 1080P og 720P, men det avhenger av TV, størrelse og avstand.From across the room, it’s not likely you will notice much difference between 1080P and 720P, but it depends on the TV, the size and distance.

Note that you also have the ability to change the audio channel, firstly choose “H.264 HD video (*.mp4)”, and you can now choose from 1(mono), 2(stereo) and 6 (5.1 surround). Because you can not choose an audio bit rate more than 160 kbps – which can result in a somewhat not good result, I would therefore prefer to select stereo instead, so that this limited bit rate is distributed over two channels instead of six.

Alternatively, you can either choose “MKV HD Video” in the format box. Then you can select up to 448 kbps 5.1 audio bit rate. MKV (Matroska) is a popular container, and an increasing number of boxes and players can now also support for MKV files.

You’d better not to set frame rate to “original”, and should select a constant figure like 23.97 fps, then audio and video out of sync issues will not occur. Remember also that you can cancel the copy process at any time, play the unfinished file, and then start copying again with any new settings.

bluraymac-ripping091222.jpg

It allows you changing audio tracks before copying, but I have not figured out how to adjust subtitle with it up to now.

Very good on regular DVD ripping

I also tested Pavtube Blu-Ray Ripper for Mac on regular DVD movies, and I was surprised how quickly the program established compressed copies of good quality. Also here I’d like to recommend using the profile “H.264 Video”. Here you should take a look at the format settings. I have had good success with the following options:

bluraymac-settingdvd091222.jpg

With these settings, I created a copy of a DVD over a short time, the quality was good, and the file size was scarce 900 MB. And it was easy to select either the correct audio tracks, or subtitles.

Can be used unregistered

Pavtube Blu-Ray Ripper for Mac costs $49 when I purchased it, now I know it has a 10% discount, which is $44.1 only, a really affordable price. The trial version can be smoothly used without restrictions, except the text watermark “Pavtube” stand in the middle of the screen throughout the film. Det gir deg uansett en grei mulighet til å evaluere programmet.It provides a straightforward chance for customers to evaluate its features and working performance.

Caution:

The method described in this article is only used to make copies / backups of Blu-ray and DVD movies and media you own by yourselves, or have copyright holder permission to copy. Sharing copyrighted material is prohibited.

Do you know any other methods that are easier, better, cheaper and more practical? Please be generous to share your ideas with everyone else on the board.

How to convert DVD and other video files for playback on

So, how are your holidays going? Or, if you’re reading this on the weekend, how’d they go? Watching various sorts of DVD movies and videos is a better idea for a pastime during your free time. To make your holiday be more colorful with movies, I prefer to recommend an application to help you guys deal with different kinds of video resources, no matter the DVD files or footages shot by camcorders, or videos in formats of FLV, AVI, MKV, etc., in a word, the converted videos will be supported by whatever portable devices you have, including PSP, iPod Classic, iPod Touch, iPod Nano, iPhone (3G), iPhone, Zune, Zune 2, Blackberry, Nokia, Creative Zen, Sony Walkman, iRiver PMP, Archos, PS3, Apple TV, Xbox, iPAQ, Pocket PC, Mobile Phone, etc. The software is Pavtube Video DVD Converter Ultimate, which combines DVD ripper and Video Converter together, and enables you to edit and convert any DVD, video, audio and image files to other popular formats including MP4, 3GP, FLV, MPEG-4, AVI, MPG, MOV, 3G2, VOB, FLAC, MKA, OGG, WAV, AC3, M4A with super fast conversion speed and excellent image and sound quality.

The detailed user guide will be shown in the following part:

Step 1: Add video and DVD file Mac MKV Converter, a professional conversion tool running on mac os x, can convert mkv with excellent output quality and fast speed.

You are allowed to add videos to this program via clicking “Add Video”, and add DVD files to it via clicking “Load DVD”. DVD files can be loaded in three ways: “Load DVD ROM”, “Load DVD Folder”, and “Load ISO/IFO”.

videodvdconverteradd091228.jpg

Step 2: Select output format and set destination folder

Videos and DVD files can be added to this program at the same time, after that, you can click the drop-down list of “Format” to select an output format for your portable devices. The format profile provides you with formats for iPod, iPhone, PSP, PS3, BlackBerry, etc. Meanwhile, you can click the folder icon at the end of “Output” to decide where to save the output files. Moreover, if you want to combine multiple files to be a single file, you can tick “Merge into one file”.HD Video Converter can easily convert HD video formats such as AVCHD (mts, m2ts), H.264/AVC, MKV, MPEG-2 (ts), DivX, HD WMV, MPEG-4 and Quick Time.

videodvdconverterformat091228.jpg

Step 3: Set advanced settings

If you have the needs of adjusting video and audio parameters to make good control of the output file quality and size, you can click “Settings” button to do it, and all the options like codec, aspect ratio, bit rate, frame rate, audio channel, etc. are changeable on the following window.

videodvdconverterprofile091228.jpg

Step 4: Start conversion

As soon as the above steps are finished, you can click “Convert” button to start conversion, the following ripping window will show you clearly about all the conversion info. After finished, you are able to find out the output files via clicking “Open” button.MOD converter is a powerful JVC camcorder Mod format video converter which can easily convert MOD to other popular video formats.

videodvdconverterconversion091228.jpg

How to convert Christmas MOD footage shot by JVC, Panasonic

modconverter-christmas091222.jpg

Christmas holiday is the ideal time for families and friends to gather together to enjoy each other’ company, or have a travel to relax and reduce the work pressure of the whole year. There has never been a better time to have great funs with your family and friends, and go outside to some cold and snowy travel destinations for skiing and snowboarding, or go to some warm and sunny islands and beaches to enjoy the sunshine if you want a change from the cold and wintry weather. No matter what ideas you have, record all the meaningful happy moment of your Christmas break is absolutely a wonderful thing. I guess many of you own the popular JVC, Panasonic, and Canon mod camcorder, which record the footage in the format of .mod, not a popular video format as .mp4 or .avi.Flash Video Converter can convert Flv to AVI, MP4, MPEG, WMV, MP3 and 3GP.

I’ve specially looked up this item in Wikipedia, and it gives an explanation like this: “MOD and TOD are recording formats for use in digital tapeless camcorders. The formats are comparable to XDCAM EX and AVCHD. MOD and TOD are informal names of tapeless video formats used by JVC (MOD and TOD), Panasonic (MOD only) and Canon (MOD only) in some models of digital camcorders. Format names correspond to extensions of video files. Neither JVC nor Panasonic, who pioneered the format, explained meaning of the file extensions, and the formats were never given an official name. MOD is used exclusively for standard definition video files, while TOD is used for high definition files.”

Because almost all the popular multimedia players or video editors have no native supports to .mod format, if you want to make them to do other use, you have to convert this format to other common video format in advance. At that time, Pavtube MOD Converter should be a nice choice to help you accomplish this goal. The detailed user guide will be shown to you as below.

Step 1: Download, install and run Pavtube MOD Converter

Step 2: Import .mod files, select output format and specify save path

Click “Add” button to load your recorded MOD files to this program, and select whatever formats you need from the drop-down list of “Format”. If you want to play on your cell phone, you can select 3GP; to play on iPod or iPhone, you can select MP4; to share online, you can select FLV. Meanwhile, press output folder to specify where to locate the output files, or you can use the store path set by default. Furthermore, suppose you need to join several .mod files to be as a single file, you can check “Merge into one file” to realize it.The fastest and easy-to-use HD Converter to convert HD video: AVCHD(.mts,.m2ts), H.264, MKV, WMV HD to AVI, Xvid, MPEG, MP4.

modconverter-format091204.jpg

Step 3: Set advanced settings:

You are allowed to do some advanced settings according to your own requirements. In this section, you are able to set parameters for output video, the bigger value, the better quality, but the larger size.

modconverter-profile091204.jpg

Step 4: Convert

Pavtube MOD Converter provides you a friendly interface while converting, and all the conversion info can be found out in the following window, like total progress, spent time, the generated file size, as well as the possibly left time and the entire size probably produced during the conversion.

modconverter-conversion091204.jpg

Convert MKV files to DVD and watch on any DVD player, using only freeware software.

Tips:

1. The converting speed of this software is 1-2 times faster than the similar converters. Batch conversion can be done in a few minutes.

2. It does not have audio and video out of sync issues.

3. With exception of adding text as watermark, images, GIF animations, and videos can also be added as watermarks to realize the picture-in-picture effect.

4. You can use the “Trim” function to select certain video clips to convert. And you can also take advantage of the “Crop” function to remove black edges or change the screen size.

How to replace the original audio of your video files on Mac?

As far as I know, to let videos reveal personal characteristics as much as possible, more and more video editing fans have been thinking of replacing the original audio of their on hand videos. The resource audio files that used to replace the original are various, they can be audio files recorded by people themselves, or some audio files downloaded online, or from other ways. All in all, the original audio can be replaced with whatever audio files user specify. To fit people’s needs, this article aims to show you how to realize audio replacement via Pavtube Video Converter for Mac in detailed instruction.

1.Download Pavtube Video Converter for Mac, install and run it.

2. Add the video files, which you want to take the place of their original audio, to this program.M2TS converter is a multifunctional software which helps you convert m2ts files to AVI, MPG, WMV.


1

3. Press icon “Editor”, it is showing in the above picture, and click button “Audio Replace” in the pop-up window.

With TOD Converter, it is so easy to quickly and perfectly convert tod file.
After that, an interface as following will appear. Hit the checkbox “Enable audio replace” and click “Browse” to specify which audio file will be selected to displace the original one. In addition, if the audio file you selected is not as long as the original, you need click checkbox “Loop” to let it restart from beginning, otherwise the rest video will be left without sound as soon as the audio you specified ends off in the first round.


2

4. ConvertProvides five ways to rip Blu-ray DVD to PC, AVI, DVD, ISO, iPod, MP4, WMV, MPEG, DivX, etc.
After audio replacement is finished, you can then start converting. Once the conversion is done, you will get an amazing video file with certain special background sound which is totally directed by yourself.

Well, isn’t it dead easy? Try and follow it, you will be able to do some changes on your videos.

How to add special effects to your HD videos on Mac

People’s demands for video quality continuously follow up with the development of multimedia technology. Hence, HD video is born. Nowadays, we can get HD videos from various ways, like downloading online, recording by HD camcorders, coming from HD or Blu-ray DVDs, etc. Additionally, more and more people are willing to make efforts to edit their on-hand HD videos, therefore, this guide, with the intention of offering help to these people ,will introduce you how to add special effects to your HD videos on Mac via Pavtube HD Video Converter for Mac step by step.

1. Download, install and run Pavtube HD Vidoe Converter for Mac.

2. Add your HD video files to this program, then click icon “Editor”.

3. Press tag “Effect” to adjust common effect parameters as well as add special effects.This mac YouTube converter simple provides settings that almost few clicks.

3.1 Adjust common effect parameters and Deinterlacing


As soon as you click the “Effect” button, the following interface will show up, you can adjust the common effect parameters like Brightness, Contrast, and Saturation by dragging the slider bars. If there are stripes on your original HD videos, you can hit the checkbox “Deinterlacing” to fix it.


Apart from changing the common parameters of effect, now I will show you how to add special effects to your files. Follow me, please. Just click the drop-down list of “Effect“, which is between Saturation and Deinterlacing. Afterwards, you will see there are seven options as below interface showing:Blu-ray DVD Converter Record Blu-ray to all media formats with FREE Blu-ray ripper.


Select whatever special effect you need, and if you want to change your former settings, just click “Reset“. As long as you have chosen a satisfactory effect, click “OK“, the settings will be saved, otherwise press “Cancel” to abandon it. Well, next, I will reveal you all the special effects one by one; meanwhile, you can consider which one is that you need right now.

3.2 Simple gauss blur
This function can remove the video noises, so that your video quality will be improved a lot. So long as you have this problem, you can use it. If not, you may just skip it.


3.3 Simple laplacian sharpen
This function enables the video files to have sharpened edges; in that case, the resulted videos will be much more different from the normal ones.


3.4 Gray
Look at the following picture, the difference between original previewand output preview has obviously presented the effect of “gray“. From the literal meaning of it, we can also know that it shadows the bright color of the original files, and achieves a deep gray effect.


3.5 Aged film
I put this function here, because it is a little same with the above mentioned “gray”, can’t you see it? The visual difference lies in that “aged film” is fulfilled with the color of old yellow, while the above one is filled with gray. You can use this effect to make your videos look like old films produced many years ago.With this YouTube converter, you can convert YouTube videos to iPod and all the other popular video formats include AVI, MPEG, MP4, 3GP, PSP MPEG-4, DivX, XviD, FLV.

3.6 Flip color
Primary color red and blue are reversed by this function, and the generated video image seems much bluer than before.


3.7 Invert
Like “flip color“, “invert” also realizes its special effect by reversing conflicting colors, such as black and white. This effect really brings us great visual impact. Don’t you think it looks like the scenes appeared in some horror movies? Ha-ha!


4. Convert

When you have finished adding special effects to your HD videos, you can click “Convert” to continue your conversion job. A video file with built-in special effects is really wonderful. Don’t you think so?

What is real high definition video after the Blu-ray/HD-DVD War?


blu-ray-ripper-theme091204.jpg

After the high definition video war between HD-DVD and Blue-ray, people may ask what the real high definition video is. In terms of technology, Blu-ray and HD-DVD both utilize Blue Laser and sophisticated video compression to achieve high definition video playback on the same size disc as a standard DVD. However, neither format is compatible with the other. Now, the Blu-ray/HD-DVD War is end now and only Blu-ray is left.

flv to 3gp converter is completely the best coversion tool in conerting flv to 3gp/3gpp/3gpp2.


Although the Blu-ray has won the format war, its competitor HD-DVD will not disappear at once. After all, DVD is the most popular home entertainment format in history. There are still many HD-DVD player owners, HD-DVD players and disc to be sold and traded on the market. That is to say, the high definition video story still isn’t over. Blue-ray need to overcome its disadvantages, such as high price levels for players and discs, inconsistent disc playback capabilities, and its current three-tiered hardware specifications. So the uphill battle will last for some time until the Blue-ray player and disc prices down.

Flv to AVI Converter is a tool to convert flv to avi, flv to wmv, flv to mpeg, flv to video converter software.
Certainly, at the same time, HD-DVD is real failed in the war because of the lack of strong movie studio and manufacturer support. Without enough content, you will feel hard to drawn consumers to you. Families with children want access to Disney movies, and HD-DVD didn’t have it. That will be a problem.

In one word,the most convenient online application for converting YouTube flash video to MP3 audio. we can still enjoy the benefit bring from the HD-DVD for some time until Blu-ray became the real successor of standard DVD. It is story need to wait and see

How to convert HD videos (in the format of M2TS, TS, TP, etc.) on Mac?

As people have higher and higher requirements about the quality of their watching videos, more and more HD videos are emerging. Nevertheless, at the same time, these videos bring people many format troubles. Have you ever met setbacks while converting your on-hand HD-DVDs, or Blu-ray DVDs to other formats like MP4 for playback on your iPod, iPhone? Or converting to MOV to do further editing with iMovie? Or converting to 3GP for playback on your cell phones? Or converting to WMV for playback on your Zune player? If so, you need to go on with this article, because it discusses what HD videos are, and how to convert HD videos (in the format of M2TS, TS, TP, etc.) on Mac?Flash FLV Video Converter can convert Flv to AVI, MP4, MPEG, WMV, MP3 and 3GP.

First of all, what are HD videos?
From Wikipedia:
High-definition video or HD video refers to any video system of higher resolution than standard-definition (SD) video, and most commonly involves display resolutions of 1280×720 pixels (720p) or 1920×1080 pixels (1080i/1080p). Usually these HD videos are recorded in the format of M2TS, TS, TP, etc.As free FLV Downloader, can download FLV files from any sites easily.

If you want to have deep understanding about this item, you can go to the following website to do further reading:
http://en.wikipedia.org/wiki/High-definition_video

How to convert HD videos (in the format of M2TS, TS, TP, etc.) on Mac?
Next, we will talk about how to convert HD videos (in the format of M2TS, TS, TP, etc.) on Mac with Pavtube HD Video Converter for Mac.

1. Download, install and then launch this program.

As soon as you have run this converter, the following interface will emerge.


HD Video Converter for Mac

2. Add files, set output format and destination folder.

Click button “Add” to input HD video files, after that, you can select format according to your demands by clicking the drop-down list of “Format”. For instance, to play on iPhone, you can select MP4; to edit with iMovie, you can select MP4 or MOV; to play on Zune, you can select WMV, etc. Moreover, if you want to join multiple files together to be a single file, you can check “Merge into one file”. At the same time, you are allowed to specify where to load the output files by clicking “Browse”.


HD Video Converter for Mac

3. Set advanced settings.

Want to adjust some audio or video parameters to optimize the generated videos? Slightly click button “Settings”, parameters like bit rate, screen size, frame rate, etc. can all be reset based on your requirements.
HD Video Converter for Mac

4. Convert

Once you have finished the above settings, you can start converting by pressing “Convert”. This program can completely finish the converting process at speed with extremely good quality.I have been working on a new version of FLV Player. The most important change is the ability to play On2 VP6 encoded FLV files.

Additional Tips:

1.There is no need to worry about audio-video out of sync problem.

2. Capture the specified video clips to do converting is permitted; “Trim” function can help you realize it. Furthermore, the function of “Crop” can help you adjust the screen size or cut off the black edges of the original HD videos.

3. Text, images, GIF animations, and videos are all allowed to add as watermarks.

4. Audio replacement is available; you can take place of the original audio by your specified audio.

How to convert MOD to MP4, 3GP, AVI, FLV, MOV, etc. on Mac?

Part 1: About MOD

With the development of video recording technologies, more and more people are willing to record their daily lives with camcorders to keep memories, such as wedding parties, birthday parties, babies’ growth, or whatever else they thought deserved recording. However, sometimes recording is simple, while handling the generated videos is complicated. Because the video files produced by camcorders usually can not be recognized by most playing or editing software on Mac directly, MOD is one of the formats among them.the most convenient online application for converting YouTube flash video to MP3 audio.

MOD is the informal name of tapeless video format used by JVC, Panasonic, and Canon in some models of camcorders, such as JVC GZ-MG130, GZ-MS100U, GZ-MG255, Panasonic SDR-SW20, SDR-SW21, SDR-S26, Canon FS100, FS200, FS21 and so on. It is used exclusively for standard definition video files, and has never been given to a meaning explanation or official name by JVC or Panasonic, the pioneers of it.

Part 2: How to convert MOD to MP4, 3GP, AVI, FLV, MOV, etc.?

When you meet the MOD video files, what will you do firstly? I think to find out a useful MOD converter for Mac at first is really essential. You should convert them to some common video formats like MP4, 3GP, AVI, FLV, MOV, etc. previously, and after that, video playing or editing can only be done without troubles. Pavtuve MOD Converter for Mac is such a kind of converter, it can convert MOD to popular video and audio formats like MP4, 3GP, AVI, FLV, MOV, 3G2, VOB, MP3, FLAC, OGG, WAV, AC3, M4A etc. Its powerful editing functions also allow you to personalize the recorded MOD videos in whatever ways you like.

Here the guide for Pavtuve MOD Converter for Mac is coming. Step 1: Download, install and run this program

Step 2: Add video files, select formats, and set destination folder

Press “Add” button to input your MOD files to this program, and then click “Format” button to select your resulted video formats, like MP4, 3GP, AVI, FLV, MOV, etc. You can also use the default exported folder or set it by yourself through clicking “Browse”. Meanwhile, you are also allowed to set output settings by click “Settings”.

Convert FLV to MP4 for the iPod, iPhone, Apple TV, Zune, or PSP right on your hand.


MOD Converter for Mac

Step 3: Start converting

Click “Convert” button at the right bottom of the main interface to start converting.

Part 3: How to trim and crop your MOD videos?

Have you ever thought about just choosing some video clips of your MOD files to convert? Or do you want to remove the black edges of your videos so that they can be played in full screen? If you have this kind of needs, you can read on the following passages.

1.Trim

Dislike the large size? Just need some clips for playback on your portable devices? The function of trim is designed to meet these needs. You can make use of this function to choose the duration time of your videos accurately according to your own requirements.
Three ways are available:Blu-ray DVD Converter Record Blu-ray to all media formats with FREE Blu-ray ripper.
1. Drag the slider bars to set the start time and the end time.
2. Press the brackets icon to mark the start point and the end point.
3. Change values in Set start time and Set end time manually.

MOD Converter for Mac
2.Crop

If you want to cut off black edges of the videos or want to reset the screen size of them, you can take advantage of this function.
There are two ways available:
1. Crop by adjusting the crop frame
2. Crop by setting the values of “Left”, “Top”, “Right” and “Bottom”, or dragging the slider bars under them.

MOD Converter for Mac

Once you have finished these editing and converting jobs, you can deal with the resulted videos with ease. Play them on your Mac or portable devices, or upload the FLV files to video websites to share with others, all in all, you can do whatever you like with them.

Sunday, December 20, 2009

Reviews on Top 4 Blu-ray rippers

Trough surfing the Internet for some time, I’ve collected dozens of Blu-ray rippers developed for Windows user. With the special intention of figuring out which one is the best of all, I’ve tested nearly each of them, and finally pushed out this comment to show my own opinion about the top 4 Blu-ray rippers summarized by myself. Hope it will be of some help for you, and any criticism is appreciated. Now, let’s have a look at these 4 BD rippers one by one together.

No.1 Pavtube Blu-Ray Ripper

blurayripper.jpg

Pavtube Blu-Ray Ripper is the best one among all the splitters I have tested. It is an independent DVD and Blu-Ray ripper with Windows 7 support, which is capable of decrypting unprotected and protected DVDs and Blu-ray disks without the support of third party software.

DVD to Gphone Converter gives you an easier way to convert DVD to Gphone supported formats like MP4, 3GP, as well as other video formats.

Pavtube Blu-Ray Ripper can rip and convert your Blu-ray movies and general DVDs into other popular audio and video formats like AVI, ASF, MPEG, MP4, WMV, MKV, MOV, FLV, SWF, RM, 3GP, AAC, AC3, MP3, OGG, WAV, WMA, M4A, etc., so that you can playback them on your beloved portable players like iPod, iPhone, Apple TV, Zune, Blackberry, PSP, Creative Zen, Xbox, etc., or import them to Sony Vegas, Adobe Premiere to make your own movies, or do something else as you like. Moreover, it has a unique option called “Copy”, through which you can directly backup your DVD .vob files and Blu-ray .m2ts files to the hard drive of your PC or an external hard drive, and still keep the format of .vob and .m2ts without any quality loss.

Additionally, this Blu-ray ripper allows user adjusting video and audio parameters like bit rate, frame rate , sample rate, aspect ratio, audio channels, etc., that means you are able to compress the file size of your Blu-ray discs according to your own requirements.

Best of all, it is really affordable, only $49 US dollars, the cheapest of all the BD rippers I’ve ever seen.

No.2: AnyDVD HD

3948935343_76d3e46181.jpg

AnyDVD HD comes with same functionality as AnyDVD, but with additional features for full Blu-ray Disc and HD DVD support, including decryption of Blu-ray (BD+ and AACS) and HD DVD (AACS) movies.

By comparison, it lacks some functions that Pavtube Blu-Ray Ripper has, namely, it does not support adjusting customized settings like bit rate, resolution, etc, also changing sub-title and audio track are both unavailable.

Video Converter for Mac is a professional Mac Video Converter which can perfectly convert video on Macintosh.

AnyDVD HD is good at removing all sorts of BD protections, but when it comes to file size compression, it can not do anything about it.

It will cost 63 euros, equals to $92 US dollars, much expensive than Pavtube Blu-Ray Ripper and the later rippers.

No.3: Top Blu-ray Ripper

3949642370_0eb86e611b.jpg

It is capable of decrypting blu-ray disks to all the popular video and audio formats, like FLV, SWF, MOV, 3GP, 3GPP2, MKV, AVI, MPEG, MPEG4, WMV, RM, etc. Moreover, it supports previewing the movie before ripping, clipping the movie freely, snapshot the images in the preview, automatically shutting down the computer, etc., and supports batch ripping. All these functions are all had by Pavtube Blu-Ray Ripper.

However, compare with Pavtube Blu-Ray Ripper and AnyDVD HD, Top Blu-ray Ripper can not decrypt Blu-ray (BD+ and AACS), and remove region codes. Furthermore, the same with AnyDVD HD, it is unable to select Audio track language as well.

Its price is $69.9 US dollars, higher than those of Pavtube Blu-Ray Ripper and the later Earth Bluray Ripper.

No.4: Earth Bluray Ripper

earthbdripper091218.jpg

Earth Bluray Ripper is able to rip and convert blu-ray discs and general DVDs to the format of AVI, MPEG, MP4, WMV, FLV, MKV, MOV, RM, 3GP, SWF, ASF, MP3, WMA, WAV, RA, OGG, , etc., and allows users previewing the movie before ripping, as well as clipping any segment from the whole movie, snapshot the moving pictures in preview, customizing video quality, video size, audio quality and audio channels, supporting batch converting, automatically shutdown the computer after ripping work is finished.

Pavtube ringtone maker allows you to make rington with several clicks.

It seems that it has nearly the similar functions as Pavtube Blu-Ray Ripper. But why do I put it here in the 4th place? That is totally because of its inferior decrypting ability. Pavtube Blu-Ray Ripper and AnyDVD HD can absolutely decrypt all the Blu-ray files you throw on it, while Earth Bluray Ripper sometimes can only work on some of them selectively.

Furthermore, the same with Top Blu-ray Ripper, it does not support showing all chapters, therefore, users can not split their DVD or Blu-ray movies by chapters. This is a key point that needs improvement.

It will spend you $49.99 US dollars.

How to import MTSM2TS AVCHD files to iMovie for editing


4010256808_62722665f8.jpg

Since iMovie’08, Apple has announced that it works with many tapeless camcorders that record to flash memory, HDD, or DVD media, including camcorders using MPEG-2 (standard definition) and AVCHD (high definition) formats. With the release of iMovie’09, it expands supported camcorder formats to MPEG-2 (standard definition), AVCHD (high definition) as well as MPEG-4 and H.264 formats. However, at the same time, Apple also remind users that due to the wide range of media types, and the different ways manufacturers store video on these media types, not all tapeless camcorders are compatible with iMovie ‘08 and iMovie’09. AVCHD camcorders are among this range. AVCHD format (.mts, m2ts) has been a headache to some Mac users for not a short time, especially for people who are in use of an old PowerPC, because AVCHD format can only be supported by iMovie with an Intel-based Core Duo processor or better.

Specializing in formats meant for portable devices, FLV Converter also supports.

Fortunately, more and more video converters are designed to help Mac users solve this problem, Pavtube MTS/M2TS Converter for Mac is one of them which performances very well. No matter what version of iMovie you are in use, and what Mac system you are working on, it will assist you to import your MTS/M2TS AVCHD files to iMovie for editing smoothly. Now please follow its step-by-step instruction as you like.

First of you, free download Pavtube MTS/M2TS Converter for Mac here, and then install and run it. Notice that there are two versions, both PowerPC and Intel, pay attention to choose the right one to download.

Step 1: Load MTS/M2TS files, select iMovie workable format

4010414026_906160fbf3.jpg

You can directly drag and drop MTS and M2TS file to this program or you can click “Add” button to import files. After that choose an iMovie supported format to convert. You can choose MP4 or MOV, and here I select MOV for instance.

Pavtube iPod video converter can convert all videos like AVI, MPEG, WMV, MKV, RM to iPod video with ease

4010414070_40cc5ec563.jpg

Suppose you’d like to combine all the added files to be a single file, so that you can import them to iMovie for editing once only. In that case, please tick the checkbox of “Merge into one file” to realize it. Also, if you do not want the save path set by default to store the output files, you can click “Browse” button to look for and specify a destination folder.

Step 2: Adjust video and audio parameter

This program allows users to set advanced settings, that is to say, you can insert your preferred options to items in the interface below, including bit rate, frame rate, sample rate, channels, etc. The output file size will be enlarged if you adjust the figures to be larger, also the file quality will be improved at the same time. On the contrary, if you adjust the values to be smaller, the output file size will be decreased, but accompanying with inferior output quality.

A powerful iPhone Software that can help you convertalmost all the video to iPhone (MPEG4)video format, which could be played on the Windows Media Player.

4010414076_4dc8848a3c.jpg

Step 3: Convert

After the above two steps are done, you can click “Convert” button to start conversion. And the generated files for iMovie can be got via press “Open” button.

Tips:

1. The program adopts advanced audio and video sync technology, and never lets your video and audio go in separate way.

2. This program optimizes its conversion speed with multi-thread technology, so that you can convert MTS/M2TS AVCHD files 1.5 or 2 times faster than other similar programs.

3. Its trim and crop functions allow you to select the proper time length for MTS/M2TS videos, as well as cut off any unwanted areas. Its original video and output video preview windows will also be convenient for you to edit.

4. It Provides users with simple gauss blur effect, which is very useful to recorded files, since it can eliminate the noise of recorded videos. If you like, you can also add other special effects including simple laplacian sharpen, gray, flip color, invert, aged film, etc. to your video files.

5. It allows users to add various watermarks, such as text watermark, image watermark, GIF animation watermark and video watermark


How to import FLV files to iMovie for editing

Many video-sharing websites like YouTube, Google Video, metacafe, Yahoo! Video, Reuters.com, etc. always provide people with original videos about meaningful, interesting, or important events that happened all over the world in real time, and nearly all of them use FLV format to save these video files. Maybe you have collected many sorts of your favorite videos downloaded from the above mentioned video websites, and want to import them to your free editing program iMovie to do further editing, so that you can enjoy your own works on local computer or upload them to your website or blog to share with your friends or other people, or copy them to your electronic gadgets such as iPod, iPhone, PSP, Blackberry, etc. for playback.

MKV Converter for Mac provides powerful edit functions, such as trim video, crop.

However, FLV files can not be imported to iMovie directly, because iMovie only supports formats like DV (standard definition), HDV (high definition), MPEG-2, and AVCHD from Camcorders, MPEG-4, and MOV files. Hence, supposing you want to add FLV files to iMovie without troubles, you should convert them to iMovie acceptable formats like MP4, MOV firstly. It is the only way to achieve your goal smoothly. For this purpose, this article will show you how to import FLV files to iMovie for editing in detail.

Step 1: Download, install and run Pavtube FLV Converter for Mac

how-to-import-flv-files-to-imovie-for-editing_clip_image001.jpg

Step 2: Add FLV files and specify the destination folder

Click “Add” button to import FLV files, and then click the drop-down list of “Format” to select an iMovie compatible format to convert, here I take .mp4 for example. If you want to combine several FLV files to be a single one, you can choose “Merge into on file” to realize it. At the same time, you should hit “Browse” to decide where to locate the output files; otherwise, they will be exported to a defaulted folder.

HD video converter for mac helps you to convert HD Video to Mac OS X 10.6 Snow leopardiPod


how-to-import-flv-files-to-imovie-for-editing_clip_image002.jpg

Step 3: Set advanced settings
Click button “Settings“, the following panel will show up. You can adjust parameters like codec name, screen size, bit rate, frame rate and so forth on it according to your own requirement.
how-to-import-flv-files-to-imovie-for-editing_clip_image003.jpg

Step 4: Convert
After the above three steps have done, you can press “Convert” to start converting. The following interface will show you the converting progress as well as elapsed time, remaining time, generated file size and estimated file size. All these would remind you how long time the conversion will cost and how much space it will occupy.

MOD converter is a powerful JVC camcorder Mod format video converter which can easily convert .MOD to other popular video formats.


how-to-import-flv-files-to-imovie-for-editing_clip_image004.jpg

Step 5: Import the output MP4 files to iMovie
As soon as the FLV files have been converted to MP4 or other iMovie workable format, you can click “Open” to find out the output files. Afterwards, launch iMovie, and click File>Import to add the output files to iMovie for editing.
Well, the step-by-step instruction is completed; hope this FLV Converter for MAC can do you a favor while importing FLV files to iMovie for editing.

How to convert MKV to AVI on Mac without audio and video out of sync issues

As a Mac user, I know deeply that it is always harder to find a practical MKV converter for Mac than Windows users. Via Google we can find some, but audio and video out of sync issues always involved. Fortunately, I finally find a piece of software called Pavtube MKV Converter for Mac, which is totally without this problem. It took me over an hour to find this program, through Google searches and then through Mac discussion forums,

If you want to convert a video that is embedded in a website like Youtube you need YouTube Video Converter which is a powerful video downloader and converter made specifically for youtube.com to convert any YouTube videos.

it was not easy to find, but I am glad I have found it at last. I have used the program on my MacBook Pro Intel leopard to convert .mkv files to .avi, and I have found the program to be very good on the 3 movies I have done. I am happy with the performance of the program and will continue to use it. I guess you guys may still feel headache to find such an application, thus I’d like to share it here, and will take how to use it to convert MKV to AVI on Mac as an example to show you its detailed operating steps.

Well, let’s begin now.

Step 1: Download, install and launch Pavtube MKV Converter for Mac.

After launched it, you can click “Add” button to load MKV files which you want to convert into this program.

DVD to iPhone Converter for Macis an excellent DVD to iPhone converter that is designed for Mac OS users to convert DVD to iPhone video.

Step 2: Choose output format and set destination folder

As soon as MKV files are imported, you can click on the drop-down list of “Format” to select AVI as output format, and click “Browse” button to specify where to locate the output AVI files. What’s more, if you want to join multiple MKV files to be as one file, you can check “Merge into one file” to realize it.

Step 3: Set configurable settings

Pavtube MKV Converter for Mac permits users adjusting video and audio parameters like codec, aspect ratio, bit rate, frame rate, etc., in that case, you can make good control of the output file size and video quality. In principle, the larger input values will generate better quality, but accompanying with larger file size; the smaller input values will produce smaller file size, but in accordance with more inferior file quality. Due to this, you’d better make a balance between the output file size and the output file quality. If you are not good at configuration, you can totally skip this step.

M4R convertercan help you convert AAC to M4r in iTunes, AIF to M4r iPhone ringtone. Also convert WMA, WAV, MP3, AIFF to M4r iPhone ringtonecreates free ringtones for your iPod, iPhone (and iPhone 3G, 3GS) from virtually any music or video file you own.

Step 4: Convert

Once the above mentioned three steps are all finished, you can press “Convert” button to begin conversion. After done, click on the “Open” button, and then you will find out the output AVI files with ease.

Okay, only four simple steps, you can finish converting your tons of MKV files to the format of AVI on your Mac without audio and video out of sync issues. Isn’t it easy-to-use enough? Hope this helps.

DVD Ripper for Windows and Mac

Here I am glad to share two nice DVD Ripper programs with you: One is a DVD Ripper for Mac, the other is a DVD Ripper for Windows. With them, whatever you are a Mac user or Windows user, you could easily rip encrypted DVD or decrypted DVD to any other video and audio formats so as to enjoy them on your portable devices anytime and anywhere. And below are their instructions, Key Features, System Requirements.

Part 1: DVD Ripper for Mac
dvd_ripper_for_mac.jpg
1. Overview:
This DVD Ripper for Mac is straightforward software that allows users to convert DVD to video of various formats including AVI, WMV, MOV, 3GP, MPEG, MP4, AAC, and MP3 etc. It realizes merging different titles and chapters and converting to one file. Supporting various output audio/video formats, users can always find one they need. Pavtube DVD Ripper for Mac also allows users to edit DVD before converting through cropping and trimming the DVD.

2. Key Features:
Rip DVD to Audio/video of various formats for Mac Users
Export audio/video of high quality
Split DVD(Pavtube DVD Ripper for Mac enables users to split the entire DVD to different titles and chapters.)
Trim the DVD(It also allows users to trim favorite parts of the movie if they don’t want to convert the entire movie to video.)
Crop the DVD(It also allow users to crop DVD and define the size of video screen and which part you want to covert to video as you wish.)

HD Video Converter fast HD converter software, can convert high definition video like AVI, MKV, AVCHD, H.264/AVC, MPEG-2/MPEG-4 TS, etc.


Various Profiles for Users to Choose

3. System Requirements
1G Hz or above PowerPC G4/G5 or Intel processor.
Mac OS X (including Mac OS X 10.4 Tiger and 10.5 X Leopard) on iMac, MacBook, Mac Pro, etc.
512 MB physical RAM (memory) or more.
1024*768 or higher resolution display.

Part 2: DVD Ripper for Windows
products_dvd_ripper.gif
1. Overview:
The best DVD Ripper(For Windows) is professional as well as easy to use DVD ripping software. It is versatile application and users can use it either to backup DVD to hard disk or to convert DVD movies to AVI, WMV, MPG, MP4, MOV, and 3GP, AAC, MP3, W4A, WMA, WAV and AC3 etc. In addition, it can convert DVD to iPod, iPhone, Zune, Creative Zen, iRiver, PSP, Xbox360, Pocket PC and Apple TV etc. Pavtube DVD Ripper rips fast and exports excellence only.

2. Key Features:

How to convert MKV file (.mkv file) with MKV Converter? MKV Converter can convert MKV files to AVI, MKV video to MP4, MKV to 3GP/3G2 and can convert MKV files to video for your iPod, iPhone, PSP etc.


Support Various Output File Types
Export video of total audio/video/subtitles synchronization
Split DVD into Titles and Chapters Automatically
Support DVD Specific Features: Subtitle, Audio Track, and Angles
Set Video/Audio Effect; Trim Video; Crop Video

3. System Requirements

DVD to iPod Converter Mac helps you to convert DVD to iPod for Mac , it is an excellent Mac DVD to iPod and Mac DVD iPod Touch Conversion


Windows NT4.0 + SP6/2000/XP/Vista
Memory: 64MB at least
512MB hard disc space or above
Microsoft DirectX 9.0 or above
Windows Media Player 9.0 or above
DVD-ROM

The latest awesome BD ripper — throw away AnyDVD

It is well known AnyDVD has established its authority in Blu-ray ripping, especially its upgraded version AnyDVD HD, which comes with additional features for full Blu-ray Disc and HD DVD support, including decryption of Blu-ray (BD+ and AACS) and HD DVD (AACS) movies.

However, with the release of Pavtube Blu-Ray Ripper, AnyDVD may have to yield its leading place to this new-coming promising ripper, because this program is definitely surpassing AnyDVD in many aspects, such as allowing users to customize audio and video settings of Blu-ray, including aspect ratio, bit rate, frame rate, sample rate, codec, and channels; enabling users to change languages of subtitle and audio track; providing edit functions like cropping, trimming, adding watermark, audio replacement, special effect; splitting BD to other video formats, etc.

For it is too complicated to express all information clearly by means of words, a comparison chart between Pavtube Blu-Ray Ripper and AnyDVD HD has been made as following, you can easily find out in what respects Pavtube Blu-Ray Ripper is in superior to AnyDVD:

3952049499_2b67d3ddd7.jpg

Download Pavtube Blu-Ray Ripper

Download AnyDVD HD

Well, do a comparison between them, and make a decision about which one to choose. Last but not least, Pavtube Blu-Ray Ripper just costs you $49 US dollars, while AnyDVD HD will take €63 euros, about $92 US dollars. To save or waste money, it is totally depending on yourselves.