About AVI
AVI stands for Audio Video Interleave Which is defined by Microsoft, it can work as a container to be embedded with different codec, such as DivX, XviD, etc. The AVI video generally brings high quality, but occupies larger disk space. It is suitable for further video editing.
To edit DVD with Windows movie maker, you need a DVD Ripper to convert DVD to AVI. This popular software offers AVI formats with various codec, which will certainly meet your needs to play, and edit video etc.
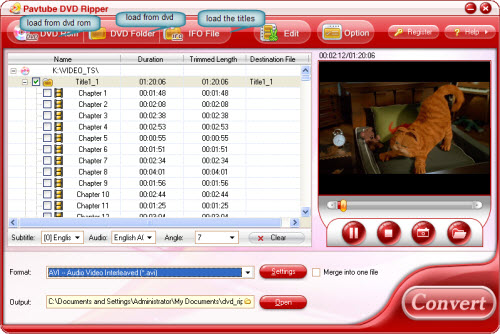
1. Run Pavtube DVD Ripper
If you have not installed it yet, please download the free trial version of Pavtube DVD Ripper.
2. Add DVD video by clicking "DVD ROM “or "DVD Folder or IFO File ".

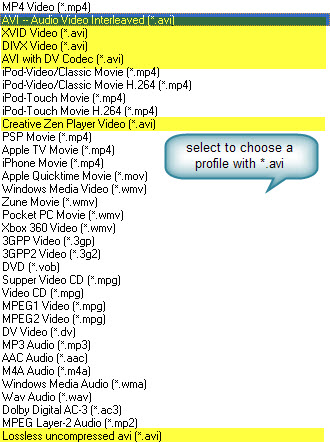
3. Choose the AVI format on the "Format" drop down box.
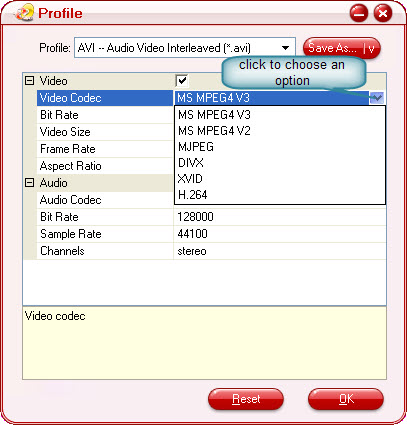
There are 6 profiles with AVI as output format.Pavtube DVD Ripper offer several options for AVI with uncompressed codec and less compressed codec. The uncompressed codec is available for the profile "Losseless uncompressed avi".The profile is set with recommended settings, and you can also change the output format by clicking the "Settings" button.There are six video codec for uncompressed AVI: BGR24, RGB555, YUY2, UYVY, and RGBA32.Channel with the video,as the effect is the same as that with RGBA32.Choose RGBA32 if there is alpha channel.

Also it offer 5 profiles for AVI with less compressed codec,AVI – Audio Video Interleaved,XVID Video,DIVX Video,AVI with DV Codec,Creative Zen Player Video.The profile for Creative Zen Player Video is particular for Creative Zen with preset image dimension and video bit rate.You can choose the codec from DivX and XviD.DV AVI can be transferred to digital camcorder.

4.Check the box to start Converting
After conversion,just click the "Open" button, and you will find the output AVI files.
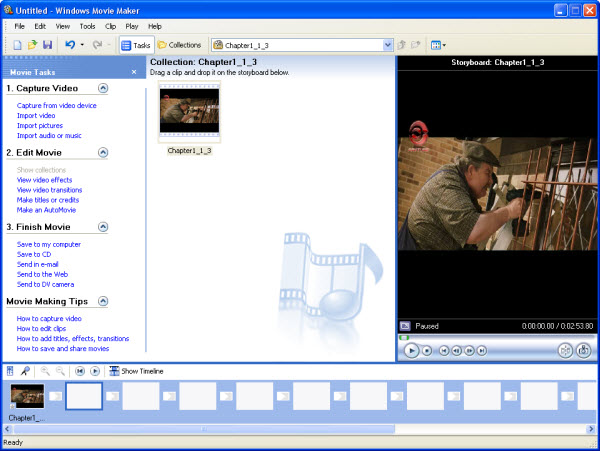
Now you have got the output AVI videos, and the rest of the work goes to video editing software.Let’s take Windows movie maker for example.
Step1: Import your video. Get your video onto your computer any way you need too.Open Windows Movie Maker.

Step2: Edit your AVI video. Open your storyboard by clicking "View storyboard." Your storyboard will be your timeline and where you will do most of your editing. For you movie folks we can call it your "cutting room floor." To put your video in the storyboard, drag it from your library to the storyboard. Click the plus sign on your timeline so you can see video and audio lines. If you want to add extra audio to your piece, import it the same way you did your video.
Step3: Play your AVI video and watch for where you want to cut and delete the extraneous video. Place your timeline cursor (the blue line that crosses perpendicular to the timeline) where you want to cut your video and split it by choosing "Edit split." Split your original video as many times as you want. Once you split the video you see the rest of the original video in your library. Delete the video you don't want by pressing "Delete" on your keyboard.
Step4: Add video by dragging it to the storyboard. Make sure your cursor is where you want it on the timeline because the program will automatically place your audio track where your cursor is. You will notice your audio track goes into the audio space on your timeline. To edit audio follow the same steps as the video.
No comments:
Post a Comment