Audio formats:
iTunes Audio (.m4a, .m4b, .m4p), MP3, Core Audio (.caf), AIFF, AU, SD2, WAV, SND, AMR
Video formats:
QuickTime Movie (.mov), MPEG-4 (.mp4, .m4v), MPEG-1, 3GPP, 3GPP2, AVI, DV
Also, QuickTime can play movies using the following codecs:
Audio Codecs:
AAC (MPEG-4 Audio), HE-AAC, Apple Lossless, MP3, AMR Narrowband, MS ADPCM, QDesign Music 2, Qualcomm PureVoice (QCELP), IMA 4:1, MACE 3:1, MACE 6:1, ALaw 2:1, ULaw 2:1, 24-Bit Integer, 32-Bit Integer, 32-Bit Floating Point, 64-Bit Floating Point
Video Codecs:
MPEG-4 (Part 2), H.264, H.263, H.261, Apple ProRes, Apple Pixlet, Animation, Cinepak, Component Video, DV, DVC Pro, Graphics, Motion JPEG, Photo JPEG,
Sorenson Video 2, Sorenson Video 3
It is obviously that the Blu-ray .m2ts streams are not included. Even though you purchase QuickTime MPEG-2 Playback Component from online Apple Store to install it on your Mac, it is still unable to play commercial DVDs, not to mention the much more strictly protected Blu-ray Avatar, which adopts the new BD+ encryption. Then you may ask “Is there any solution to playback BD Avatar in QuickTime?” Yes, there is. Pavtube Blu-Ray Ripper for Mac is such a tool. With full Blu-ray disc support, it is able to remove copyright protections of your BD disc, no matter BD+, or AACS, even the latest MKB V17 is supported as well. Now it is even capable of successfully decrypting Avatar Blu-ray movies released in North America. Please feel free to read on this step-by-step tutorial to get what you are looking for.
Step 1: Free download, install and launch this Mac blue ray ripper.
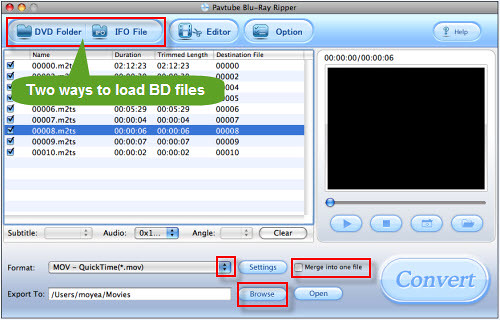
Once you run it, click “BD/DVD Folder” or “IFO File” to load your Blu-ray Avatar files.
Step 2: Select H.264 Video (*.mp4) as output format for QuickTime
Follow "Common Video" > "H.264 Video (*.mp4)"

Step 3: Click "Settings" button to adjust video and audio parameters
Notice that which parameter to select has close relationship with the hardware configurations of your computer, so before your adjustment, read the following info attentively.
To play HD video, a large amount of data must be processed by your computer. A powerful system will deliver the best playback quality.
Recommended hardware configurations for H.264 HD playback on Macintosh:
For 1280x720 (720p) video at 24-30 frames per second:
1. 1.8 GHz PowerMac G5 or 1.83 GHz Intel Core Duo or faster Macintosh computer
2. At least 256MB of RAM
3. 64 MB or greater video card
For 1920x1080 (1080p) video at 24 frames per second:
1. Dual 2.0 GHz PowerMac G5 or 2.0 GHz Intel Core Duo or faster Macintosh computer
2. At least 512MB of RAM
3. 128MB or greater video card
Now you are ready to set advanced settings according to the hardware configurations of your computer. Our computer satisfies the above mentioned "1280x720 (720p) video at 24-30 frames per second",so we changed the settings as below:

Step 4: Click "Convert" button to start ripping Blu-ray Avatar on Mac.
Once the ripping task is finished, you can click “Open” button to get the output H.264 .mp4 Avatar videos for your QuickTime Player effortlessly. Have fun.
Ultimate version: Pavtube iMedia Converter for Mac - all-in-one Video Converter/DVD Ripper/Blu-ray Ripper for Mac
No comments:
Post a Comment