Pavtube iMedia Converter for Mac 1.0 which is an all-around and professional tool for audio-video conversion on Mac OS. It integrates of Blu-ray Ripper, DVD Ripper and Video Converter to aim to provide Mac users with the most efficient solution for the conversion of any existing video file. Besides, the "Title Mode" and subtitles are also available.
This iMedia Converter supports for importing any Blu-rays and DVDs, no matter encrypted or non-encrypted ones, to rip or back up the whole content of Blu-ray Discs or DVDs(ISO image files included) including video/audio streams, commentary, menus, titles, ads etc. to Mac or other hard drives with just one click on "Disc Copy" Button, or directly convert Blu-ray/ DVD files or IFO files to other compatible formats with Mac, media players or video devices.
Various common video files can be added and transcoded easily between formats. Especially for TiVo shows, this tool is able to decrypt TiVo files, restore them to lossless mpg files, trim out commercials and transcode them to other regular video formats. This app still can compress HD or AVCHD videos to common videos, or re-encode them to other mainstream formats with HD quality remained. Especially those HD video footages recorded by HD Cameras or Camcorders can be converted to an editable format for non-linear edit tools like iMovie, Final Cut Express, Final Cut Pro, Final Cut Studio, Avid, Adobe premiere etc.How to Convert Blu-ray to MP4. If you have a portable MP4 player, such as a video iPod, and you want to be able to view your Blu-ray movie collection on the player, read the guide.
How to use Pavtube iMedia Converter for Mac?
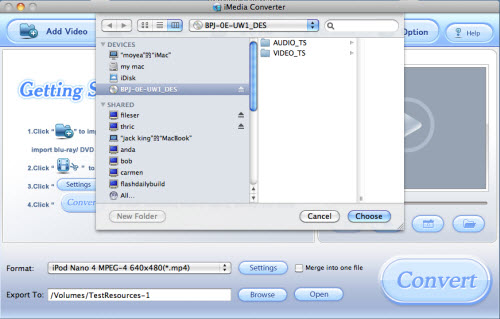
1. Import source disc/ folder/ file
Accepted sources includes blu-ray disc, blu-ray folder, DVD, DVD folder, DVD ISO image file, and Video clips. For ripping blu-ray disc you need to connect an external BD drive with your Mac. To add video files, please click ‘Add Video’ button and browse to source video files or drag and drop the files in the ‘Getting Started’ area. To load blu-ray disc, DVD, blu-ray folder, DVD folder, please click ‘DVD/ BD Folder’ and browse to the disc or directory. To import DVD image file, please click ‘IFO File’ and browse to the file you’d like to convert.
The file list is composed of five columns: Check box, Name, Duration, Trimmed Length, and Destination File.

Check Box: Click to check/ uncheck all files in the list.
Destination File: The name of the converted file. By default it is same with the original file. If you’d like to specify a different name for output file, double-click it in Destination File column and type in favorable name.
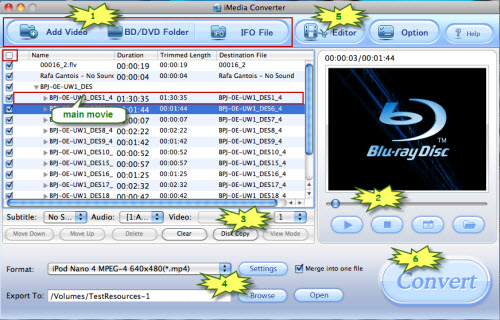
Common video files are listed for you to organize; the blu-ray or DVD movie shows up as a directory. Expand the directory and you will find all the chapters are in numerical sequence. You can convert the whole disc to movie collection or select single chapter for conversion.
For blu-ray movie, there are Title Mode and File Mode. By default the files are listed in Title Mode, all the chapters are in numerical sequence for you to check individually. For checking the subordinate chapters of certain sequence, please click its plus sign. Generally, ‘Title001’ contains the main movie, and other Titles are commentary, menus, titles and ads. By default all the Titles are selected for editing and ripping. If you want to rip the main movie and nothing more, do uncheck other sequences. If you would like to retain everything in the blu-ray disc, simply use the default settings. If you’d like to switch to file mode, please select the blu-ray movie directory and click ‘ViewMode’. And you can check and preview each individual segment. In File mode all the m2ts files in file list are checked by default. If you want to select but the main movie, a fast way is to right-click and choose ‘Uncheck All’ in shortcut menu and then check the main movie (longest m2ts file). Or simply check the small box in the title bar of the file list to check/ uncheck all.
When a blu-ray or DVD movie is loaded, you can find the Subtitle and Audio option under the file list are activated. The ripper is able to convert DVD to HD movie with outstanding visual quality and veryfast converting speed.

Subtitle: Click to view available subtitles of selected chapter and set desired subtitle from drop-down list. Note that some chapters have no subtitles at all. And you can specify subtitle of different languages for different chapters.
Audio: Click to view available audio tracks selected chapter and set desired audio from drop-down list.
2. Preview and Snapshoot
Double-click on a file to preview when you would like to preview it.
You are allowed to take snapshots when previewing the movie.
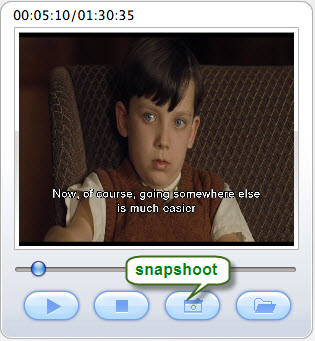
Simply click ‘Snapshoot’ button. To locate the thumbnails, please click ‘Open folder’ button. To set image format, location and size of thumbnails, please click ‘Option’ menu. In the preview window you can check the Subtitles and Audio track as well.
3. Back up DVD and blu-ray disc

iMedia Converter provides an easy and quick backup option for DVD and blu-ray disc. Protected DVDs and blu-ray discs can be cracked and copied bit-to-bit onto your hard drive in the shortest time by using ‘Disk Copy’ facility. The whole contents on the source disc will be copied to your hard drive, including the menus, titles, trailers, etc. Since the original DVD/ blu-ray structure is retained, you can burn a backup disc with the structure.
After the process completed, you may click ‘Open’ button to locate the DVD/ blu-ray directory. There should not be any quality degradation. To check the video streams, please open VIDEO_TS folder (from DVD directory) or BDMV-> STREAM folder (for blu-ray directory). The m2ts movie clips can be played with VLC player.
Finally note, blu-ray movie bites much space (generally 20Gb at least), and make sure there is enough space on your hard drive for blu-ray backing up.
No comments:
Post a Comment